







POSCA Markers on Glass: The Ultimate Guide to Decorating and Sealing
Have you ever spent hours perfecting a personalised jar or a vibrant window display, only to watch the paint scratch off with the slightest touch? It is a common frustration for many Australian creators who love using posca markers on glass but struggle with durability. While the bold, opaque ink looks stunning, the non-porous nature of smooth surfaces can be notoriously difficult for paint to grip without the right technique. You want your work to look professional, not streaky or temporary.
We understand that you need your creativity to last. This guide will show you exactly how to prepare your surface, choose the ideal marker tips like the versatile PC-5M or the fine PC-3M, and correctly seal your art for a professional finish. We are going to cover everything from heat-curing in the oven to choosing the right water-based varnish. By the end of this article, you will have the confidence and technical knowledge to turn any ordinary glassware into a vibrant, long-lasting masterpiece.
Key Takeaways
- Prepare your surface by removing every trace of dust and oil to ensure your paint adheres perfectly to smooth glassware.
- Master the art of using posca markers on glass with specialised techniques like reverse painting and light layering for professional, opaque results.
- Learn how to make your designs permanent through heat-curing or applying a water-based spray varnish to protect against moisture and scratches.
- Select the ideal bullet tips, such as the PC-3M or PC-5M, to maintain crisp lines and prevent paint pooling on non-porous surfaces.
- Gain clarity on food safety and practical usage so you can confidently create decorative pieces for your home or business.
Can You Use POSCA Markers on Glass?
The short answer is a resounding yes. Artists and hobbyists across Australia frequently use posca markers on glass because the water-based acrylic paint provides incredible opacity and vibrant colour that stands out on transparent surfaces. Unlike traditional felt-tip pens that might bead or streak, these markers deliver a consistent flow of pigment that allows for intricate detailing and bold filling. Because glass is a non-porous material, the paint doesn't soak into the surface. Instead, it sits firmly on top, which creates both opportunities and challenges for the creator.
Understanding the physics of your medium is the first step toward a successful project. Since the ink is water-based, it behaves differently than an oil-based paint marker might. This unique formulation means the art remains non-permanent until you take specific steps to seal it. POSCA markers serve as a uniquely adaptable medium for glass, offering the freedom of temporary expression or the durability of a permanent masterpiece depending on how you finish the work. Whether you are a professional designer or a parent helping with a school project, this flexibility is a massive advantage.
Temporary vs Permanent Glass Art
One of the best features of using POSCA markers is the ability to choose your level of permanence. For temporary displays, such as seasonal Christmas window drawings, cafe menus, or personalised messages on party mirrors, you don't need to do anything special. The paint will stay vibrant for as long as you need it, but it can be removed with a damp cloth and a bit of window cleaner when the event is over. This makes them a favourite for Australian small businesses that need to update their signage regularly without ruining their storefronts.
If your goal is a lasting treasure, like an upcycled glass jar or a decorative vase, you'll need to transition the art to a permanent state. This involves cleaning the glass thoroughly before you start and sealing the finished work with a water-based varnish or by heat-curing it in a domestic oven. Without these extra steps, the paint remains susceptible to scratches and moisture. You can find a wide variety of individual POSCA pens to suit both temporary doodles and permanent gallery-style pieces.
A Note on Food Safety
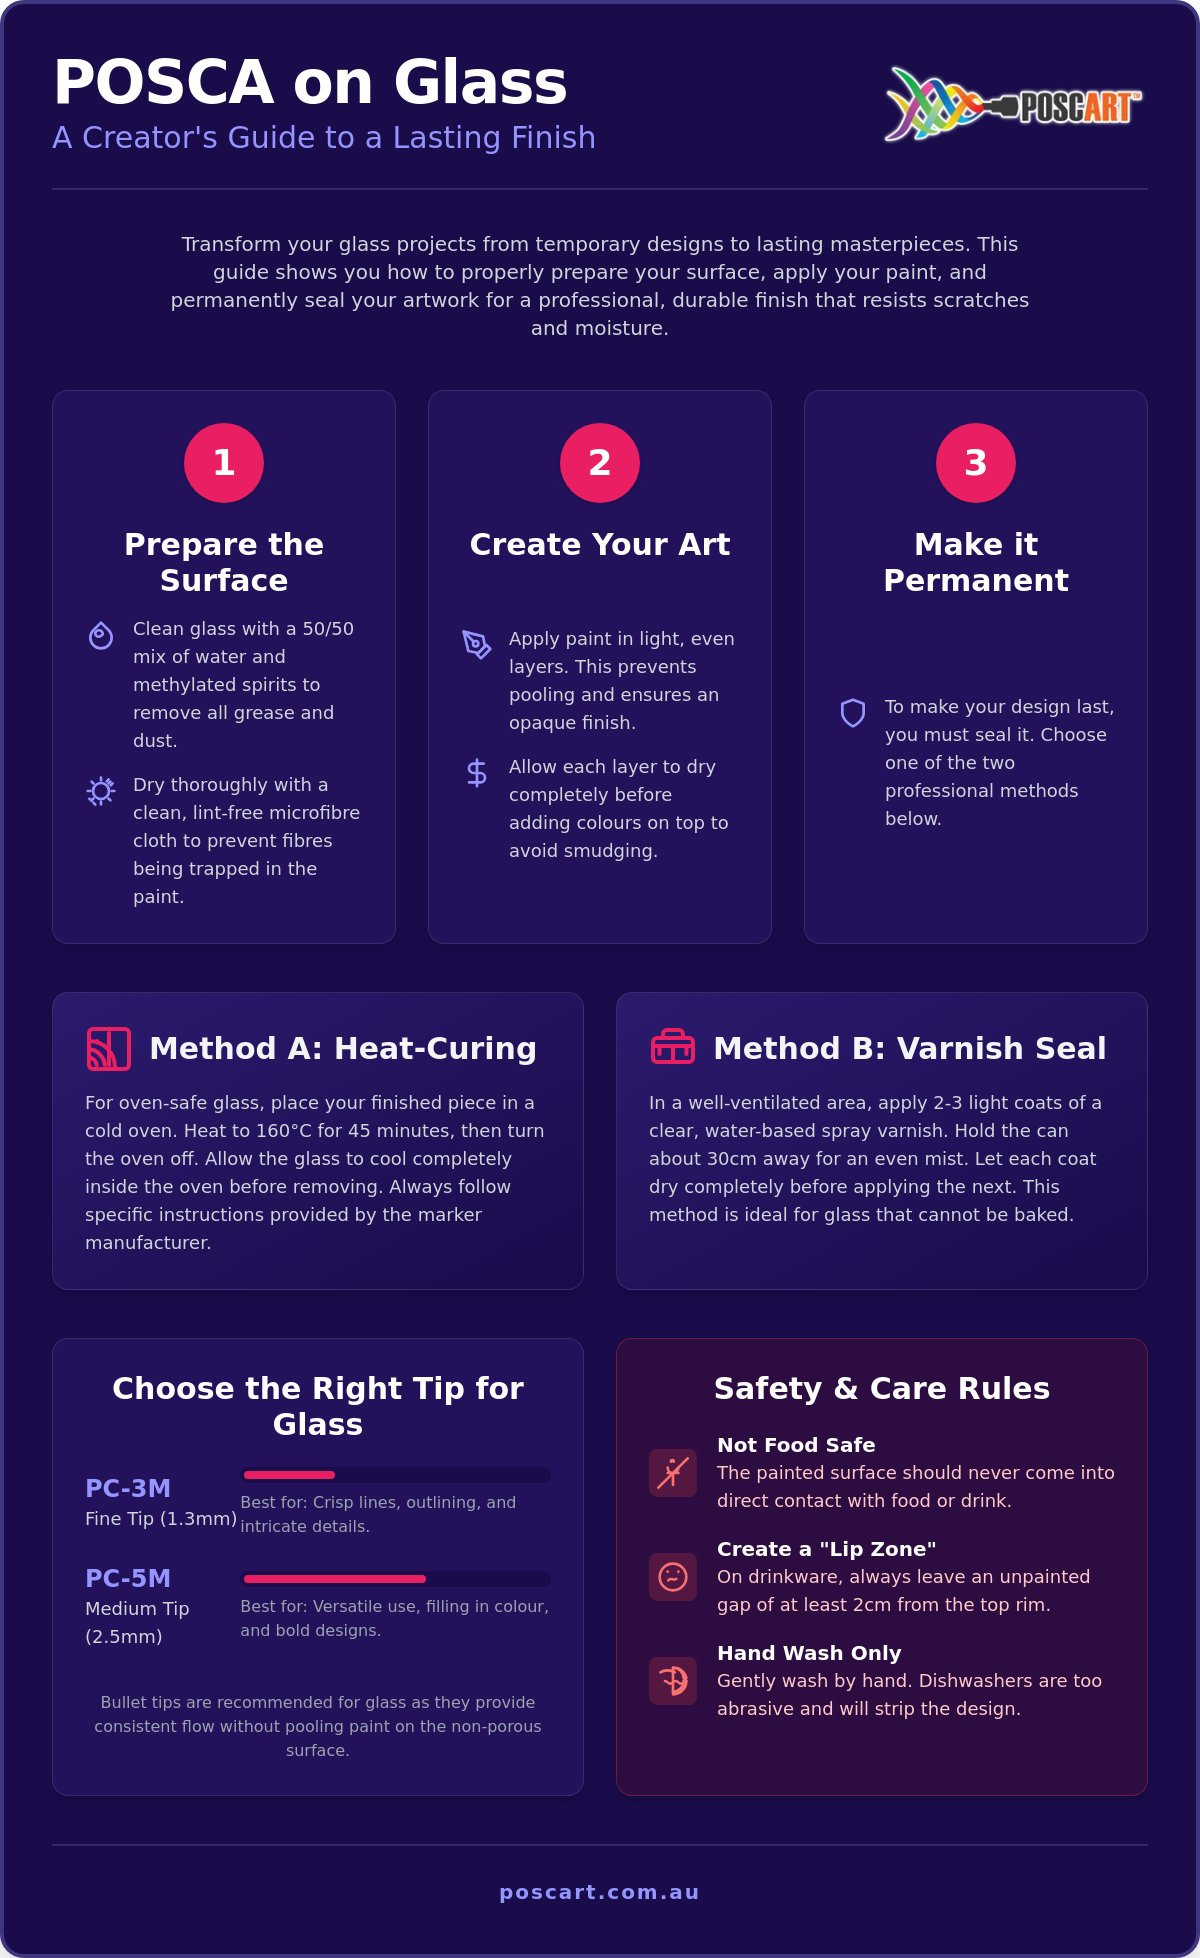
While the paint in these markers is non-toxic and safe for supervised classroom use, it's vital to remember that it isn't food-safe. Even after sealing or baking, the paint should never come into direct contact with food or drink. If you're decorating wine glasses or mugs, always leave a "lip zone" of at least 2cm from the top rim to ensure no paint touches the mouth. For plates and bowls, focus your creativity on the underside or the outer rim. It's also worth remembering that decorated glass should always be hand-washed, as the high heat and abrasive chemicals in a dishwasher will quickly strip your beautiful designs away.
Preparing Your Glass Surface for Paint Pens
Achieving a professional finish with posca markers on glass starts long before you prime your first nib. Cleanliness is the single most important factor determining whether your paint bonds securely or eventually peels away like a sticker. Because glass is a non-porous material, any microscopic layer of grease, moisture, or dust acts as a barrier between the pigment and the surface. Without proper preparation, even the highest quality acrylic paint will struggle to find a foothold.
You should also ensure your glass is at room temperature before you begin. If you bring a cold jar or bottle into a warm room, it might "sweat" or develop invisible condensation. This moisture ruins the paint's ability to dry and bond. Avoid using heavy-duty household sprays that contain waxes or "streak-free" additives. These chemicals often leave behind a slick residue that prevents POSCA markers from gripping the glass properly. Instead, stick to simple, effective cleaning agents that leave the surface truly bare.
The Best Cleaning Methods
For the most reliable results, use a simple 50/50 mixture of water and methylated spirits. If you don't have methylated spirits handy, a standard glass cleaner is fine as long as it doesn't contain silicone or oils. Wipe the surface down thoroughly and dry it with a lint-free microfibre cloth. Avoid using paper towels or old cotton rags, as these often leave behind tiny fibres that create unsightly lumps in your paintwork. Once the glass is cleaned, try to only handle the object by the edges or from the inside to avoid depositing new fingerprints or natural skin oils.
Testing Your Surface
Before committing to your full design, do a small test stroke in an inconspicuous area. If the paint "beads" or pulls away into small droplets, it means there is still a greasy film present. This step is a vital part of the process, especially when learning How to Make POSCA Permanent on Glass. If you encounter issues, simply wipe the test stroke away and clean the area again until the paint sits flat and opaque. Testing ensures your posca markers on glass deliver the vibrant, professional results you expect.
Understanding how glass differs from other materials like wood or stone is essential for any artist. You can check our POSCA Surface Guide to see how preparation steps vary across different creative projects. If you're unsure about a specific type of glass or need advice on the right tools for a large-scale project, feel free to reach out to our creative support team for personalised guidance.
How to Make POSCA Permanent on Glass
Sealing is the final piece of the puzzle. It transforms a temporary sketch into a durable piece of art that can withstand the test of time and handle the rigours of everyday display. Without this protection, your hard work is vulnerable to scratches, moisture, and UV fading from the harsh Australian sun. Choosing the right sealant is vital for anyone using posca markers on glass. You should always opt for a water-based spray varnish to lock in your design. Brush-on varnishes are risky because the friction of the bristles combined with wet sealant can reactivate the paint, causing your crisp lines to smudge or bleed.
The secret to a professional finish lies in the "mist coat" technique. This initial layer acts as a protective barrier without saturating the paint. Hold your spray can approximately 30cm away from the glass. Start your spray off the edge of the object, sweep quickly across in a steady motion, and finish past the opposite edge. You aren't looking for full, wet coverage during this first pass. You're simply laying down a fine dust of sealant that "grabs" the paint and prepares it for the heavier coats to follow. Once this mist layer is dry, the paint is much less likely to react to subsequent applications.
The Sealing Process: Step-by-Step
Patience is your best friend when you're finalising a project. Follow these steps to ensure your posca markers on glass remain vibrant and intact for years to come:
- Cure the paint: Wait at least 24 hours after finishing your drawing. Even if the paint feels dry to the touch, it needs time to bond properly with the smooth glass surface.
- Prepare your space: Find a well-ventilated area, such as a garage or outdoor undercover spot, away from direct wind and dust.
- Apply thin coats: Apply 2 to 3 thin coats of water-based spray varnish. It's much better to do several light passes than one thick, runny layer.
- Dry between layers: Allow each coat to dry fully, usually 15 to 30 minutes depending on the humidity, before applying the next one.
For high-quality finishing supplies that suit local conditions, you can browse our curated range of art add-ons to find compatible sealers for your next project.
Maintaining Your Decorated Glass
Once your art is sealed, it's remarkably durable, but it still requires a gentle touch. Even with a professional finish, you should always hand-wash your decorated items in cool water. Avoid soaking the glass in a sink for long periods, as moisture can eventually seep under the edges of the sealant. Never use abrasive sponges or scourers on the painted area, as these will eventually dull the finish and create micro-scratches. If you haven't used a specific UV-resistant sealer, try to display your work away from windows that receive intense afternoon sunlight to prevent the colours from softening over time.
Creative Glass Projects and Techniques
Mastering the application of posca markers on glass requires a delicate hand and a bit of patience. Because the surface is so smooth, the marker nib can sometimes act like a tiny shovel, digging up the paint you just laid down if you press too hard. We call this the "light touch" technique. You want to glide the nib over the surface rather than scrubbing it. If you need to layer colours, always wait until the first layer is touch dry. This usually takes a few minutes in the Australian climate, though high humidity might slow it down. If you want to explore more professional blending and shading methods, our guide on POSCA Pen Techniques offers a deeper dive into creative mastery.
Window Art and Shopfronts
Window art is a fantastic way to brighten an Australian storefront or celebrate a seasonal event at home. If you're designing from the inside to be seen from the street, remember that all text must be mirrored. A helpful trick is to tape a paper template to the outside of the window and trace it from the inside. For these large-scale displays, the POSCA PC-17K is the ideal tool. Its massive 15mm chisel tip allows you to fill in large blocks of colour quickly and evenly. When the promotion is over, removing posca markers on glass is simple; just use a bit of soapy water or a safety glass scraper to peel the paint away without leaving a trace.
Upcycled Glassware and Jars
Upcycling old glassware is a rewarding way to create personalised gifts and home organisers. You can turn empty jam jars into colourful candle holders or stylish desk tidies with just a few strokes. To achieve a stained-glass effect, apply very thin, single layers of light colours. The transparency of the glass will allow light to glow through the pigment beautifully, creating a warm atmosphere. Whether you are creating wedding favours or simple home decor, the ability to customise every detail makes these markers a versatile choice for any DIY enthusiast. If you have a specific project in mind and aren't sure which nib size to choose, get in touch with our specialist team for expert advice.
Choosing the Best POSCA Tips for Glass
Selecting the correct nib size is more than just a creative choice; it is a technical necessity when working with posca markers on glass. Because glass is entirely non-porous, the paint doesn't soak in, which means it can "pool" or puddle if your marker releases too much ink too quickly. Bullet tips are generally much easier to control on these slippery surfaces compared to chisel tips. The rounded shape of a bullet nib allows for a consistent flow of paint from almost any angle, which is vital when you are trying to maintain a steady hand on a curved jar or a vertical window pane.
Using genuine markers is the only way to ensure the paint formula is consistent enough for glass work. Counterfeit pens often have thinner, more watery ink that beads immediately on smooth surfaces, leading to frustrating, streaky results. As an Australian specialist, we offer individual POSCA pens across our entire range. This allows you to test specific sizes for your project without needing to invest in a full set until you're ready. Finding the right balance between pigment flow and line precision will make your decorating process far more enjoyable.
The Best Markers for Detail and Outlining
For fine patterns, intricate mandalas, or small personalised text, the PC-1MR and PC-3M are your go-to tools. The PC-1MR features an ultra-fine tapered tip that is perfect for technical drawing and tiny details that require a steady, thin line. However, the PC-3M remains the most popular choice for general glass decorating. Its fine bullet tip provides enough pigment to stay opaque on transparent surfaces while still being small enough for detailed illustrations. If you find you need a slightly thicker line for medium-sized projects, our POSCA PC-5M Guide explains why the medium bullet tip is often considered the most versatile marker in an artist's kit.
Filling Large Areas and Window Work
When your project scales up to bold shapes or large blocks of colour, you'll need the broader tips to maintain a uniform finish. The PC-5M and the PC-8K broad chisel tip are excellent for filling in designs on larger vases or signage. For those tackling massive window murals or shopfront displays, the PC-17K is the professional choice. Its extra-broad 15mm tip covers vast areas quickly, which helps prevent "lap marks" where the paint might dry at different rates. To ensure your project has a professional, harmonised look, consider using POSCA Marker Sets. These curated collections provide a cohesive colour palette, ensuring your shades work together perfectly across different tip sizes.
Bring Your Glass Art Vision to Life
PoscART is proud to be a genuine POSCA specialist and a family-owned Australian business dedicated to our local creative community. We offer the full range of authentic tools with fast Australia-wide shipping to ensure you have everything you need for your next project. If you're feeling inspired but need a little extra guidance on tip sizes or custom bundles, contact our expert support team today. We are always happy to help you choose the perfect supplies for your specific creative goals. It's time to pick up your markers and start decorating!
Common Questions About Using POSCA on Glass
Are POSCA markers permanent on glass without sealing?
No, POSCA markers are not permanent on glass until they have been sealed or heat-set. Because the paint is water-based and glass is a non-porous surface, the design will stay vibrant but can be easily scratched off or wiped away with a damp cloth. This makes them perfect for temporary window displays, but permanent projects require a protective finish to stay intact.
Can I bake POSCA markers on glass to make them permanent?
Yes, you can bake decorated glass in a domestic oven at 160°C for 45 minutes to help set the paint. It's best to place the item in a cold oven and let it reach the temperature gradually to prevent the glass from shattering. Once the 45 minutes are up, turn the oven off and leave the item inside to cool completely before handling it.
How do I remove POSCA pen from glass if I make a mistake?
You can easily remove mistakes using a damp cloth or a standard glass cleaner. If the paint is still wet, it wipes away instantly without leaving a trace. If it has already dried, a bit of warm soapy water or a window cleaning spray will dissolve the pigment. For very fine corrections, a cotton bud dipped in methylated spirits works perfectly for cleaning up edges.
Is POSCA paint safe to use on wine glasses?
POSCA paint is non-toxic, but it is not classified as food-safe or dishwasher-safe. When decorating wine glasses, always leave a 2cm gap from the top rim to ensure the paint doesn't come into contact with your lips. Focus your designs on the base or the lower half of the bowl. Because the paint sits on the surface, it could flake off if ingested, so it shouldn't touch any eating surfaces.
Why is my POSCA pen streaky on glass?
Streaky coverage usually happens because of invisible surface oils or applying too much pressure while painting. If the glass isn't perfectly clean, the paint will bead or streak instead of laying flat. Ensure you've wiped the surface with methylated spirits first. Also, remember to use a light touch; pressing too hard can scrape off the previous layer, especially when using posca markers on glass where the surface provides very little grip.
Can I use POSCA markers on my car windows?
Yes, POSCA markers are excellent for temporary car window signs, such as "Just Married" or "For Sale" notices. The paint is highly opaque and stands out clearly against tinted glass. It won't damage your windows and can be removed easily later with a wet sponge. Just ensure you don't paint over areas that obstruct the driver's vision or cover the mirrors.
What is the best varnish to seal POSCA on glass in Australia?
A high-quality water-based spray varnish is the most reliable way to seal your work for Australian conditions. Avoid brush-on varnishes as they often smudge the water-based paint underneath. A spray allows you to apply thin, even coats without disturbing the design. Look for a product that offers UV protection if your glass art will be displayed near a sunny window to prevent the colours from fading.
Will POSCA markers wash off in the rain if used on outdoor windows?
Yes, unsealed POSCA paint will eventually wash off or run if it is exposed to heavy rain. While the paint can withstand a light misting once dry, it is not waterproof on non-porous surfaces like glass. If you're creating a storefront display that needs to survive a storm, you must apply a water-based sealant. For purely temporary outdoor art, be prepared to touch up the design after a downpour.
General Information
This article is provided as general information only to help customers compare and choose POSCA markers, acrylic markers, art supplies, creative tools and related products. Product details, colours, finishes, surface suitability, availability, pricing and usage results may vary. Always check the individual product page, manufacturer information, age guidance, surface instructions and safety recommendations before purchasing or using a product.