







POSCA Pen Techniques: A Comprehensive Guide to Creative Mastery in 2026
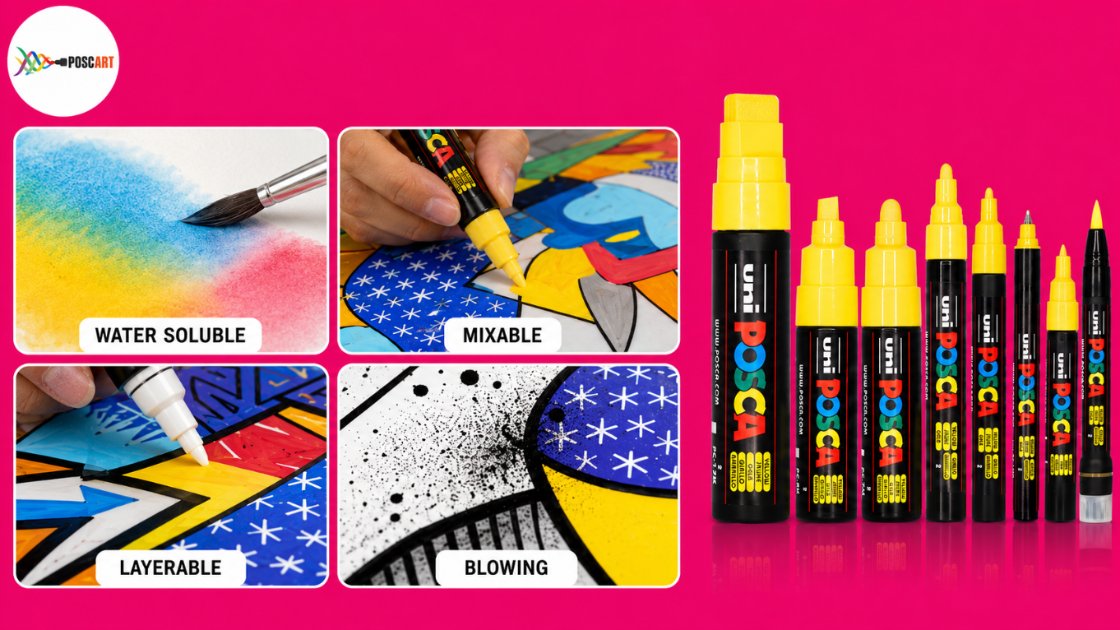
Mastering POSCA markers requires treating them as fluid acrylic instruments rather than standard felt-tip pens. It's a common frustration to watch a beautiful piece of art suffer from a streaky finish or see your favourite paper start pilling because you've worked the surface a little too hard. We understand that accidentally muddying your colours during a transition can feel like a significant creative roadblock. This guide provides the professional-grade posca pen techniques you need to achieve a smooth, opaque colour laydown and successful gradients every time. You'll discover how to fix mistakes without starting over and gain the confidence to explore advanced textural effects on any surface. We're going to walk through everything from precise tip selection to the secrets of seamless layering to ensure your next project reflects your true creative potential. Whether you're a student or a professional artist, these insights will help you organise your workflow and master the unique flow of high-quality paint pens.
Key Takeaways
- Learn how to manage the internal ball bearing and nib pressure to ensure a consistent paint flow without pilling your paper surface.
- Master professional posca pen techniques for wet-on-wet blending to create seamless colour gradients and soft transitions.
- Understand the timing required for layering light pigments over dark bases to achieve maximum opacity without muddying your work.
- Explore experimental methods like stippling and the blowing technique to add depth, shadow, and a spray-paint aesthetic to your designs.
- Gain the skills to adapt your application for different materials, including essential pre-treatment steps for rough or non-porous surfaces.
Mastering the Fluid: Proper Activation and Flow Control
The magic of a POSCA marker lies in its valve-action system. Unlike standard felt-tip pens, these tools house a high-quality acrylic pigment that remains separate from the nib until you're ready to create. Inside every barrel sits a small metal ball bearing. When you shake the marker, this ball acts as a mixer, ensuring the pigment and binder are perfectly integrated for a smooth, opaque finish. This design is rooted in the history of street art, where artists needed portable, high-coverage tools that could withstand various outdoor conditions. Mastering these posca pen techniques starts with understanding that you're controlling a fluid instrument, not just a drawing tool.
Temperature changes can often affect the internal pressure of your marker, especially in the fluctuating Australian climate. If your studio gets quite warm, the air inside the barrel expands, which might cause the paint to gush out unexpectedly. You can prevent this by "burping" your marker. Simply hold the pen nib-up and gently press the tip with your finger or a scrap of card to release the built-up air pressure. This simple step ensures your flow remains steady and predictable. Identifying the "sweet spot" of nib saturation is a skill that develops with practise. You want the nib to be fully coloured but not glistening with excess liquid.
To better understand the mechanics of activation and flow, watch this helpful video:
The Prime and Pump Method
Your first few strokes should never happen on your final masterpiece. Always keep a piece of scrap art paper nearby to prime your markers. To activate the flow, shake the pen vigorously with the cap on, then gently press the nib down onto your scrap paper until you see the colour begin to saturate the tip. Avoid excessive or rapid pumping. If you press too hard or too often, you'll create a puddle that can saturate the nib beyond the ideal level. A perfectly primed nib should look moist and vibrant but shouldn't be dripping. This balance is essential for maintaining control during intricate work.
Troubleshooting Flow Irregularities
Even with the best posca pen techniques, you might encounter a dry or "crusty" nib during a long creative session. This usually happens when paint dries on the surface of the tip, blocking the flow from the valve. You don't need to throw the marker away. Most POSCA nibs can be removed and soaked in a small jar of water to dissolve the dried acrylic. If the nib has become frayed or permanently clogged from use on rough surfaces, it's often more efficient to use replacement nibs to restore that factory-fresh precision. Keeping the internal valve clean and the nib in good condition ensures your paint laydown remains professional and streak-free.
Blending and Dilution: The Art of Wet-on-Wet Techniques
POSCA markers aren't just for solid blocks of colour. Their high-quality, water-based acrylic formula allows for sophisticated blending, provided you work within the "open time". This is the brief window before the acrylic resin begins to set and cure. On porous surfaces like paper, this window is quite short, usually around 15 to 20 seconds. On non-porous surfaces like glass or plastic, you might have up to a full minute to manipulate the pigment. Before you start mixing, ensure you properly activate your pens to get a consistent flow of pigment, which is essential for a smooth blend.
One of the most effective posca pen techniques for creating seamless gradients is the "Tip-to-Tip" method. By touching the nib of a darker marker to the nib of a lighter one, the lighter pen will temporarily absorb some of the darker pigment. As you draw, you'll see a beautiful transition from the dark shade back to the original light colour. A common worry is that this will permanently "ruin" your lighter marker. To recover the tip, simply scribble on a piece of scrap paper until the original colour flows purely again. It's a simple way to achieve professional bi-colour effects without needing a palette.
You can also transform your marker strokes into soft, watercolour-style washes by using a damp brush. While the paint is still wet on the surface, a light touch with a brush can pull the pigment across the page, creating soft shadows or transparent backgrounds. This technique works best on heavy-duty art paper or primed canvas that can handle a small amount of moisture without warping. If you're unsure which colours work best together for a specific project, our team is happy to provide personalised advice on colour theory and marker selection.
Direct Surface Blending
Working in small sections is vital for successful surface blending. If you try to cover a large area before mixing, the first section will dry before you can reach it with your second colour. We recommend using the POSCA PC-5M for this task. Its medium bullet tip provides an optimal volume of paint, keeping the surface wet for longer. Use circular stroke patterns to create soft, cloud-like textures, or stick to linear strokes for sharp, modern horizons. The key is to keep the nibs moving while the paint is still fluid.
Water Solubilisation and Washes
Diluting POSCA paint allows you to build depth through transparent layers. By applying a small amount of paint to a non-porous palette and adding water, you can create a wash that maintains the vibrant pigment while increasing transparency. This is perfect for creating atmospheric perspective in landscapes or soft skin tones in portraiture. Remember that once these washes dry, they become permanent, allowing you to layer more traditional marker work over the top without disturbing the base layer.
Strategic Layering: Building Depth with Opaque Acrylic
One of the most powerful aspects of POSCA markers is their incredible opacity. Unlike traditional markers that are transparent, these paint pens allow you to layer light pigments directly over dark bases. This characteristic is central to many advanced posca pen techniques, enabling you to build complex, multi-dimensional compositions. Successful layering requires a solid understanding of drying times. There is a vital distinction between a layer being "dry-to-touch" and being "fully cured". While your art might feel dry within minutes, the acrylic resin underneath is still settling. If you apply a second layer too aggressively before the first has stabilised, the nib can reactivate the bottom layer. This leads to muddy colours and pigment contamination.
For those just starting, mastering basic layering techniques involves patience. If you make a mistake, don't panic. You can simply wait for the area to dry completely and "block it out" using an opaque white or a matching base tone. This ability to edit your work without starting over is what makes these markers so forgiving for both students and professionals. By building your artwork in stages, you can achieve a level of depth and vibrancy that standard drawing tools simply cannot match.
Timing and Environmental Factors
Living in Australia means dealing with diverse climates that directly impact your creative process. If you're working in the tropical humidity of Darwin or Brisbane, your paint will take significantly longer to dry compared to the arid conditions of Perth or Adelaide. High humidity slows down the evaporation of the water-based binder. To speed things up safely, you can use a hair dryer on a cool setting. Avoid using heat, as this can cause the acrylic paint to bubble or crack. Always test the stability of a layer by lightly tapping an inconspicuous corner before committing to fine top-layer details.
Precision Detailing and Outlining
The final stage of any layered piece usually involves adding sharp highlights or defining outlines. Choosing the right tool for this is critical to prevent scratching the underlying paint. While the PC-3M is a fantastic all-rounder, the PC-1MR offers a metal-tapered tip that is perfect for ultra-fine precision. You can find more detail on which POSCA pen is best for outlines in our specialised selection guide. When detailing, use a light touch. If you press too hard, the hard nib might gouge the cured paint underneath, ruining your smooth finish. Keep your strokes swift and confident to maintain those crisp, professional edges.

Experimental Techniques: Stippling, Splashing, and Textural Effects
Pushing the boundaries of your artwork involves moving beyond standard lines and solid fills. These posca pen techniques allow you to add texture and movement that mimics more traditional painting styles or gritty urban aesthetics. One of the most rewarding methods is Sgraffito. This involves applying a wet layer of paint over a fully cured base layer and then scratching through the top coat with a fine tool or even a toothpick. It reveals the colour underneath, allowing you to create intricate patterns, fine hair textures, or weathered effects. Because POSCA paint is so opaque, the contrast between the two layers remains sharp and professional.
Splashing and flicking add a sense of organic energy to your backgrounds. To achieve this, you can flick the side of the marker nib against the inside of its cap or your finger. This sends a spray of fine droplets across your work. Unlike aerosol paints, this method gives you a high degree of control over the "mess." You can mask off specific areas of your composition with low-tack tape to create crisp, clean boundaries against the chaotic splashes. It’s a favourite technique for artists looking to add a "street art" vibe to their studio pieces.
Pointillism and Stippling Examples
Building form and shadow through stippling requires patience but yields incredible 3D results. We recommend using fine bullet tips like the PC-1M or PC-3M for this work. By varying the density of your dots, you can create smooth transitions from deep shadow to bright highlight. You can also vary the pressure of your strokes. A light tap creates a tiny speck, while a firmer press results in a larger, more saturated dot. Organising your palette beforehand is essential here. Having your light, medium, and dark tones ready ensures your tonal consistency stays perfect across the entire stippled area.
The "Street Art" Spray Effect
The blowing technique is a unique way to achieve a misted, spray-paint look without using an aerosol. To master this, you first need to saturate the nib on a piece of scrap paper until a small bead of paint forms. Hold the marker about 2 to 5 centimetres from the surface and blow sharply onto the side of the nib. To control the splash size, adjust your distance. Blowing from further away creates a fine mist, while getting closer results in larger, more dramatic drips. If you're looking for specific advice on which tip sizes work best for these experimental methods, reach out to our creative support team for a personalised recommendation.
Surface-Specific Mastery: Adapting Your Technique
While POSCA markers are celebrated for their versatility, achieving a professional finish requires you to adapt your approach based on the material in front of you. One of the most critical posca pen techniques involves adjusting your stroke speed. On porous surfaces like raw timber or fabric, the water-based paint is quickly absorbed. If you move too slowly, the pigment will spread beyond your intended line, a phenomenon known as feathering. Conversely, on non-porous surfaces like polished metal or glass, moving too quickly can result in thin, streaky coverage because the paint has nothing to grip. Finding the right tempo for each material ensures your artwork remains crisp and vibrant.
Pre-treatment is another essential step that many hobbyists overlook. For rough textures like terracotta or weathered wood, a light sanding can prevent your marker nibs from fraying prematurely. If you're working on fabric, ensure the material is pre-washed to remove any industrial sizing that might repel the paint. Once your masterpiece is finished, sealing is the final hurdle. While POSCA paint is permanent on porous materials, it requires a clear acrylic varnish to remain durable on hard surfaces. We recommend using a spray varnish rather than a brush-on version to avoid reactivating the paint layers you've worked so hard to build. This protects your work from UV fading and physical wear over time.
Canvas and Paper Strategies
Choosing the right foundation is the best way to prevent the dreaded pilling of the paper surface. Selecting high-quality books and pads specifically designed for mixed media or acrylics will allow you to layer without damaging the fibres. If you're working on canvas, applying a coat of gesso first provides a smoother glide and prevents the paint from sinking too deeply into the weave. To cover large areas without visible lap marks, work quickly while the paint is wet and use slightly overlapping, consistent strokes to maintain a uniform opacity. This ensures a professional, flat finish that looks like a printed graphic rather than a hand-drawn sketch.
Hard Surfaces: Glass, Metal, and Stone
Working on hard surfaces can feel slippery compared to the tactile resistance of paper. When painting on glass or metal, you might need to apply several thin layers rather than one thick coat to prevent drips or runs. For a deep dive into the specifics of material compatibility, you can reference our pillar guide on what surfaces POSCA pens work on. For items like ceramic mugs or glassware, heat-setting in a domestic oven can significantly improve the longevity of your design. Always ensure the surface is chemically clean and free of fingerprints before you begin, as natural oils can interfere with the paint's adhesion and lead to premature peeling.
Elevate Your Creative Journey with Professional Mastery
Mastering the fluid nature of paint pens involves more than just drawing lines. It requires a solid understanding of flow control, the timing of wet-on-wet blending, and the strategic patience needed for opaque layering. By adapting your stroke speed to your chosen surface and experimenting with textural effects like stippling or blowing, you can achieve a level of depth that standard markers simply can't match. These posca pen techniques are the foundation for creating vibrant, professional artwork on everything from art paper to glass.
As an Australian family-owned specialist, we take pride in supporting your creative process every step of the way. We stock all 66+ POSCA colours and provide expert-curated bundles tailored for every skill level. Whether you're a student starting your first project or a professional artist pushing the boundaries of the medium, we're here to ensure you have the right tools for success. Explore our full range of genuine POSCA Markers and start practising these techniques today! Your next masterpiece is waiting to be brought to life with confidence and precision.
Frequently Asked Questions
Can I blend POSCA pens once they have dried?
No, you cannot blend the paint once it has dried because the acrylic resin becomes permanent and water-resistant. Successful blending must occur while the paint is still wet on the surface. If you aren't happy with a dried area, the best approach is to wait for it to cure completely and then apply a fresh, opaque layer of colour over the top to start again.
How do I stop my POSCA markers from streaking on large areas?
To avoid streaks, you should use a larger tip size like the PC-17K or the MOP'R PCM-22 to cover the area as quickly as possible. Streaking usually happens when one stroke dries before the next one overlaps it. By working in small sections and maintaining a "wet edge," you allow the pigment to level out into a smooth, professional finish without visible lap marks.
Will blending ruin my POSCA pen nibs?
Blending will not ruin your nibs as long as you clear the excess pigment before it dries. While the tip might look temporarily stained, the internal valve system remains protected. You can easily restore your marker to its original state by scribbling on a piece of scrap paper until the paint flow returns to its pure, single colour.
How long should I wait between layering different POSCA colours?
You should wait until the base layer is "dry-to-touch," which typically takes between one and five minutes depending on your local climate. For advanced posca pen techniques that require multiple layers, giving the paint extra time to stabilise prevents the nib from scratching the surface. If you are in a humid environment, a quick blast from a hair dryer on a cool setting can safely speed up this process.
Is it possible to use POSCA pens with water and a brush?
Yes, you can use a damp brush to dilute the paint and create soft, transparent washes while the pigment is still wet. This technique effectively turns your marker into a portable acrylic paint set. It is an excellent way to create atmospheric backgrounds or soft shadows on heavy art paper, provided the surface can handle a small amount of moisture without pilling.
What should I do if my POSCA pen blobs or leaks on my work?
Stop immediately and use the corner of a clean paper towel or a cotton bud to wick away the excess paint. Blobs usually happen because of built-up air pressure or over-pumping the nib. Once the accident has dried completely, you can simply use the marker's high opacity to paint over the mistake. This is much more effective than trying to wipe it away while wet.
Can I use POSCA markers over other types of paint?
POSCA markers perform exceptionally well over dried acrylic paint, gouache, and matt watercolours. They provide a crisp, opaque line that sits beautifully on top of these traditional mediums. However, they generally won't adhere well to oil-based paints or very greasy surfaces. Always ensure your base layer is fully cured and free of dust before you begin detailing with your paint pens.
How do I clean the tip of my POSCA pen after mixing colours?
Cleaning the tip is as simple as scribbling on a scrap piece of paper until the original pigment flows purely again. If the paint has become crusty or dried on the nib, you can remove the tip and rinse it under lukewarm water without damaging the pen. Maintaining clean nibs is one of the most important posca pen techniques for ensuring your colours stay vibrant and uncontaminated during complex projects.
General Information
This article is provided as general information only to help customers compare and choose POSCA markers, acrylic markers, art supplies, creative tools and related products. Product details, colours, finishes, surface suitability, availability, pricing and usage results may vary. Always check the individual product page, manufacturer information, age guidance, surface instructions and safety recommendations before purchasing or using a product.