







How to Layer POSCA Markers: The Ultimate Australian Artist's Guide
Most artists believe that waiting for paint to dry is the only secret to success, but mastering how to layer posca markers actually requires a deeper understanding of pigment density and surface tension. If you've ever watched a beautiful highlight turn into a muddy grey mess or felt the frustration of your paper pilling under too much moisture, you're certainly not alone. It's a common hurdle that can make even the most inspired project feel like a struggle; especially when you're aiming for that signature opaque finish that these paint pens are known for.
Our professional Australian guide will help you master the art of layering without the stress of smudging or streaky finishes. You'll gain the confidence to apply vibrant light colours over dark backgrounds while keeping your work looking crisp and professional. We'll explore the technical side of drying times, marker tip selection, and surface preparation to ensure your next creative piece truly pops. Whether you're a student working in a sketchbook or a professional artist tackling a large canvas, these practical tips will help you achieve the clean, vibrant results you've been searching for.
Key Takeaways
- Understand the unique science of water-based pigment ink and how it enables you to achieve total opacity when covering dark tones with light colours.
- Follow a proven four-step process that includes the "Bone Dry" rule to prevent your base layers from mixing with your fresh highlights.
- Master the professional techniques for how to layer posca markers to avoid common frustrations like paper pilling, smudging, and unwanted paint mixing.
- Learn why your choice of art paper or canvas is the most important foundation for a successful, professional-looking layered finish.
- Discover how to add final details and soft gradients using specialised tools like the PC-1MR ultra-fine tip for a polished creative outcome.
Understanding the Science of Layering POSCA Paint Markers
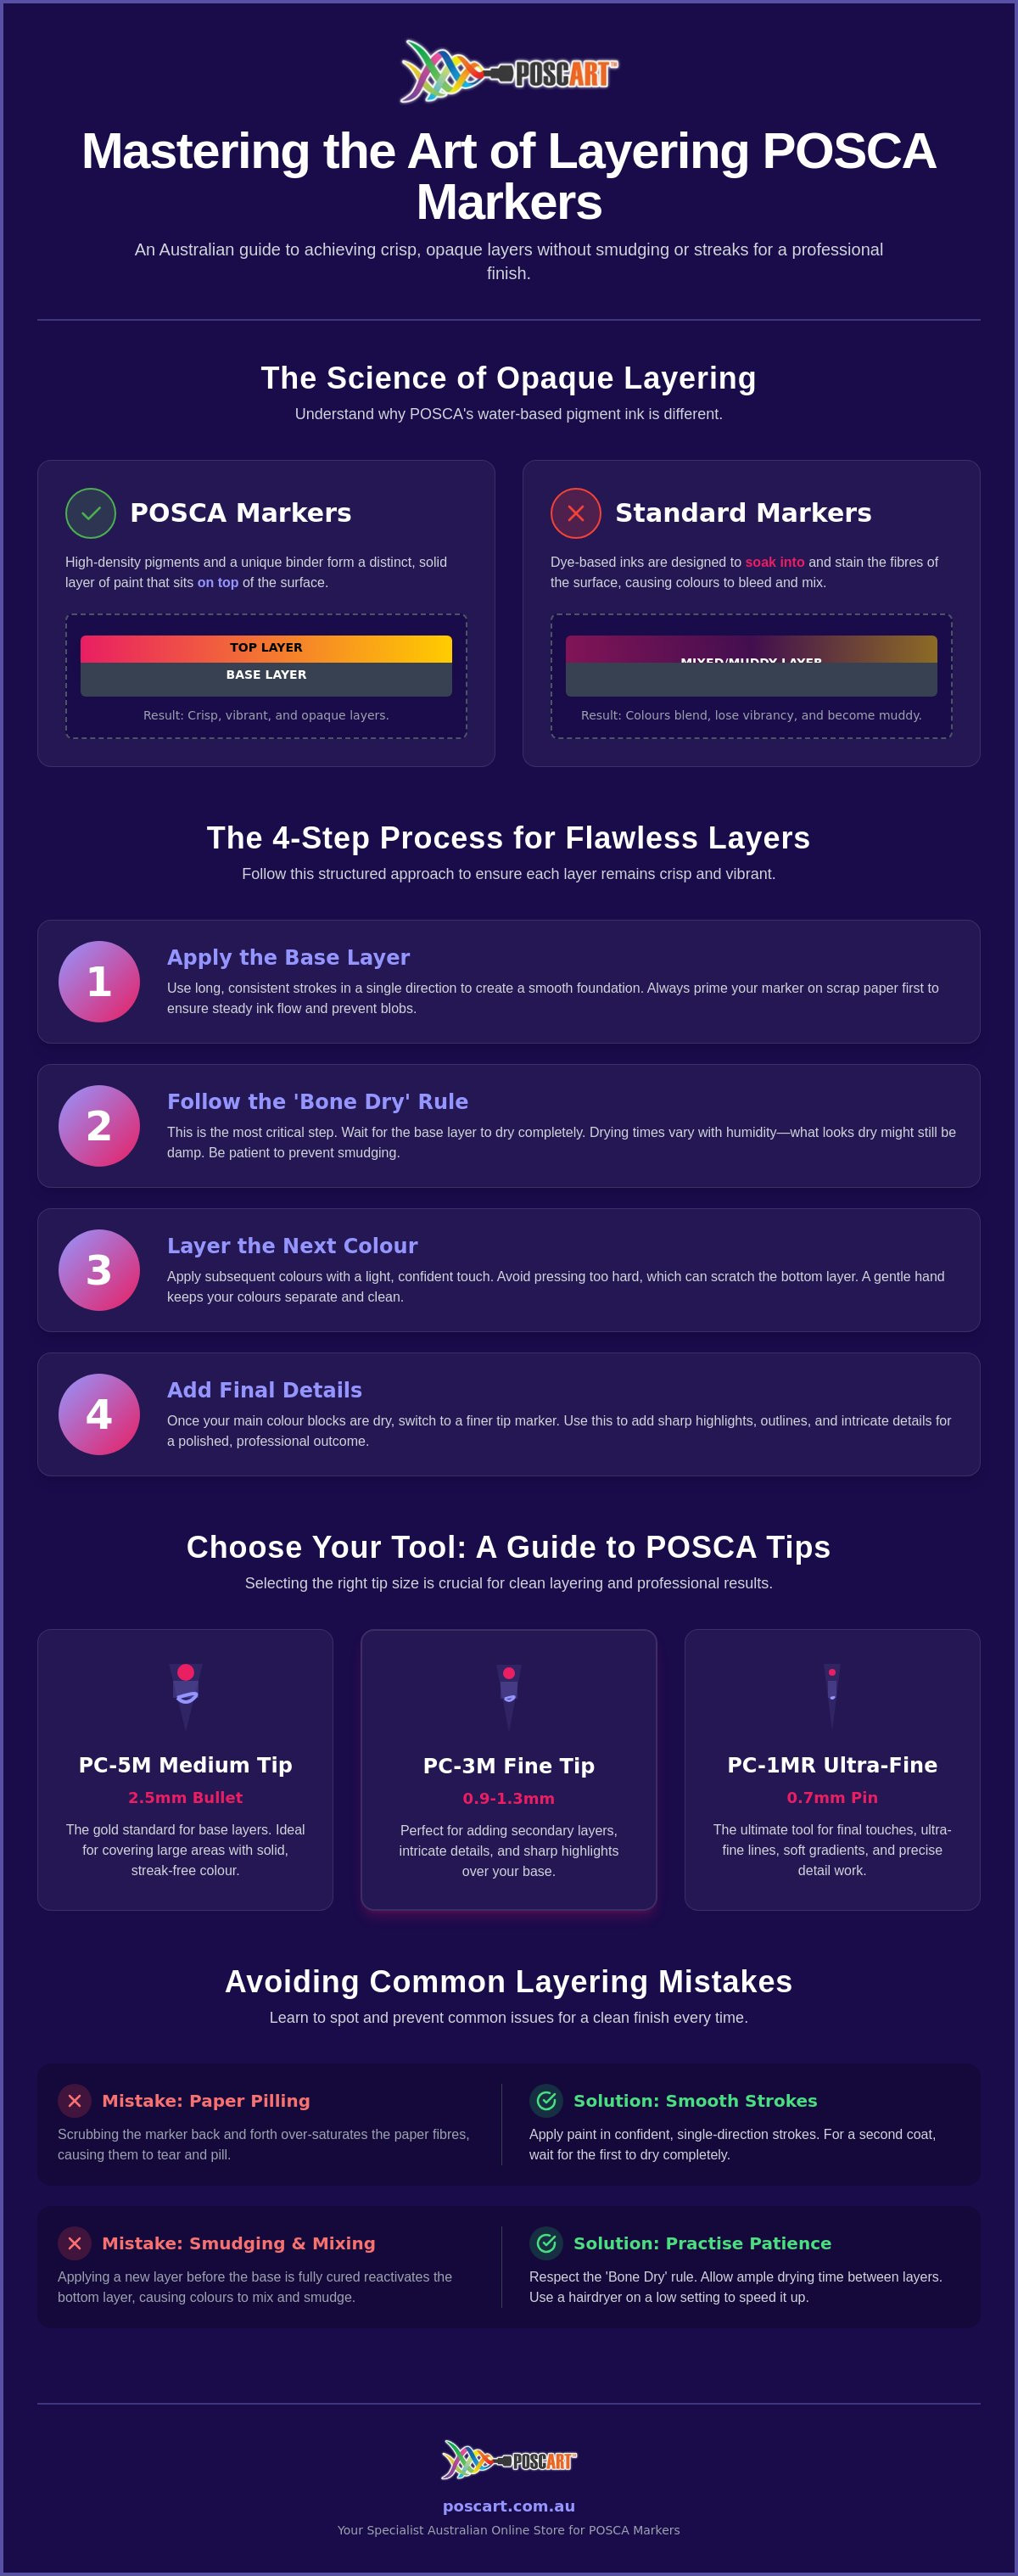
To understand how to layer posca markers effectively, we first need to look at what's happening inside the barrel. POSCA markers aren't just standard pens; they are a portable delivery system for high-grade acrylic paint. While a Paint marker can come in various formulations, POSCA's specific blend of water-based pigments and a unique binder allows the paint to sit on top of the surface rather than soaking into the fibres. This is the secret to its incredible opacity.
Opacity refers to how well the paint hides what's underneath it. Because the pigment density is so high, you can easily apply light colours, like white or pastel yellow, directly over a dark navy or black background once the base is dry. The binder acts like a glue, hardening into a water-resistant film as the water evaporates. Unlike alcohol-based markers that reactivate the bottom layer and cause bleeding, POSCA layers remain distinct. This means your colours stay vibrant and true without turning into a muddy mess.
To see these techniques in action on a real-world project, watch this helpful video:
Why POSCA Ink Behaves Differently Than Standard Markers
Standard markers often use dyes that stain the paper or surface. POSCA uses suspended pigments that form a physical layer. This is why you hear that clicking sound when you shake them; the internal ball-bearing is essential for mixing those heavy pigments into the binder to ensure every stroke is consistent and opaque. Because the ink stays on the surface, it creates a professional, matte finish that looks like it was applied with a traditional brush, providing a safe and reliable experience for both hobbyists and professionals.
The Role of Tip Sizes in Layering Success
Choosing the right tool is half the battle for a clean finish. For a solid, streak-free foundation, the POSCA PC-5M Medium Bullet Tip is the gold standard. Its 2.5mm nib delivers enough paint to cover large areas quickly without flooding the surface. Once that base is bone dry, switching to a finer PC-3M allows you to add intricate details or sharp highlights on top. Managing your ink flow is vital; a gentle touch prevents the nib from scratching the bottom layer, while a steady pace ensures the paint applies smoothly without pooling or streaking.
The 4-Step Process for Perfect Layering Without Streaks
Learning how to layer posca markers successfully often comes down to a simple change in pace and pressure. Many artists rush the process, leading to the dreaded muddy effect where colours blend unintentionally. By following a structured approach, you ensure each layer remains crisp and opaque. This method works across various surfaces, from porous paper to smooth glass, provided you respect the drying cycle of the water-based pigment.
Mastering the Base Layer
The success of your entire piece depends on Step 1: the foundation. To achieve a smooth, professional finish, use long, consistent strokes in a single direction. Avoid scrubbing the nib back and forth, as this can create visible overlap lines or saturate the surface too much. Before you start a large area, always prime your marker on a scrap piece of paper. This ensures the ink flow is steady and prevents unexpected blobs from ruining your work. For more advanced advice on hand positioning and stroke variety, you can explore our guide on POSCA Pen Techniques.
Drying Times and Environmental Factors
Step 2 is the 'Bone Dry' rule. In Australia, our climate plays a massive role in how quickly your paint cures. If you're working in the high humidity of Tropical North Queensland, your markers might take twice as long to dry compared to a dry summer day in Adelaide. A layer that looks dry might still be damp in the centre; this leads to Step 3: applying the next colour with a light, confident touch. If you're in a hurry, you can use a hairdryer on a low-heat setting to speed things up, but keep it at a distance to avoid cracking the paint. To check if you're ready, perform a touch test by gently tapping the very edge of your paper where you've tested the colour.
Finally, Step 4 involves managing 'over-working' your art. Once you've applied a second layer, resist the urge to go over the same spot repeatedly while it's wet. The nib of a POSCA marker is firm. If you press too hard or linger too long, it will act like a tiny scraper and lift the base coat right off the page. Keep your movements swift and your pressure light. If you have specific questions about a tricky surface or need advice on a particular project, feel free to chat with our creative support team for personalised guidance.
Mastering Opacity: Layering Light Colours Over Darker Tones
One of the most satisfying parts of mastering how to layer posca markers is seeing a bright yellow or crisp white sit perfectly on a dark background. This unique ability is what sets these paint pens apart from traditional markers. However, achieving that professional finish requires more than just drawing on top of another colour. You need to understand the hierarchy of pigment density. Some colours naturally cover better than others, and knowing which ones to trust will save you from a lot of creative frustration.
White is the undisputed champion of the POSCA range. It's often used as a primer to help more transparent colours stand out. If you're working on a black or dark-toned surface, applying a white base layer first ensures your top colour remains vibrant. This is the secret to getting a "true" colour result every time. Without this step, your bright yellows or pinks might look dull as they struggle to mask the dark background underneath.
Layering White and Pastels Over Dark Bases
Patience is vital when working with high-pigment shades. It's tempting to flood the surface with a single thick layer to cover the dark base quickly, but this often leads to an uneven texture or even cracking as the paint dries. Instead, apply two thin, consistent layers. This creates a solid foundation without the gloopy finish. Because white ink is particularly dense, it requires a slightly longer drying time than standard colours. If you need a specific tip size for your highlights, you can browse individual POSCA pens to find the exact match for your project.
Dealing with Transparency in Certain Pigments
Not every colour in the POSCA palette has the same level of opacity. Yellows, oranges, and light pinks tend to be more translucent and can appear streaky if applied directly over dark backgrounds. To avoid this, use a neutral base layer like white or a very light grey. This "blocks" the dark background and allows the lighter pigment to show its full potential. Also, be mindful of layering complementary colours. If your bottom layer isn't fully cured, mixing a yellow over a purple will result in a muddy, unprofessional look. Always wait for the base to be bone dry.
For those final, intricate highlights that make an artwork "pop", switch to a finer tip. Using a PC-1MR or PC-3M over your broader layered backgrounds allows for extreme precision. These fine nibs deliver concentrated pigment that sits sharply on top of your previous work. It creates a professional finish. Learning how to layer posca markers with this level of detail is what separates a hobbyist sketch from a professional-looking illustration. Precision matters. For artists who want to bring this same level of detail to home decor, you can discover Shabby Chic & Co for specialist furniture upcycling supplies and paints.
Avoiding Common Layering Mistakes: Pilling, Smudging, and Mixing
Ruining a creative piece at the final hurdle is a frustrating rite of passage for many artists, but most layering disasters are entirely preventable. When you're learning how to layer posca markers, the most common issues like pilling, smudging, or "ghosting" usually stem from surface choice or simple impatience. Understanding why these technical failures happen will help you troubleshoot in real-time and keep your work looking crisp and professional. It's about respecting the limits of your materials.
Paper choice is the single most important factor in your success. If you use standard office paper or thin sketchbook pages, the water-based paint will quickly saturate the fibres. This causes the surface to "pill," creating those tiny, annoying balls of paper that ruin your finish. Aim for high-gsm paper, ideally 200gsm or higher, to ensure the surface can handle multiple passes of wet paint. Ghosting is another frequent headache; this occurs when the moisture from your top layer reactivates a bottom layer that hasn't fully cured. The result is a muddy bleed that's difficult to reverse.
Surface Preparation for Better Layering
Different materials respond to paint pens in unique ways. For instance, painting on canvas is much more forgiving than paper because the textured fabric can hold more pigment without warping or tearing. If you're working on porous surfaces like raw wood, the paint can "feather" or sink into the grain. Sealing the base with a clear primer or a solid white coat first creates a smoother foundation. This ensures your detail layers stay vibrant and don't disappear into the material.
Fixing Mistakes on the Fly
If you make a mistake while layering, stay calm. A damp cotton bud can gently lift wet paint without disturbing a fully dried base layer. However, you must know when to stop. If the paper begins to look grey or fuzzy, it has reached its moisture limit and further rubbing will cause a tear. If you've pushed too hard and damaged your marker tip on a rough surface, you can easily restore your tools by using replacement nibs rather than replacing the entire marker. This is a cost-effective way to keep your kit in top condition.
To prevent ink blobs, never pump your marker nib directly on your project. Always use a scrap piece of paper to prime the marker and check the flow first. If your nib accidentally picks up a different colour from a wet layer, simply scribble on a scrap until the original colour runs clear again. If you're still experiencing issues with your layering technique, get in touch with our specialist team for expert advice on your specific project needs.
Enhancing Your Layered Artwork with Finishing Touches
Organising your workspace is just as important as the technique itself. Having a pre-curated range of tones allows you to transition between base coats and detail work without breaking your creative flow. Many artists find that investing in POSCA marker sets is the most efficient way to build a balanced palette, ensuring you have the right mix of broad tips for coverage and fine tips for those final, defining strokes.
Blending vs. Layering: Knowing the Difference
While this guide has focused on wet-on-dry layering, you can also achieve soft gradients through a wet-on-wet blending technique. Blending happens when you apply a second colour while the base is still damp, allowing the pigments to merge on the surface. This is perfect for creating soft shadows or skin tones. In contrast, layering is the process of building depth through distinct, dry applications. You can even create "glazes" by using a slightly damp brush to thin out a fresh layer of paint, allowing the colour beneath to partially show through for a translucent effect.
Long-term Protection for Layered Art
Because POSCA paint is water-based, your layers can still be reactivated by moisture or damaged by friction even after they feel dry to the touch. This makes varnishing a non-negotiable step for any serious project. In Australia, our environmental conditions can be particularly harsh on art. Choosing a high-quality spray varnish is vital to lock in your work without the risk of "melting" or smearing the layers, which can sometimes happen with brush-on alternatives. You can choose between a matte finish for a modern look or a gloss finish to make your colours appear even more vibrant.
Applying your sealant in several thin coats is much safer than one heavy application. Start with a light "mist" coat to set the pigment before moving on to fuller coverage. A UV-protection varnish is especially important for Australian light levels to prevent your favourite colours from fading over time. By following these final steps, you ensure that the time you spent learning how to layer posca markers results in a piece of art that remains vibrant and protected for years to come.
Bring Your Next Masterpiece to Life
Mastering how to layer posca markers is a transformative skill that moves your art from simple sketches to professional, multi-dimensional illustrations. By respecting the "Bone Dry" rule and understanding the high opacity of water-based pigments, you can confidently apply vibrant colours and highlights over the darkest backgrounds without fear of smudging. Remember that your choice of surface and tip size is the foundation of every successful layer; whether you're using a broad chisel for base coats or an ultra-fine tapered tip for final details.
As an Australian family-owned and operated specialist, we take pride in supporting your creative journey with an extensive range of genuine POSCA tip sizes. We provide fast national shipping across Australia so you can get back to your studio sooner. If you're ready to expand your toolkit, build your perfect layering palette with our individual POSCA pens and see the difference that quality supplies make. We're excited to see the vibrant, crisp results you achieve with your next project.
Frequently Asked Questions
How long do I actually need to wait between POSCA layers?
You should wait until the paint is completely matte and cool to the touch, which typically takes between 10 to 20 minutes in standard Australian conditions. If you're in a more humid environment like Darwin or Brisbane, this time may double. Using a hairdryer on a low-heat setting can speed up the process to under five minutes. Always ensure the surface is bone dry to prevent the layers from merging unintentionally.
Can I layer POSCA markers over other art supplies like watercolour or acrylic paint?
Yes, POSCA markers layer beautifully over dried watercolour and acrylic paint because they share a water-based pigment foundation. Ensure the underlying medium is fully cured before you start. If you're layering over oil-based paints, the POSCA ink may bead or fail to adhere properly. For mixed media projects, always test a small area first to check for compatibility and to ensure the finish remains vibrant and stable.
Why is my second layer of POSCA picking up the colour underneath?
This usually happens because the bottom layer isn't fully dry or you're applying too much pressure with the marker nib. When learning how to layer posca markers, it's vital to use a light, sweeping motion for top layers. If you scrub the nib back and forth, you'll reactivate the previous paint and cause it to lift. If the base layer is still slightly damp, the moisture in the new ink will merge the two colours.
Is it possible to layer light POSCA colours over dark ones?
Absolutely, the high opacity of the acrylic pigment means you can easily layer light colours over dark ones. For the best results, apply two thin coats of the light colour rather than one heavy one. This prevents the dark background from ghosting through. White, yellow, and pastel shades are specifically designed to be opaque, allowing you to add crisp highlights over deep navy, forest green, or black backgrounds with ease.
What is the best paper for layering POSCA markers without pilling?
You'll achieve the best results using a high-gsm paper, ideally 200gsm or above, like heavy-duty mixed media paper or smooth watercolour card. Standard paper fibres break down too quickly when saturated with paint, leading to pilling. Using a smoother surface also protects your marker nibs from excessive wear. If you're working on a larger scale, primed canvas or wood panels are excellent alternatives that can handle multiple layers without any structural damage.
How do I fix a smudged layer without starting my whole drawing again?
You can often fix a smudge by gently lifting the wet paint with a slightly damp cotton bud before it dries. If the smudge has already set, wait for it to dry completely and then simply paint over the mistake with your background colour. Because these markers are so opaque, you can effectively erase errors by layering the original base colour back over the top, providing a clean slate for your corrections without ruining the entire piece.
Can you layer POSCA markers on non-porous surfaces like glass or plastic?
Yes, you can layer on non-porous surfaces, but you'll need to allow for much longer drying times as the paint cannot soak in. On glass or plastic, the paint sits entirely on the surface, making it more prone to scratching during the layering process. It's helpful to apply a very thin base layer first. Once your final design is complete, use a spray varnish to protect the layers from being rubbed off or smudged by accident.
Do I need to prime my surface before I start layering with POSCA?
Priming isn't strictly necessary for most paper or canvas projects, but it's highly recommended for porous materials like raw wood or terracotta. A primer prevents the paint from sinking into the grain, which helps you understand how to layer posca markers more effectively on tricky textures. On smooth, non-porous surfaces, a light sand or a specialised primer can help the first layer of paint adhere better, ensuring your layered artwork remains durable and vibrant.
General Information
This article is provided as general information only to help customers compare and choose POSCA markers, acrylic markers, art supplies, creative tools and related products. Product details, colours, finishes, surface suitability, availability, pricing and usage results may vary. Always check the individual product page, manufacturer information, age guidance, surface instructions and safety recommendations before purchasing or using a product.