


Sealing POSCA Paint on Ceramic Mugs: The Ultimate Australian Guide
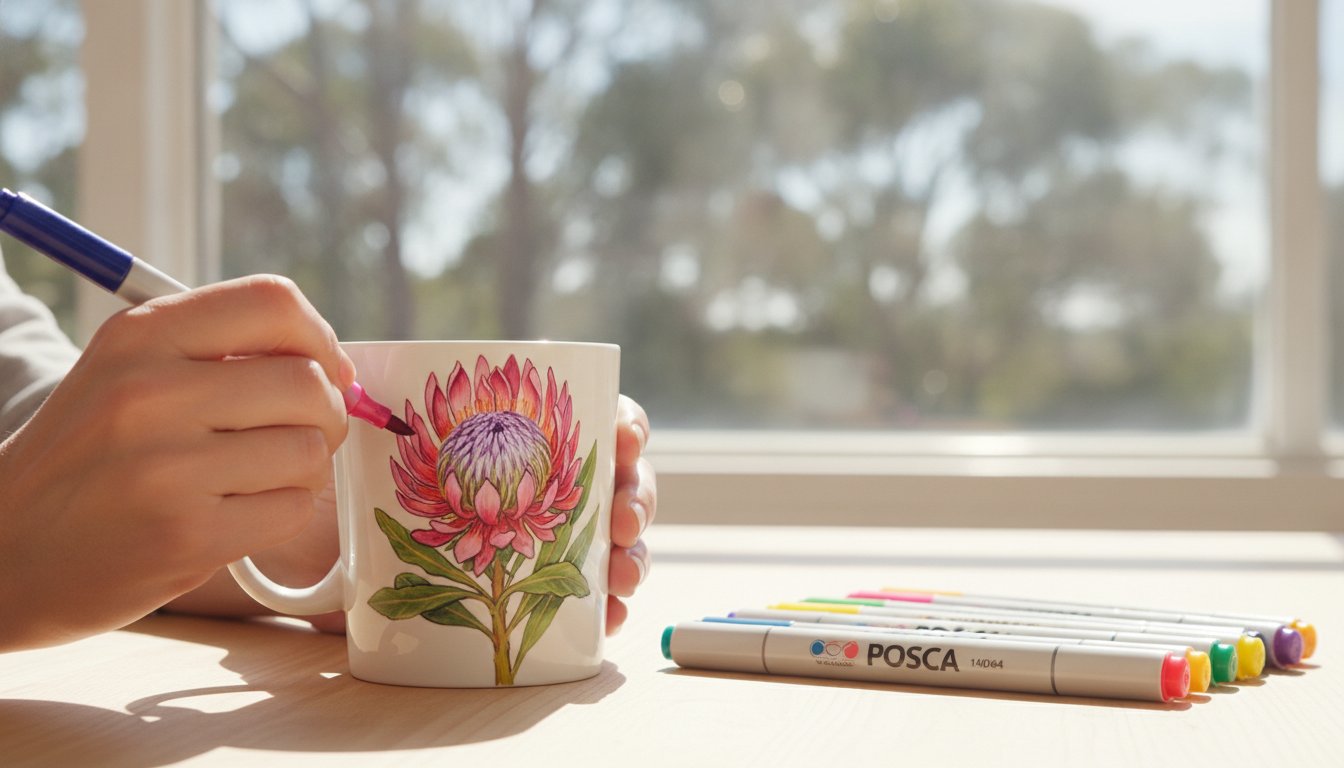
You have spent hours meticulously detailing a custom mug for a birthday gift, only to watch your hard work flake away after a single rinse in the sink. It is a common frustration for many Australian creators who love the vibrant, opaque finish of POSCA markers but struggle to make those designs permanent on slick surfaces. We understand that nothing is more discouraging than seeing a beautiful project smudge before it even has a chance to set properly.
This guide reveals the professional secrets for sealing posca paint on ceramic mugs, ensuring your hand-painted masterpieces remain as vivid as the day you drew them. You will discover the precise oven-baking techniques used by artists to set the paint and learn which protective sealants provide that final, professional-looking finish. We also provide clarity on which POSCA tip, such as the fine PC-3M or the versatile PC-5M, is best for your specific ceramic details. By the end of this article, you will have the confidence to bake and seal your creations with ease, turning everyday kitchenware into lasting, colourful works of art.
Key Takeaways
- Prepare your surface with isopropyl alcohol to remove manufacturing residues that often cause paint to peel or flake.
- Use the cold oven start method to bake your mug safely, which allows the acrylic resin to cure for maximum durability.
- Choose a spray varnish over a brush-on alternative for sealing posca paint on ceramic mugs to prevent your design from smudging.
- Apply a light mist coat of sealant first to create a protective barrier that won't react with the water-based pigment ink.
- Protect your finished masterpiece by sticking to gentle hand-washing and avoiding abrasive scourers that can scratch the paint.
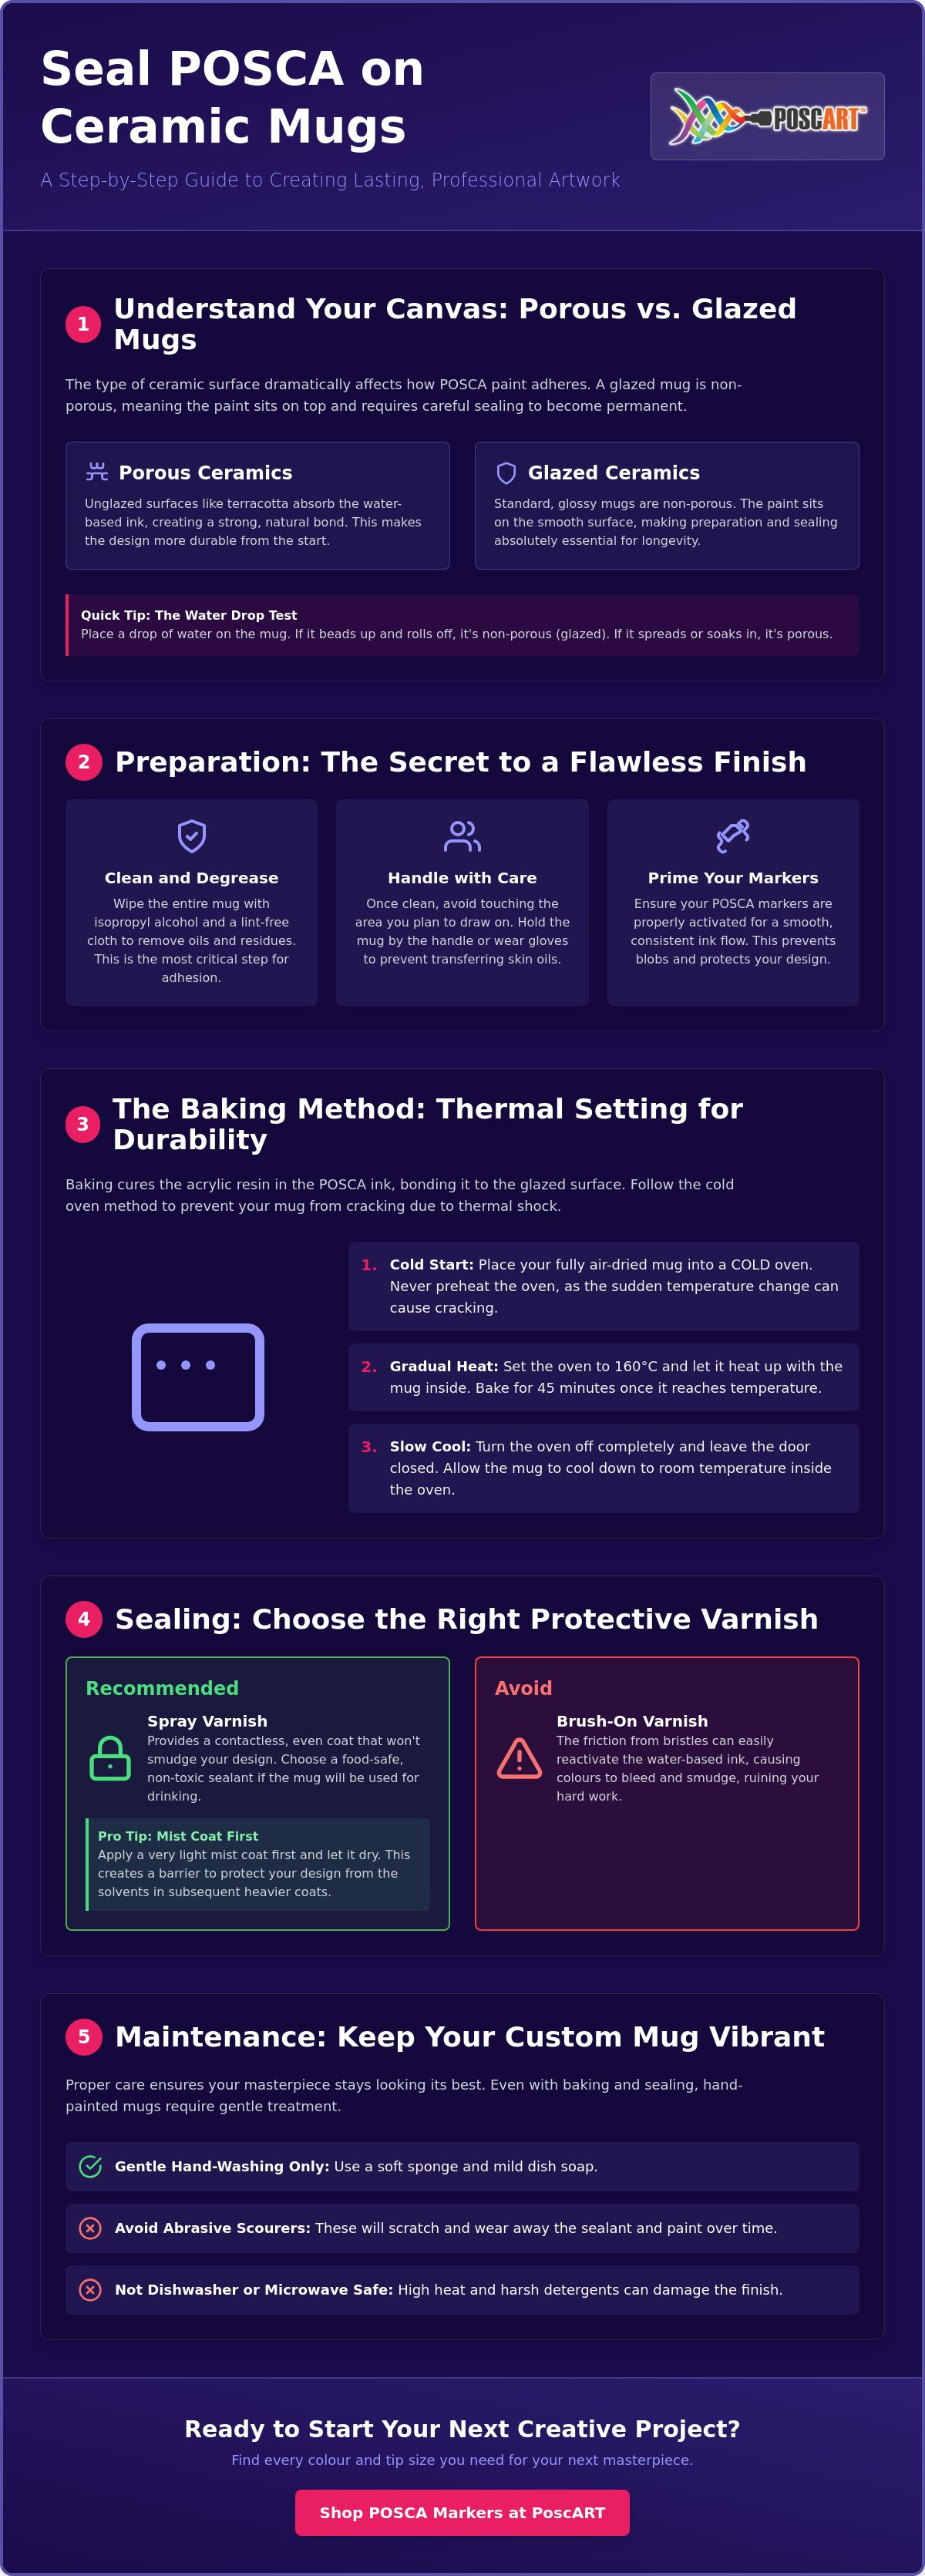
Understanding POSCA on Ceramics: Porous vs Glazed Mugs
POSCA markers are a staple for Australian creatives because they use a high-quality water-based pigment ink that offers incredible opacity. To grasp how these tools interact with your favourite coffee cup, it helps to understand what acrylic paint is and how it behaves on different surface densities. Unlike standard permanent markers that use dyes, POSCA paint consists of pigments suspended in an acrylic emulsion. On porous surfaces like unglazed terracotta or earthenware, the ceramic "drinks" this liquid into its tiny pores, creating a deep mechanical bond. However, the standard mugs you find at Kmart or Target are usually non-porous and glazed, meaning the paint simply sits on top of the surface. This makes the process of sealing posca paint on ceramic mugs a mandatory step for any piece intended for daily use rather than just sitting on a display shelf.
To better understand this concept, watch this helpful video:
The Science of Adhesion on Smooth Surfaces
The acrylic resin in individual POSCA pens requires a clean, stable surface to create a lasting "bite." On a high-gloss glazed mug, the surface is microscopically smooth. This lack of texture creates high surface tension, which is why you might notice the ink "beading" or pulling away into small droplets when you first apply your design. In the art world, we look for a mechanical bond where the paint physically locks into the surface. Since a glazed mug offers no such grip, we must rely on thermal setting and protective coatings to compensate. Without these steps, the paint remains vulnerable to moisture and friction, eventually flaking off after a few uses.
Why Your Choice of Mug Matters
When you're shopping for ceramic blanks, the finish of the mug is your most important consideration. While high-shine glazes are popular, matte or satin finishes often provide a much better "tooth" for the paint to adhere to. You can test the porosity of a potential project piece using a simple water drop test. Place a single drop of water on the ceramic; if it stays in a tight, spherical bead and rolls off without leaving a trace, the mug is non-porous and will require extra care during the preparation phase. If the water spreads out or leaves a dark patch, the ceramic is porous and will hold the colour more effectively. Regardless of the texture, sealing posca paint on ceramic mugs remains the final seal of quality that ensures your hard work doesn't disappear down the drain during the first wash.
Preparation: The Secret to a Permanent Design
Many hobbyists dive straight into the drawing process, but the foundation of sealing posca paint on ceramic mugs starts long before the pen touches the surface. New mugs often arrive with a thin film of manufacturing residue or wax that is invisible to the eye but fatal to paint adhesion. Even the natural oils from your fingertips can create a microscopic barrier that prevents the acrylic resin from bonding correctly. To ensure your artwork survives the test of time, you must achieve a clinical clean using isopropyl alcohol or methylated spirits. This step strips away contaminants and provides a pristine canvas for your creativity.
Before you begin your first stroke, make sure you know how to activate your POSCA markers correctly. A properly primed marker ensures a smooth, consistent flow of pigment without the risk of unexpected blobs or dry patches. Once the mug is cleaned, it must be bone-dry. Any residual moisture trapped under the paint can turn to steam during the baking process, which often leads to bubbling or peeling designs. Patience during the preparation phase is what separates a professional finish from a DIY disaster.
Degreasing Your Ceramic Surface
Use a lint-free microfibre cloth to apply your cleaning agent. Standard paper towels or tissues often leave behind tiny fibres that become trapped in your paint, ruining the smooth finish of your work. Once the surface is cleaned, try to hold the mug only by the handle or the very base to avoid reintroducing skin oils. We recommend wearing powder-free gloves if you have them. Avoid using standard dish soap for this initial degreasing. Many Australian dishwashing liquids contain skin-softening agents or oils that leave a residue. This film is a primary culprit when paint fails to stick during the final wash.
Choosing the Right POSCA Tip for Mugs
Selecting the correct tool for the job makes a significant difference in your final result. The POSCA PC-3M Fine Bullet Tip is our top recommendation for intricate patterns, outlines, and detailed illustrations. Its 0.9 to 1.3mm nib provides exceptional control on the curved surfaces of a mug. For filling in larger colour blocks or creating bold, modern lettering, the PC-5M Medium Bullet Tip is the industry standard. If you are adding microscopic details or signing the base of your work, the PC-1MR ultra-fine tip is indispensable. While we focus on the exterior, remember that these markers are for decorative use. Concerns regarding the potential for lead leaching in some low-quality ceramics highlight why we should keep our designs away from the rim and inner surfaces. If you are unsure which nib size suits your specific project, feel free to reach out to our creative support team for personalised advice.
The Baking Method: Thermal Setting for Longevity
Thermal setting is the most reliable approach for sealing posca paint on ceramic mugs. This heat treatment fundamentally alters the physical and chemical properties of the acrylic resin, forcing it to cure and harden into a more resilient surface. Before your project enters the oven, your design must be completely air-dried. We recommend a minimum wait of 24 hours. If you attempt to bake the mug while the ink is still damp in the centre, you risk the paint bubbling or cracking as trapped moisture tries to escape through the hardening outer layer.
Safety and patience are your primary companions during this stage. When you bake paint, it will release a slight odour, so ensure your kitchen is well-ventilated by opening a window or using a range hood. One of the most critical errors artists make is placing a room-temperature mug into a preheated oven. This sudden heat causes "thermal shock," which can lead to your ceramic cup cracking or shattering. Always use the "Cold Oven Start" method. Place your finished piece into a cold oven, then turn the heat on. This allows the ceramic and the paint to expand at the same rate, ensuring a stable and professional outcome.
The Step-by-Step Baking Schedule
Follow this specific schedule to achieve high-quality outcomes with your POSCA marker sets. While individual oven calibrations vary, these settings are the standard for most domestic appliances in Australia:
- Temperature: Set your oven to 160°C.
- Time: Bake for 45 minutes once the oven reaches the set temperature.
- Setting: Use a conventional bake setting. Avoid high-speed fan-forced settings, as intense air movement can occasionally disturb the paint surface before it sets.
- Cooling: Once the timer goes off, turn the oven off but leave the mug inside with the door closed. Do not remove it until it is completely cool to the touch.
The Lip Line Rule and Food Safety
We believe in creating art that is both beautiful and safe for everyone to enjoy. While POSCA markers are water-based and non-toxic, they aren't classified as "food safe" once cured in a domestic oven. The golden rule for any decorated drinkware is the 2cm lip line. Always leave at least two centimetres of unpainted space at the top rim of the mug where your lips would naturally touch. Similarly, the entire interior of the mug should remain unpainted. By keeping your vibrant designs on the exterior body of the cup, you ensure that your creative projects remain a safe addition to your morning coffee routine.
Sealing and Protecting Your Finished Artwork
Baking provides the essential structural bond, but applying a high-quality varnish is the final insurance policy for your design. This step is the key to successfully sealing posca paint on ceramic mugs against the rigours of daily use. We always recommend using a spray-on varnish rather than a brush-on variety. Because POSCA ink is water-based, the friction and moisture of a brush can reactivate the dried pigment. This often leads to smudging or "bleeding" of your crisp lines. A spray allows you to build a protective barrier without ever physically touching the artwork, preserving every fine detail of your PC-3M or PC-1MR linework.
The "Mist Coat" is a professional technique you should always practise. Instead of spraying a thick layer immediately, start with a very light, dusty application from about 30cm away. This initial dusting "locks" the paint in place. Wait roughly ten to fifteen minutes before applying a more traditional, even coat. This tiered approach prevents the solvents in the varnish from reacting too aggressively with the acrylic paint markers. For those looking to expand their creative horizons beyond drinkware, you can find more inspiration in our guide on what surfaces do POSCA pens work on.
Choosing Your Finish: Gloss, Matte, or Satin
The finish you choose can fundamentally change the aesthetic of your project. A gloss varnish is a favourite for many Australian artists because it adds a high-shine depth that mimics the look of a professional kiln-fired glaze. It makes your colours appear more saturated and vibrant. On the other hand, a matte finish is excellent for preserving the organic, sketchbook-style texture of a hand-drawn design. Satin offers a subtle, sophisticated middle ground. While some specialist sealers are marketed as dishwasher-safe, these often require a full 28-day curing period before they reach their maximum hardness. Even with these products, hand-washing remains the gold standard for longevity.
Application Techniques for a Flawless Seal
Our unique Australian climate plays a significant role in how your sealant cures. Avoid varnishing on days with high humidity or during a summer storm, as moisture in the air can become trapped under the spray. This usually results in a "cloudy" or milky finish that ruins the clarity of your design. Aim for a warm, dry day with minimal wind. Two to three thin, even coats are far superior to one heavy application. If your mug feels "tacky" or sticky to the touch after 24 hours, it usually just needs more time in a warm, dust-free environment to finish the curing process. If you encounter any unexpected results during the sealing phase, you can contact our specialist team for personalised troubleshooting advice.
Maintenance: Keeping Your POSCA Mug Vibrant
You have put in the hard yards cleaning, drawing, baking, and varnish-spraying. Now comes the daily upkeep. The absolute golden rule for any custom-painted ceramic is hand-washing only. While the process of sealing posca paint on ceramic mugs makes the design remarkably durable, it is not indestructible. Treat your mug like a piece of fine art. Use warm, soapy water and a soft cloth rather than a heavy-duty sponge. Never use green abrasive scourers or steel wool on the painted areas. These will eventually micro-scratch the varnish and dull the vibrant colours of your work.
Tea and coffee stains on the inside of the cup are inevitable over time. To remove these stubborn marks without risking the exterior art, use a gentle paste of bicarbonate of soda and water. Rub the paste onto the interior stains with your finger or a soft cloth, then rinse carefully. Avoid the "soak test" where you leave the mug submerged in a sink full of water for hours. Extended soaking can cause water to seep under the edges of the paint or sealant, eventually leading to lifting or peeling. If a specific section of your design does start to show wear after years of morning coffees, you can easily perform a touch-up using PoscART individual pens to restore its former glory.
Why Dishwashers are the Enemy of POSCA
Dishwashers are the natural enemy of hand-painted ceramics. The high-pressure steam and aggressive caustic detergents found in dishwasher tablets are designed to strip away organic matter. Unfortunately, they are also very effective at breaking down the acrylic bond you worked so hard to create. The intense heat cycles can cause the ceramic to expand and contract rapidly, which puts immense stress on the paint layer. Even if a sealant claims to be "dishwasher safe," we recommend avoiding the machine entirely to ensure a long life for your design. If you are gifting your creation, include a small, personalised note explaining these care steps. It ensures your hard work doesn't end up flaking off in someone else's next wash cycle.
Long-term Care and Colour Fading
POSCA markers use pigment-based ink, which offers excellent lightfastness compared to standard dye-based markers. This means your designs are naturally resistant to fading. However, the harsh Australian sun is powerful. If you leave your mug on a sunny kitchen windowsill for months on end, the UV rays will eventually take a toll on the brilliance of certain shades. Store your mugs in a cupboard or a shaded area when not in use to keep them looking fresh. As you grow more confident in your maintenance and design skills, you might find yourself wanting to expand your palette. Exploring different POSCA marker sets is a reliable way to keep your creative momentum going and start your next kitchenware masterpiece.
Master Your Next Ceramic Project
Mastering the art of sealing posca paint on ceramic mugs transforms a simple hobby into a way to create professional, lasting gifts. By focusing on clinical preparation, precise thermal setting at 160°C, and a protective spray varnish, you ensure your designs remain vibrant through years of use. Remember to always stick to hand-washing and keep your artwork away from the lip line to ensure your project stays both beautiful and safe. These small details in the finishing process make all the difference in the longevity of your work.
As a family-owned Australian business, PoscART is dedicated to supporting your creative journey. We maintain an extensive stock of all PC-5M and PC-3M colours to help you find the perfect shade for your next masterpiece. If you need expert advice for your specific project, our team is always ready to share their knowledge with fellow Australian artists. We take pride in being a reliable local resource for creators of all skill levels.
Browse the full range of genuine POSCA markers at PoscART today and start your next project with confidence. We can't wait to see the incredible designs you bring to life.
Frequently Asked Questions
Is POSCA paint dishwasher safe after baking?
No, POSCA paint is not dishwasher safe even after the baking and sealing process. The high-pressure steam and caustic detergents found in dishwasher tablets will eventually break down the acrylic bond. To keep your designs vibrant for years, stick to gentle hand-washing with a soft cloth and mild dish soap. Avoiding the machine is the best way to protect your hard work from flaking or fading prematurely.
Can I use POSCA markers on the inside of a mug?
You should never use POSCA markers on the inside of a mug or any surface that comes into direct contact with food or drink. While the paint is non-toxic, it is not certified as food-safe. Always leave a 2cm gap at the rim to ensure your lips don't touch the painted area while drinking. These markers are designed for decorating the exterior of your kitchenware only.
What temperature should I bake my POSCA mug at?
The standard temperature for baking your ceramic projects is 160°C for 45 minutes. It is vital to use a cold oven start to prevent the ceramic from cracking due to thermal shock. Place your mug in the oven, turn it on to 160°C, and start your timer once the oven reaches the target temperature. Let it cool completely inside the oven with the door closed before removing.
Do I need to varnish my mug if I have already baked it?
Varnish is highly recommended as a final step after baking to provide maximum durability. While baking cures the paint, a spray varnish adds an extra layer of protection against scratches and moisture. This is especially important for items you plan to use daily. Applying a varnish ensures that the process of sealing posca paint on ceramic mugs results in a professional, high-gloss or matte finish that lasts.
Why did my POSCA paint bubble or peel in the oven?
Bubbling or peeling usually happens because of trapped moisture or surface contaminants. If you don't let the paint dry for at least 24 hours, moisture can turn to steam in the oven and push the paint up. Similarly, if the mug wasn't cleaned with isopropyl alcohol before you started, manufacturing oils will prevent the paint from sticking. Always ensure a clinical clean before your first stroke.
Can I use POSCA on glass mugs instead of ceramic?
Yes, you can certainly use POSCA markers on glass mugs. The process is very similar to ceramic; you bake the glass at 160°C for 45 minutes to set the design. Just be aware that some glass is more sensitive to heat than ceramic. Always use the cold oven start and slow cooling method to avoid shattering your glassware during the thermal setting process.
How long should I let the paint dry before baking?
You must let the paint dry for at least 24 hours before it enters the oven. This waiting period allows all the water in the paint to evaporate completely. If you rush this step, you risk the paint bubbling or cracking during the curing process. Patience is the secret to achieving a smooth, professional-looking finish that won't flake off during the first wash.
Is it safe to use a microwave with a POSCA painted mug?
It is generally safe to microwave a mug decorated with POSCA markers once it has been baked and cured. However, you must avoid using metallic POSCA colours, such as gold or silver, as these contain metallic particles that can spark in a microwave. Always check that the original blank mug was labelled as microwave-safe by the retailer before you begin your creative project.
General Information
This article is provided as general information only to help customers compare and choose POSCA markers, acrylic markers, art supplies, creative tools and related products. Product details, colours, finishes, surface suitability, availability, pricing and usage results may vary. Always check the individual product page, manufacturer information, age guidance, surface instructions and safety recommendations before purchasing or using a product.