


How to Make POSCA Permanent on Plastic: The Complete Australian Artist’s Guide
Have you ever spent hours meticulously detailing a plastic surface only to have your artwork smudge or peel away within days? It is a heartbreaking moment for any creator, yet many artists assume that acrylic paint markers simply aren't meant for non-porous materials. The truth is that mastering how to make posca permanent on plastic isn't about luck; it is about following a precise technical workflow that ensures your designs bond properly to the surface.
We understand the frustration of seeing a vibrant project ruined by a reactive varnish or a simple accidental scratch. You want a finish that looks professional and stands up to daily handling without losing its brilliance. This guide provides the exact three-stage process required to transform your temporary sketches into durable, scratch-resistant masterpieces. We will walk you through essential surface preparation, layering techniques with your favourite POSCA markers, and the critical final step of choosing the right sealer to protect your work for the long term. From selecting the correct marker tip to applying the final coat of Micador Crystal Clear, you will gain the confidence to create on any plastic surface with total peace of mind.
Key Takeaways
- Learn why the "De-grease, Abrade, Clean" (DAC) workflow is the essential foundation for ensuring your acrylic markers bond correctly to smooth surfaces.
- Discover the exact steps for how to make posca permanent on plastic by using a scientific approach to surface tension and mechanical bonding.
- Master the "thin-to-thick" layering technique to prevent your base colours from re-wetting and smearing during the creative process.
- Identify the specific types of spray varnish that provide a professional, scratch-resistant finish without reacting with the paint markers.
- Understand the difference between surface drying and full curing to ensure your finished project remains vibrant and durable for years to come.
Why Plastic Requires Special Care with POSCA Markers
POSCA markers are beloved for their vibrant, opaque pigment, but they aren't traditional permanent markers in the way solvent-based pens are. Inside every barrel is a high-quality Acrylic paint that is water-based and non-toxic. While this makes them safe for school projects and easy to blend, it creates a unique challenge when working on plastic. Because plastic is non-porous, the paint cannot soak into the fibres like it does on a canvas or a piece of wood. Instead, the paint film sits on the very top of the surface, held only by a thin layer of acrylic resin. Understanding this interaction is the first step in learning how to make posca permanent on plastic.
To better understand this concept, watch this helpful video:
The primary goal of any plastic project is to create a mechanical bond. We need to give the paint something to "grab" onto. Without proper preparation, the paint remains a fragile film that can be wiped away with a damp cloth or chipped off with a fingernail. This applies to everything from customising plastic lunchboxes for the kids to detailing high-end model kits or phone cases. Learning how to make posca permanent on plastic involves more than just a steady hand; it's about chemistry and surface tension.
The Science of Non-Porous Surfaces
High-density plastics often have a high surface energy, which causes water-based liquids to bead up rather than spread out evenly. On a porous surface, the pigment is locked within the material. On plastic, the paint relies entirely on the strength of its own dried film. In the Australian climate, environmental factors play a massive role. High humidity in Queensland or the Top End can slow down the initial evaporation of the water, while the intense summer heat in Perth or Adelaide might cause the paint to dry too quickly, leading to cracking if applied too thickly.
Identifying Your Plastic Type
Not all plastics are created equal. Smooth, glossy plastics are the most difficult to work with because they offer zero friction. Textured or matte plastics provide a slightly better "tooth" for the markers, but they still require sealing for longevity. You should also be wary of "soft" plastics like silicone or certain flexible PVCs. These materials often contain oils or plasticisers that migrate to the surface, causing the acrylic paint to peel or remain permanently tacky. For a deeper look at which materials play nice with your pens, check out our guide on surfaces and craft materials.
Preparing Your Plastic Surface for Maximum Adhesion
Roughly 90% of all permanence issues with paint markers on plastic stem from poor surface preparation. It is a common mistake to think you can simply uncap a pen and start drawing on a new phone case or lunchbox. If you want to master how to make posca permanent on plastic, you must treat the surface with the same respect as a professional automotive painter would. Most plastic products arrive from the factory coated in "mould release" agents; these are invisible chemicals designed to help the item slide out of its manufacturing mould. If you don't remove these, your paint is essentially trying to bond to a layer of grease.
We advocate for the "De-grease, Abrade, Clean" (DAC) workflow for every plastic project. For artists in Australia, isopropyl alcohol is your most reliable tool for this task. You can find it at most local hardware stores or chemists. Avoid using standard glass cleaners, especially those with "anti-fog" or "streak-free" additives. These products often contain surfactants or silicones that stay on the plastic, creating a barrier that prevents the acrylic resin from gripping the substrate. If you are ever unsure if your cleaning agent is suitable for a specific material, our team can offer personalised advice for your project to ensure you start on the right foot.
Step 1: Deep Cleaning and Degreasing
Start by thoroughly wiping the entire surface with a lint-free cloth soaked in isopropyl alcohol. This step removes factory oils, dust, and any fingerprints from previous handling. A great way to verify your progress is the "water bead test." Drip a small amount of clean water onto the plastic. If the water beads up into tight droplets, the surface still has oils on it. If the water sheets off in a flat, even layer, you have successfully lowered the surface tension. Always handle the item by the edges after this point to avoid re-contaminating it with your own skin oils.
Step 2: Creating "Tooth" Through Light Sanding
Smooth, high-gloss plastics are notoriously difficult for water-based markers because they lack "tooth." To fix this, use a fine-grit sandpaper, specifically between 400 and 600 grit. The goal is not to leave deep, visible scratches, but to create a microscopic texture that the paint can mechanically bite into. Understanding the science of paint adhesion helps here; you are essentially increasing the surface area for the paint to latch onto. For high-gloss items like hard plastic cases, a light, circular scuffing motion until the gloss disappears is usually enough. Once sanded, wipe the surface one last time with alcohol to remove the plastic dust. This preparation phase is the most critical part of learning how to make posca permanent on plastic.
Mastering the Application: Tips for Smooth Plastic Coverage
Once your surface is prepped, the way you apply the paint determines the durability and professional look of the final piece. Applying water-based paint to a smooth substrate requires a different rhythm than working on paper or canvas. If you press too hard or flood the surface, the paint will pool or "bead" rather than spreading evenly. This is where understanding adhesion surface science becomes practical; you're managing the way the liquid acrylic interacts with the surface tension of the plastic. To truly understand how to make posca permanent on plastic, you must master the art of thin, controlled layers.
When working on vertical surfaces, such as the side of a plastic storage tub or a model kit, ink management is your biggest challenge. Gravity will pull any excess ink downwards, creating unsightly drips or thick "lips" of paint at the bottom of your design. To prevent this, always test your marker flow on a scrap piece of paper before touching your project. If the marker feels "juicy" or has just been primed, dab it on a paper towel first. This ensures you're applying a consistent film rather than a flood of liquid that will likely slide off the smooth plastic.
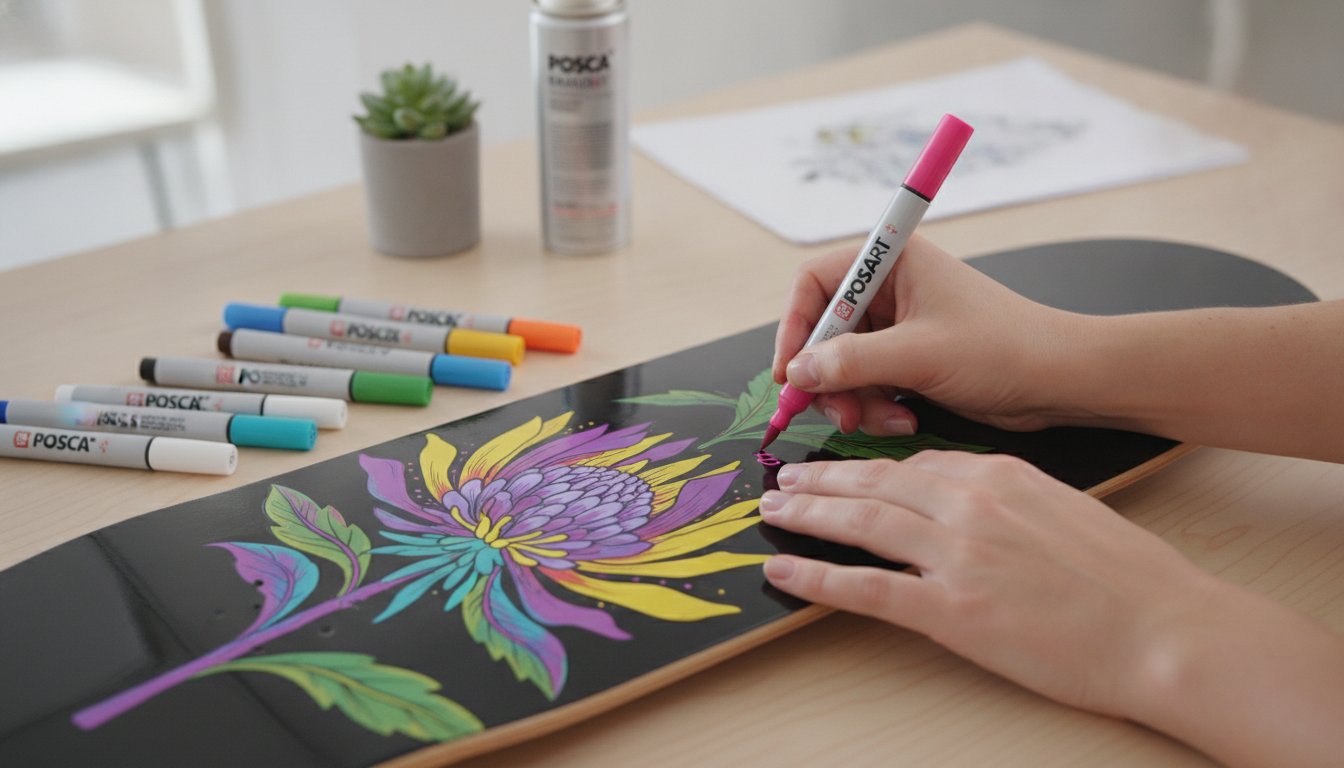
Choosing the Best POSCA Tip for Plastic
The POSCA PC-5M Medium Bullet Tip is the industry workhorse for a reason. Its 1.8-2.5mm nib provides enough coverage for base layers without dumping excessive ink that leads to puddles. For intricate linework or adding highlights once your base is bone-dry, switching to the PC-3M Fine Bullet Tip ensures precision. Having a diverse range of Individual POSCA Pens allows you to build depth and vibrant contrast without compromising the bond between the paint and the prepped surface.
Layering Techniques to Prevent Smudging
Layering is where most artists run into trouble. The "thin-to-thick" rule is vital: start with a light, even coat of your base colour. Don't worry if it looks slightly transparent at first; a second thin layer is far better than one thick, gloopy one. Use a "light touch" approach, gliding the nib across the surface rather than scrubbing it. Scrubbing can actually re-activate the sanding dust or lift the previous layer of paint.
In humid Australian conditions, a hair dryer on a cool setting is your best friend to speed up the process. Avoid using the hot setting, as extreme heat can cause some plastics to warp or the acrylic resin to dry too quickly and crack. If you make a mistake, wait for the paint to dry completely before gently scraping it away with a toothpick. This prevents you from smearing the wet ink and ruining the clean base layer you've already established. This patience is a key part of how to make posca permanent on plastic, ensuring every layer is stable before the next one arrives.
Total drying time between colours is non-negotiable for crisp results. While the paint might feel dry to the touch in minutes, it takes longer to truly set on a non-porous surface. For sharp outlines, wait at least 20 minutes before layering a new colour on top. This prevents the "bleeding" effect where a wet outline pulls the pigment from the layer beneath it, keeping your artwork looking sharp and professional.
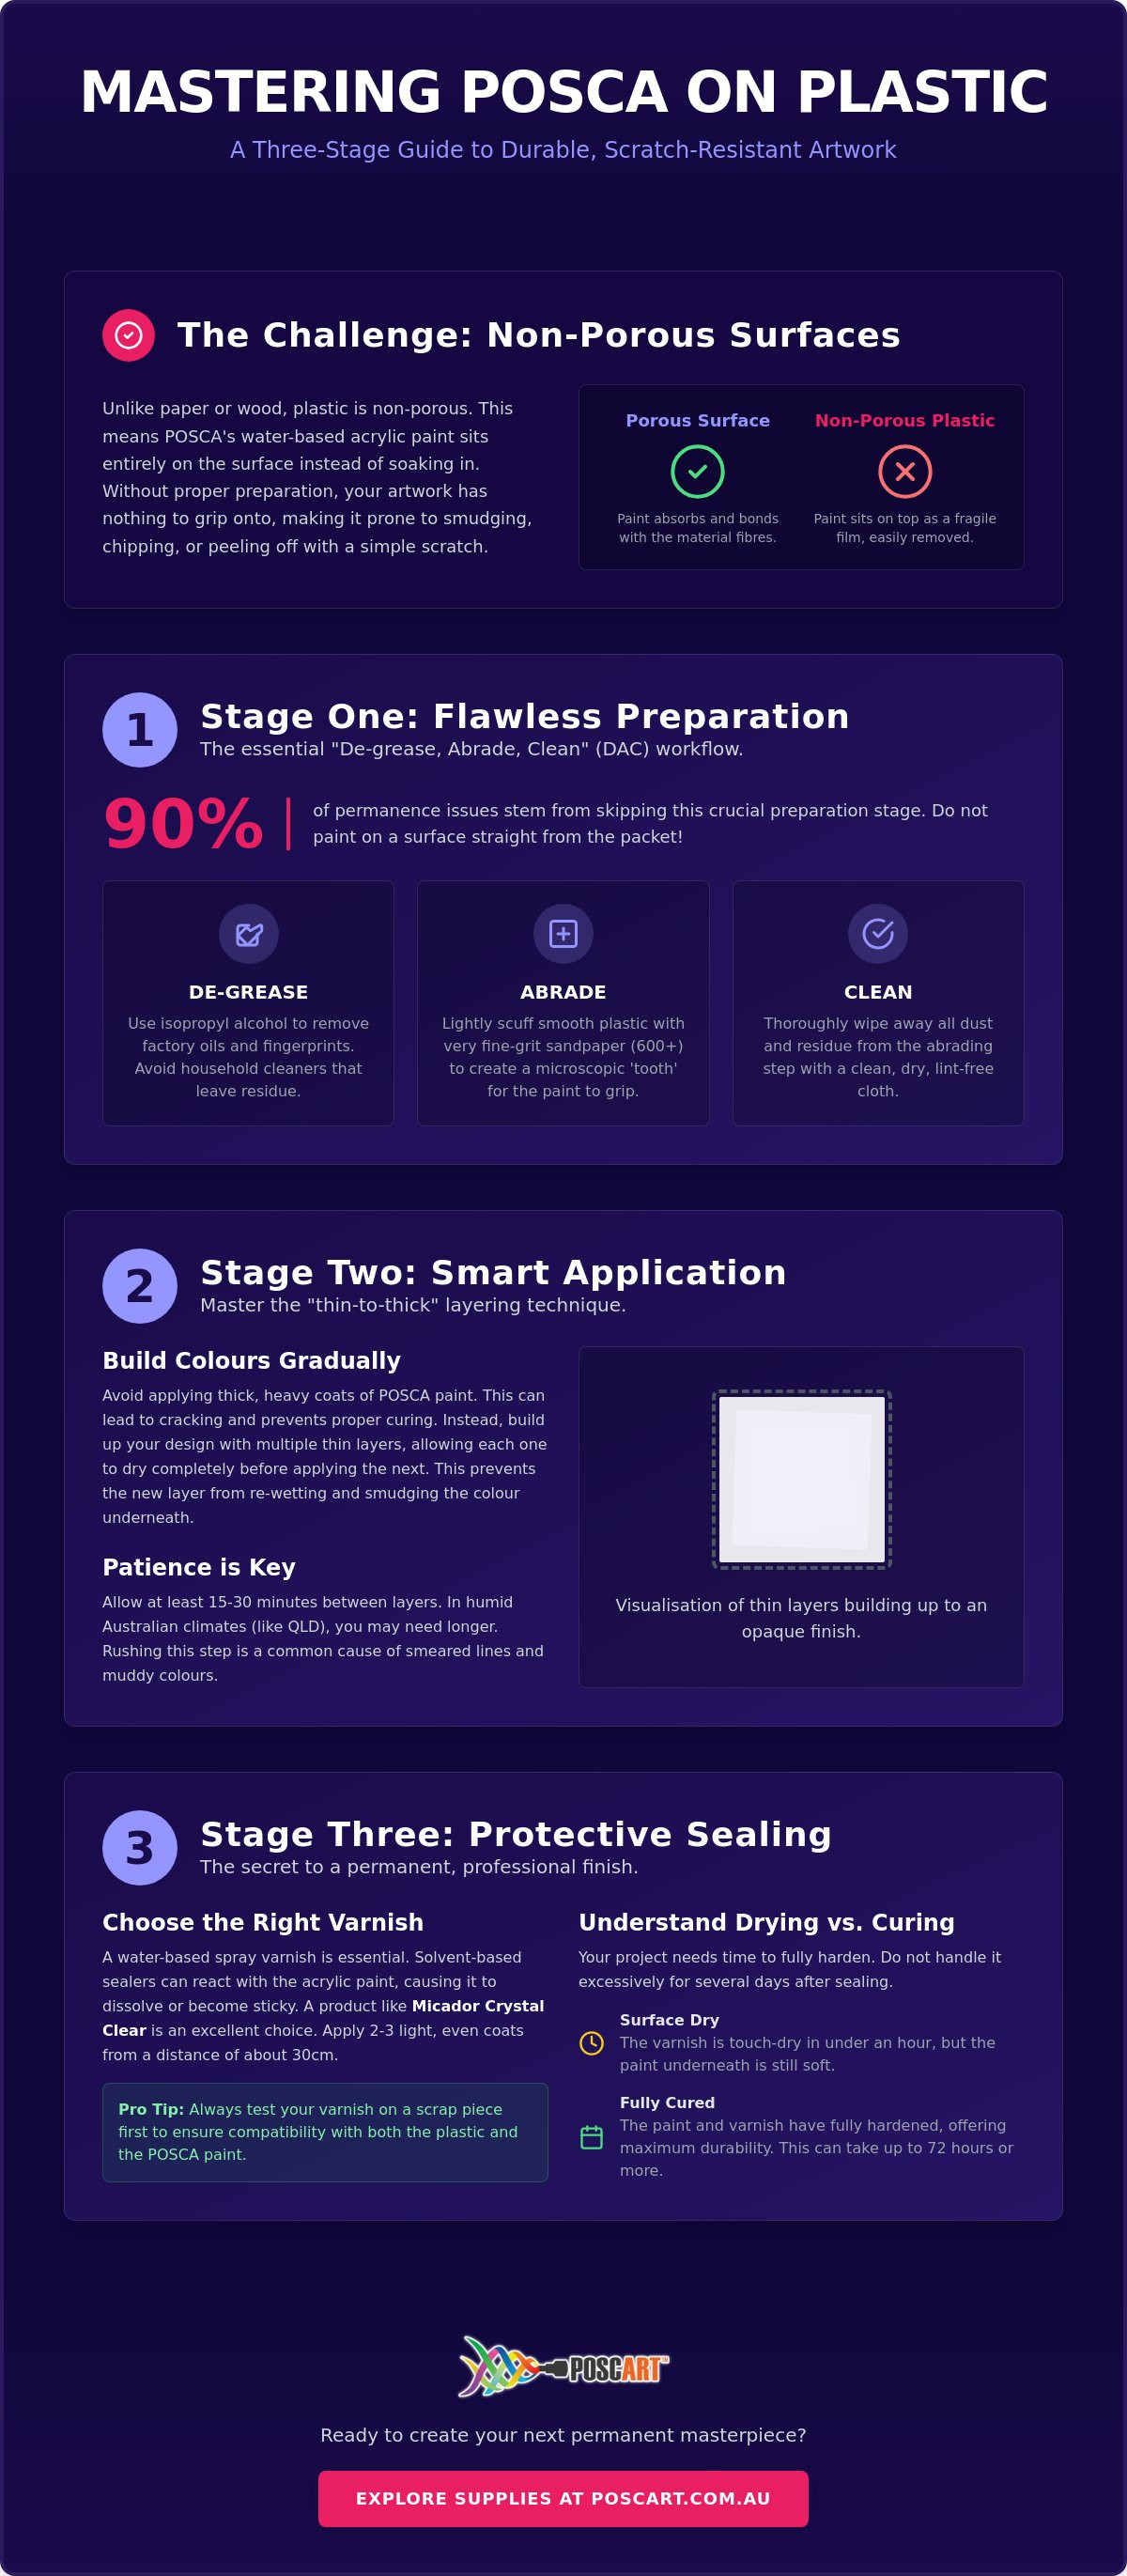
Sealing Your Design: The Secret to Permanent Results
Without a dedicated sealer, even the most beautifully executed POSCA design on plastic remains vulnerable. Because the paint sits on top of the non-porous surface, it is technically only "semi-permanent" until it is locked in. A simple bump or a stray drop of water can cause the pigment to lift or scratch away. Understanding how to make posca permanent on plastic requires a final commitment to the sealing phase, which provides the chemical shield necessary for long term durability.
The chemistry of your sealer matters immensely. Many artists mistakenly reach for heavy duty solvent-based varnishes, but these can contain harsh chemicals that react with the water-based acrylic paint, causing your crisp lines to melt, bleed, or turn yellow. We recommend using a water-based or acrylic-specific spray varnish, such as the Micador Crystal Clear range which is a staple for Australian creators. These aerosols provide a fine, even mist that protects the artwork without disturbing the underlying layers. If you need help selecting a varnish that won't react with your specific plastic project, reach out to our creative support team for expert guidance.
Safety is paramount when using aerosol sprays. Always work in a well-ventilated outdoor space, but be mindful of the Australian elements. Avoid spraying on particularly windy days to prevent dust and debris from landing in your wet varnish. The "mist coat" technique is your best defence against ink bleed; this involves applying a very light, almost dry dusting of sealer from about 30cm away and letting it dry before applying fuller coats. This initial dust layer acts as a barrier, stabilising the paint before the heavier wet coats are applied.
Comparing Sealing Methods
Choosing the right finish depends on your desired aesthetic and the intended use of the object. Use this table to decide which method suits your project:
| Sealer Type | Best For | Durability | UV Protection |
|---|---|---|---|
| Matte Spray | Subtle, professional look; hides surface scratches. | High | Excellent |
| Gloss Spray | Vibrant colours; provides a high-shine, "wet" look. | Very High | Excellent |
| Brush-on Acrylic | Heavy duty protection for items handled frequently. | Extreme | Variable |
How to Apply Varnish Without Ruining Your Art
Patience is the final ingredient in learning how to make posca permanent on plastic. You must wait at least 24 hours after finishing your drawing before you even think about sealing. This ensures the acrylic resin has fully dehydrated. When you are ready, hold the can 30cm from the surface and move in slow, circular movements. Multiple thin coats are always superior to one thick, drippy coat, as they prevent the varnish from pooling and creating cloudy patches or "orange peel" textures on your plastic substrate.
Caring for Your Finished POSCA Plastic Projects
Your project might look like a finished masterpiece within an hour of sealing, but the chemical bond is still maturing beneath the surface. Understanding the difference between drying and curing is the final, essential step in how to make posca permanent on plastic. While the paint and varnish will feel dry to the touch relatively quickly, they haven't reached their maximum hardness. Treating your item with care during this window prevents the design from lifting or indenting later on.
Cleaning your custom pieces requires a gentle touch to preserve the integrity of the sealer. Never use abrasive sponges, green scourers, or harsh chemical cleaners on your artwork. These will micro-scratch the varnish and eventually dull the vibrant pigment of your paint pens. Instead, use a soft microfibre cloth with lukewarm, soapy water. If the item is purely decorative, a simple dusting with a dry cloth is usually sufficient to keep the colours looking fresh. If you are planning a large-scale project that requires high durability, you might want to browse our POSCA Marker Sets to ensure you have a consistent supply of backup colours for future touch-ups.
Storage is another factor that many artists overlook. Avoid stacking custom plastic pieces directly on top of each other, especially in the height of an Australian summer. Intense heat can cause even high-quality varnishes to soften slightly. If two sealed surfaces are pressed together in a hot environment, they can bond, leading to the paint tearing away when you try to separate them. Place a sheet of wax paper or acid-free tissue paper between items if you must stack them for storage.
For creators who have turned their passion into a commercial venture, finding the right way to transport and store finished goods is vital; D-PACK provides advanced packaging and logistics solutions that ensure your custom plastic products reach customers in perfect condition without the risk of surface damage during transit.
The Curing Process Explained
Curing is the process where the acrylic resin fully dehydrates and hardens into a permanent film. In humid coastal regions or during a wet southern winter, this process can take significantly longer. Your project might feel slightly tacky or "grabby" for a few days; this is a normal part of the outgassing process. A simple way to test if a piece is fully cured is to gently smell it. If you can still detect a faint scent of paint or aerosol, the solvents are still evaporating. Most creators allow at least 14 to 21 days for a full cure before subjecting the item to heavy daily use. This patience is a vital part of how to make posca permanent on plastic.
Long-term Maintenance and Touch-ups
Even with the best preparation, life happens. If you notice a small scratch in your design, don't panic. You can carefully clean the area with a tiny bit of isopropyl alcohol on a cotton bud, re-apply the colour with a fine-tip marker, and spot-seal the area once dry. For items that stay outdoors, such as garden ornaments or letterbox numbers, be aware that the Australian sun is incredibly harsh. Choosing a varnish with high UV protection will slow down the fading process, but a fresh coat of sealer every year or two will keep the artwork looking professional for much longer.
Ready to start? Organise your kit and prepare for your next project with our POSCA marker sets.
Start Your Next Plastic Customisation Project Today
Mastering how to make posca permanent on plastic is a rewarding skill that opens up a world of upcycling and personalised design possibilities. By prioritising the "De-grease, Abrade, Clean" workflow and allowing for a full curing period, you ensure your artwork remains as vibrant as the day you created it. Remember that patience during the sealing phase is the difference between a temporary sketch and a professional finish that stands the test of time.
As an Australian family-owned and operated specialist, PoscART is here to support your creative journey with authentic supplies and expert advice. We provide fast national shipping across Australia so you can get started on your next project without delay. If you have questions about specific materials or need a recommendation for your classroom, please Shop the Full Range of Genuine POSCA Markers at PoscART. We're proud to be your local staple for all things creative. Grab your favourite colours, trust the process, and enjoy the satisfaction of seeing your designs come to life.
Frequently Asked Questions
Is POSCA permanent on plastic without varnish?
POSCA markers are not naturally permanent on most plastic surfaces without a protective sealer. Because the paint is water-based, it sits on top of the non-porous material rather than soaking in. Without a varnish, your design remains vulnerable to scratches, chipping, and moisture. To ensure your hard work lasts, following the full process for how to make posca permanent on plastic is essential for any professional-looking project.
Can I use POSCA markers on my phone case?
You can certainly use these markers to customise a phone case, provided it is made of hard plastic rather than soft silicone. To ensure your design lasts, you must follow the "De-grease, Abrade, Clean" workflow to remove oils. Once the artwork is finished, applying a few thin coats of a water-based spray varnish is vital to protect it from the constant friction and heat of daily handling.
What is the best varnish to use for POSCA on plastic?
A water-based or acrylic spray varnish is the most reliable choice for sealing your work. Solvent-based aerosols can be too aggressive and may cause the acrylic paint to bleed or react poorly with the plastic. Many Australian artists prefer Micador Crystal Clear in a matte or gloss finish. It provides a durable shield that won't yellow over time, keeping your favourite colours vibrant and sharp for years.
How long does POSCA take to dry on plastic surfaces?
While the paint usually feels dry to the touch within 5 to 10 minutes, you should wait at least 24 hours before applying a sealer. On smooth plastic, the moisture takes longer to evaporate completely from the paint film compared to paper. Rushing the sealing process can trap moisture, which often leads to a cloudy finish or poor adhesion between the paint and the varnish layer.
Will POSCA pens wash off plastic if they get wet?
Unsealed POSCA art will likely smudge or wash away if it comes into contact with water. Since the paint is water-based, moisture re-activates the dried pigment on non-porous surfaces. Once you have mastered how to make posca permanent on plastic with a proper sealer, your project becomes water-resistant. This allows you to safely wipe down your custom items with a damp cloth without fear of ruining the design.
Do I need to sand the plastic before painting with POSCA?
Sanding is highly recommended for smooth or high-gloss plastics to create a mechanical "tooth" for the paint. Use a very fine 400 to 600 grit sandpaper to lightly scuff the surface until the shine disappears. This small step significantly improves how the paint markers bond to the substrate. It prevents the paint from peeling off in large flakes, especially on items that are handled frequently.
Can I use a clear nail polish to seal my POSCA art?
Clear nail polish is generally unsuitable for sealing POSCA art on plastic. It is often too brittle and prone to cracking as the plastic expands and contracts with temperature changes. Additionally, the harsh solvents found in many nail polishes can react with the acrylic paint. This often causes your detailed linework to smear or discolour, potentially ruining hours of careful drawing and creative effort.
Why is my POSCA paint bubbling on the plastic surface?
Bubbling usually occurs when there are residual oils, fingerprints, or factory release agents on the plastic surface. This contamination prevents the paint from laying flat and bonding correctly. It can also happen if you apply a very thick layer of paint in high heat, causing the top layer to skin over before the moisture underneath has escaped. Always work in thin layers and ensure your surface is perfectly clean.
General Information
This article is provided as general information only to help customers compare and choose POSCA markers, acrylic markers, art supplies, creative tools and related products. Product details, colours, finishes, surface suitability, availability, pricing and usage results may vary. Always check the individual product page, manufacturer information, age guidance, surface instructions and safety recommendations before purchasing or using a product.