


How to Blend POSCA Markers on Canvas: An Australian Artist’s Guide
Have you ever looked at a professional canvas mural and wondered how the artist achieved those buttery smooth transitions using nothing but paint pens? If you have tried it yourself, you likely know the struggle of working against the clock. Learning how to blend posca markers on canvas can feel like a race against fast-drying ink, often resulting in streaky finishes or even damaged nibs on rough textures. It is a common hurdle for many Australian artists, whether you are a seasoned professional or just starting your creative journey.
We understand that your canvas is a significant investment and the fear of ruining it can be a real creative block. This guide is designed to give you the confidence to master the art of seamless gradients and professional colour transitions using your favourite POSCA paint pens. You will discover practical techniques for moisture management, surface preparation, and layering that ensure vibrant mixed colours every time. We will walk through the essential steps to transform your large-scale canvas art from flat blocks of colour into smooth, professional masterpieces.
Key Takeaways
- Learn why preparing your surface with acrylic gesso is the secret to managing the unique absorbency of the canvas weave.
- Master how to blend posca markers on canvas by using a dark-to-light layering technique while the paint is still wet for seamless transitions.
- Discover how to reactivate semi-dry paint with a tiny drop of water to rescue gradients that have started to set on textured surfaces.
- Identify the best marker sizes for the job, such as the PC-5M for broad coverage and the PC-3M for refined detail work.
- Protect your creative projects by understanding essential curing times and why spray-on finishes are safer than brush-on varnishes for paint pens.
Understanding the POSCA and Canvas Relationship
Blending is the creative process of mixing two or more wet pigments directly on your work surface to create a new shade or a soft transition between colours. When you use POSCA markers, you are working with high-quality, water-based acrylic paint contained within a convenient marker body. This allows for the precision of a drawing tool with the vibrant results of traditional painting. However, mastering how to blend posca markers on canvas requires an understanding of how these two materials interact. Unlike smooth plastic or glass, canvas is a porous fabric that actively pulls moisture away from the paint.
Because the paint is water-based, it begins to dry the moment it hits the air. On a "thirsty" surface like canvas, this process happens even faster as the fibres soak up the liquid. This makes speed the most critical factor in your workflow. To achieve a professional gradient, you must manipulate the paint while it is still in its liquid state. Once the pigment bonds with the fabric and dries, it becomes permanent and water-resistant, making further blending impossible without adding new layers.
To better understand this concept, watch this helpful video:
Why Canvas Texture Affects Your Gradient
The physical texture of a canvas is known as its "tooth." This weave is what gives canvas art its classic look, but it can be a challenge for smooth blending. These tiny ridges and valleys trap the pigment, often leading to a streaky appearance if you don't use enough paint. On a raw, unprimed canvas, the absorption is so aggressive that the paint barely has time to move. Most artists prefer a primed surface, though even then, the texture can cause the marker nib to skip over the lower sections of the weave. Finding the right balance of surface preparation is key to ensuring your colours flow together instead of sitting in isolated stripes.
The Role of POSCA Acrylic Pigment
It's helpful to remember that POSCA markers aren't just pens; they are portable acrylic paint dispensers. This pigment is incredibly opaque and lightfast, which means it won't fade easily under the harsh Australian sun. The opacity is what allows you to layer a bright yellow directly over a deep blue to create a highlight, provided the bottom layer is dry. Understanding the pigment behaviour is essential when learning how to blend posca markers on canvas because it dictates how much pressure you need to apply to the nib.
For the initial blending stage, you need a marker that can saturate the canvas weave quickly. The POSCA PC-5M Medium Bullet Tip is a staple for this reason. It delivers a consistent, heavy flow of paint that stays wet just long enough for you to work it into the surrounding colours, giving you the control needed for large-scale projects. Using a smaller tip for broad blending often leads to the paint drying too fast, which is where those unwanted streaks begin to appear.
Essential Supplies for Seamless Canvas Blending
Success with paint markers starts with your toolkit. While the pens are the stars of the show, several supporting tools make the difference between a patchy result and a professional finish. When you are learning how to blend posca markers on canvas, having the right supplies on hand allows you to focus on your technique rather than fighting against the materials. You don't need an entire studio, but a few specific items will help you manage the fast drying times of acrylic pigment.
Your core markers should include the PC-5M for broad coverage and the PC-3M for refined detail. Because canvas is naturally abrasive, it can wear down marker nibs faster than paper or smooth card. Keeping a few replacement tips nearby is a smart move to ensure your lines stay crisp throughout the project. Beyond the markers, two 'secret weapons' will change your workflow: a small jar of clean water and a soft synthetic brush. These allow you to move the paint around the canvas weave before it sets, giving you much more control over your gradients.
Choosing Your POSCA Marker Sizes
The PC-5M is often considered the 'Goldilocks' size for canvas work. It is large enough to saturate the fabric quickly but small enough for controlled blending. For expansive backgrounds or large murals, the POSCA PC-7M Broad Bullet Tip is a better choice. It lays down a high volume of paint that stays wet longer, giving you a wider window to mix your colours. Conversely, if you are working on fine-line transitions in tight spaces, the PC-1MR provides the precision you need without flooding the area. If you aren't sure which nib suits your specific project, you can always check our guide on marker specifications for more detail.
Preparing the Surface: The Gesso Secret
Most shop-bought canvases come pre-primed, but they are often still too absorbent for smooth marker work. Applying one or two extra layers of white or clear acrylic gesso is the best way to create a 'slip' on the surface. This extra primer fills in the deepest parts of the canvas weave. This means your paint sits on top rather than sinking in. For an even smoother finish, sand the surface lightly with fine-grit sandpaper between gesso layers. This reduces the 'tooth' of the canvas, preventing your marker nibs from skipping and helping you achieve those buttery smooth transitions that look like they were airbrushed on.
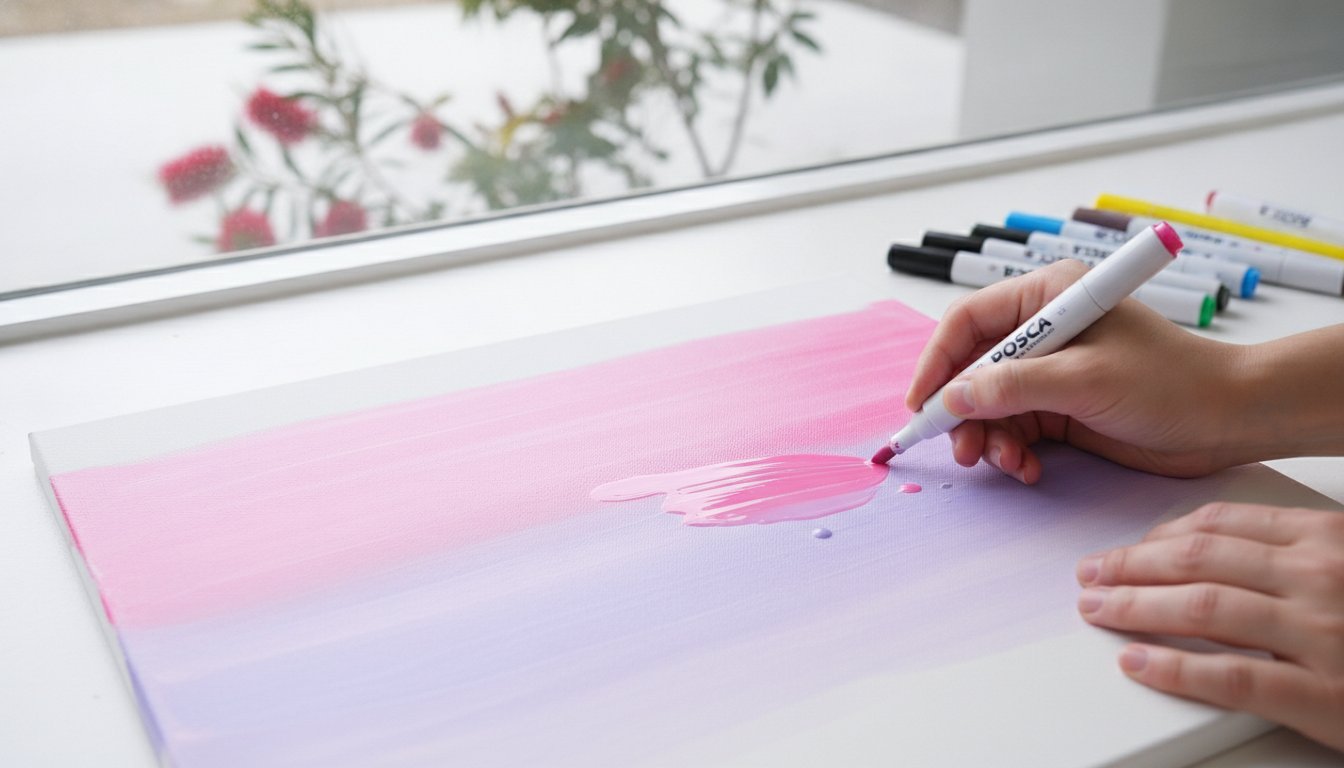
Step-by-Step POSCA Blending Techniques for Canvas
Once you have your primed surface and markers ready, it's time to put pen to fabric. Mastering how to blend posca markers on canvas is largely a game of timing and moisture control. Because the acrylic paint dries quickly, you need to be decisive. Working in small sections, roughly the size of a smartphone, ensures the paint stays fluid enough to move. If you try to cover the entire canvas at once, the edges will set before you can reach them, leading to those unwanted harsh lines.
- Step 1: Activate and prime your markers thoroughly on a scrap piece of paper. Ensure the flow is consistent and the nib is fully saturated before touching your canvas.
- Step 2: Apply your darkest colour first in a generous layer. Don't be afraid to lay it on thick; the canvas weave needs plenty of pigment to stay wet.
- Step 3: Apply the lighter colour immediately, slightly overlapping the first. The two wet edges should touch.
- Step 4: Use a circular or "scrubbing" motion with the lighter marker to marry the two wet pigments. This physical mixing on the surface creates the middle transition shade.
- Step 5: Clean the nib of your lighter marker immediately by scribbling on your scrap paper until the original colour returns.
The Wet-on-Wet Technique
Wet-on-wet is the application of fresh pigment into a still-moist base layer. This technique is the most effective way to achieve a soft, painterly look. If the paint starts to drag or feel tacky, your "window" for blending is closing. You can extend this time slightly by using a synthetic brush dipped in a tiny amount of clean water. Soften the edges of your POSCA strokes with the damp brush to pull the pigment across the weave. Be careful not to use too much water, or you'll thin the acrylic paint into a translucent wash, which can ruin the opacity POSCA is known for.
The "Blender Marker" Method
If you find that direct mixing is muddying your work, try using a white or very light grey marker as a dedicated blender. This tool acts as a bridge between two darker shades. Instead of rubbing the two primary colours together, you use the lighter shade to pull the pigments toward each other. It's a safer way to learn how to blend posca markers on canvas without over-working the surface. To keep your work bright, clean the "blender" nib frequently. Over-mixing often leads to dull, greyish tones, so stop once the transition looks smooth to the eye.

Overcoming Common Blending Challenges on Textured Surfaces
Even with thorough preparation, you might find that the paint sets faster than expected. The most frequent complaint from artists is that their work looks like a series of stripes rather than a smooth gradient. This happens when the first colour dries before the second colour can be integrated. Learning how to blend posca markers on canvas often involves a bit of rescue work. If you encounter a harsh edge, you can sometimes reactivate semi-dry pigment by using a synthetic brush with a tiny drop of clean water. This moisture allows you to "tease" the paint back into a liquid state just long enough to bridge the gap between shades.
Canvas texture can also be quite brutal on your equipment. If you notice your marker tip is "pilling" or leaving behind tiny clumps of fabric, the weave is likely tearing the nib. This usually happens when you apply too much pressure or work on an area that is too dry. If a mistake looks unsalvageable, the best approach is to let the layer dry completely. Because POSCA paint is opaque, you can simply paint over the error and start the blend fresh once the surface is bone dry. This layering capability is one of the biggest advantages of using acrylic markers over traditional watercolours.
Preventing and Fixing Streaks
Streaks often occur due to "ghosting," where the white of the canvas peaks through a thin layer of paint. To solve this, wait for your first attempt to dry and then apply a second coat of blended paint. This second pass fills in the valleys of the canvas weave that were missed initially, resulting in a much deeper and more professional finish. Maintaining consistent pressure is vital. If you press too hard, you might flood the canvas; too light, and the nib will skip. If your marker tip becomes too frayed from the rough surface, you should look into replacing POSCA pen tips to restore your precision.
Maintaining Your Markers During a Session
During a long creative session, your nibs can become clogged with drying paint or contaminated with other colours. Keep your markers moist by re-priming them on a scrap piece of paper every few minutes. This ensures a fresh flow of pigment is always available for your blend. Never mash the nib down into a rough canvas to get more paint. Instead, use a gentle "pumping" action on your scrap paper to saturate the tip. If you are struggling with a specific canvas texture or aren't sure which marker size is right for your project, you can contact our team of specialists for personalised advice on your supplies.
Elevating Your Canvas Art with Professional Finishing
You have put in the hard work to learn how to blend posca markers on canvas, but the final stage is where many artists come unstuck. Finishing your piece is about more than just aesthetics; it is about protecting your pigment from dust, UV rays, and the humid Australian climate. Before you even think about reaching for a sealer, you must allow your work to "cure." While the paint feels dry to the touch within minutes, it takes at least 24 hours for the moisture to fully evaporate from the deep fibres of the canvas weave. Rushing this step can trap moisture under your sealant, leading to cloudiness or peeling later on.
A common mistake is using a brush-on varnish directly over your work. Even if the paint feels set, the friction of the bristles combined with the liquid varnish can reactivate the POSCA pigment. This often leads to heartbreaking smears across your pristine gradients. A spray-on acrylic sealer is the professional choice for paint pens. Depending on your preference, a matte finish will reduce glare and keep the work looking like a drawing, while a gloss finish can make your blended colours appear more vibrant and saturated. Choose a high-quality Australian-weather-appropriate spray to ensure your art stands the test of time.
Once your blended background is fully cured, you can add final sharp details. Using a fine tip like the PC-1M for crisp highlights or rim lighting on top of your soft transitions adds a layer of depth that makes the artwork truly pop. Blending provides the atmosphere, but these crisp final touches provide the focus. This contrast between soft gradients and sharp lines is a hallmark of professional marker art.
Sealing Your Masterpiece
When you are ready to seal, start with very light "mist" coats. Hold the can roughly 30 centimetres away and move in a steady, horizontal motion. Do not try to cover the entire canvas in one go. After the first light coat, wait ten minutes and check for any "bleeding" or ink movement. If everything looks stable, you can apply a second and third coat slightly more heavily. For more technical data on environmental factors, check our POSCA Surface Guide for long-term durability tips across different materials.
Ready for Your Next Project?
Now that you have mastered the basics of how to blend posca markers on canvas, the possibilities are endless. We encourage you to experiment with different canvas sizes, from small study pieces to large-scale murals. As your confidence grows, you might find you need a wider variety of shades to achieve even more complex transitions. You can explore our Custom POSCA Bundles to expand your colour palette with the exact tones your style requires. If you are ready to restock your supplies or try a new nib size, browse our full range of authentic POSCA markers at PoscART today.
Master Your Next Canvas Masterpiece
Mastering how to blend posca markers on canvas is a rewarding skill that transforms your artwork from simple drawings into vibrant, professional paintings. By focusing on essential surface preparation with gesso and perfecting your wet-on-wet timing, you can eliminate the frustration of streaky finishes. Remember that moisture management is your greatest ally when working with the unique texture of the canvas weave. Proper curing and careful spray sealing then ensure your soft gradients remain bold and protected for years to come.
As a family-owned and operated specialist Australian retailer, PoscART is committed to supplying genuine POSCA products only. We take pride in being a trusted resource for the local creative community, supporting everyone from students to professional designers. If you have questions about choosing the right nib sizes or need advice on surface suitability for a specific project, contact our expert team at PoscART for personalised support. Grab your favourite markers and start practising your transitions today; your next creative breakthrough is only a few strokes away.
Frequently Asked Questions
Can you blend POSCA markers once they are dry on canvas?
No, you can't blend POSCA markers once they've dried because the acrylic pigment becomes permanent and water-resistant. To achieve a smooth transition, you must work quickly while the paint is still fluid. If you've missed your window, simply apply a fresh layer of wet paint over the dry section to start the process again. This layering ability is a key benefit of the high-quality acrylic formula.
Do I need to prime my canvas before using POSCA pens?
Yes, applying extra layers of gesso is the best way to improve your results. While most store-bought canvases come pre-primed, they're often still quite porous. Adding your own acrylic gesso fills the weave and creates a less absorbent surface. This allows the paint to sit on top longer, giving you more time to master how to blend posca markers on canvas without the ink sinking in too quickly.
Will blending POSCA markers ruin the nibs?
Blending won't ruin your nibs if you take care of them properly. The main risk is the abrasive texture of the canvas causing the felt to fray or pill. To keep your markers in top shape, avoid pressing too hard and always clean the tip immediately after mixing colours. Scribble on a scrap piece of paper until the original colour returns to prevent dried pigment from clogging the flow.
What is the best POSCA tip size for blending on canvas?
The PC-5M Medium Bullet Tip is widely considered the most effective size for canvas work. It delivers a generous flow of paint that stays wet long enough for mixing, yet it's small enough for controlled detail. If you're tackling a massive background, the PC-7M is a better choice to prevent the paint from drying too fast. For very tight spaces, the PC-3M offers more precision for fine transitions.
How do I stop my POSCA markers from streaking on canvas?
Streaking usually happens when you don't use enough paint or work in areas that are too large. To stop this, apply a heavier layer of pigment and work in small, manageable sections. This keeps the paint wet while you integrate the next colour. If you still see streaks after the first pass, wait for it to dry and apply a second coat to fill in any gaps in the canvas weave.
Can I use water to blend POSCA pens on canvas?
You can certainly use a tiny amount of water to help move the pigment around. A damp synthetic brush is perfect for softening edges or extending a gradient across a rough texture. However, be careful not to over-saturate the area. Too much water will thin the paint into a translucent wash, which can compromise the vibrant, opaque finish that makes how to blend posca markers on canvas so effective.
Is it better to use a brush or the marker itself to blend?
It's often a matter of personal preference and the specific look you're going for. Using the marker itself is faster and keeps the colours vibrant, but it can wear down the nib on rough surfaces. A synthetic brush provides softer, more traditional transitions and is gentler on your markers. Many Australian artists use the marker to lay down the pigment and a damp brush to finish the blend.
How long should I let my POSCA canvas art dry before varnishing?
You should wait at least 24 hours before applying any type of sealer or varnish. Even if the artwork feels dry to the touch within minutes, the lower layers of paint need time to cure fully. This is especially true when blending, as those areas often have a thicker application of pigment. Rushing this final step can cause the varnish to go cloudy or lead to bubbling under the surface.
General Information
This article is provided as general information only to help customers compare and choose POSCA markers, acrylic markers, art supplies, creative tools and related products. Product details, colours, finishes, surface suitability, availability, pricing and usage results may vary. Always check the individual product page, manufacturer information, age guidance, surface instructions and safety recommendations before purchasing or using a product.