


Customising Shoes with POSCA Pens: The Ultimate Australian Guide
Your favourite pair of white sneakers isn't just footwear; it's a blank canvas waiting for a complete personality transplant. You likely worry that customising shoes with posca pens will result in a cracked, faded mess the moment you step out into a humid Queensland afternoon or a sudden Sydney downpour. It's a common concern for any artist who fears ruining an expensive pair of kicks by using the wrong technique or skipping a vital step.
We're here to turn that hesitation into creative confidence by showing you how to achieve a professional, permanent finish that looks like it came straight from a boutique. This guide provides the practical knowledge you need to master every stage of the process, from initial cleaning to the final coat of protection.
You'll learn the essential preparation steps for different materials, how to select the right POSCA marker tips for intricate linework, and which specific sealants will protect your art from the unique challenges of the Australian climate. Whether you're a seasoned designer or a weekend hobbyist, you'll find the technical advice needed to ensure your wearable art stays vibrant and intact for the long haul.
Key Takeaways
- Learn why the water-based acrylic formula of POSCA markers provides the necessary flexibility to prevent paint from cracking on leather or canvas.
- Discover the essential marker sizes for customising shoes with posca pens, including why the PC-5M and PC-3M are the must-have tools for your creative kit.
- Master the vital preparation steps using isopropyl alcohol to remove factory finishes, ensuring your artwork bonds perfectly to the surface.
- Understand the "Thin is King" rule for layering paint, a technique that ensures your design remains durable even through heavy wear.
- Find out how to correctly heat set and seal your finished shoes to withstand the harsh Australian weather and everyday use.
Why POSCA Pens are the Best Choice for Customising Shoes
POSCA pens stand out because they utilise a high-quality water-based acrylic paint formula. Unlike standard ink pens, these markers contain a pigment-rich paint that remains remarkably flexible once it dries. This is a game-changer for footwear. When you walk, your shoes naturally crease and bend; POSCA paint is designed to move with the material rather than snapping or flaking off like cheaper alternatives. This specific Paint marker technology provides a professional finish without the harsh fumes or permanent staining risks associated with solvent-based leather dyes.
To see how these markers can transform a pair of kicks in a real-world setting, watch this helpful tutorial:
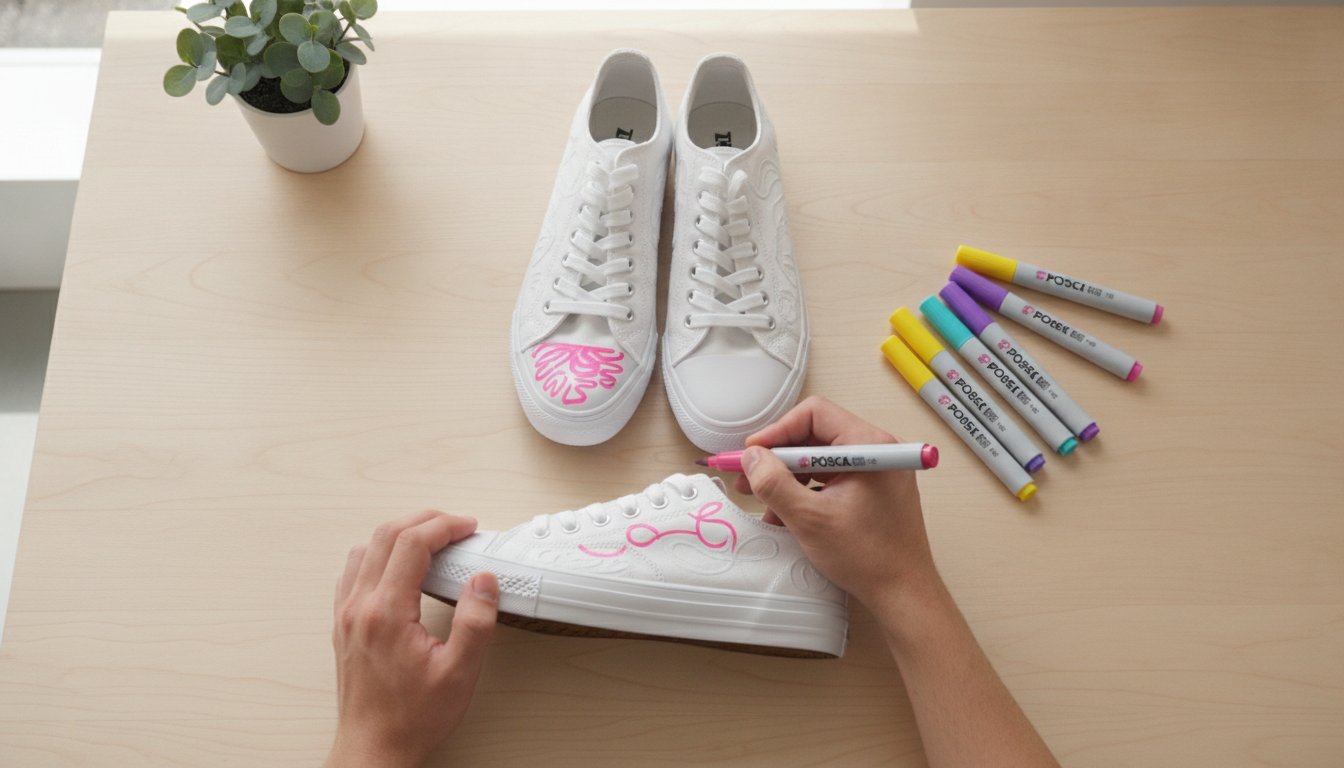
The unique pump-action nib is another reason why customising shoes with posca pens is so effective. By gently pressing the tip, you control the paint flow, ensuring a consistent application even on the textured surfaces of a canvas sneaker or the pebbled grain of leather. Beginners find this much easier to manage than traditional brushes, which can hold too much moisture and cause bleeding. Because the paint is water-based, it's also much safer to use indoors or in a classroom. You can even wipe away mistakes with a damp cloth if you act before the paint sets.
Understanding the Opaque Acrylic Advantage
The magic of POSCA markers lies in their opacity. The pigments sit on the surface of the shoe rather than soaking deep into the fibres. This means you can achieve vivid results on dark-coloured shoes without the base colour showing through. If you've ever tried to put a yellow fabric marker on a black shoe, you know it usually disappears. With these acrylic markers, you can layer a bright white or neon colour directly over a dark base once the first layer is dry. It's a level of creative freedom that traditional markers simply can't match.
Canvas vs Leather: Can You Use POSCA on Both?
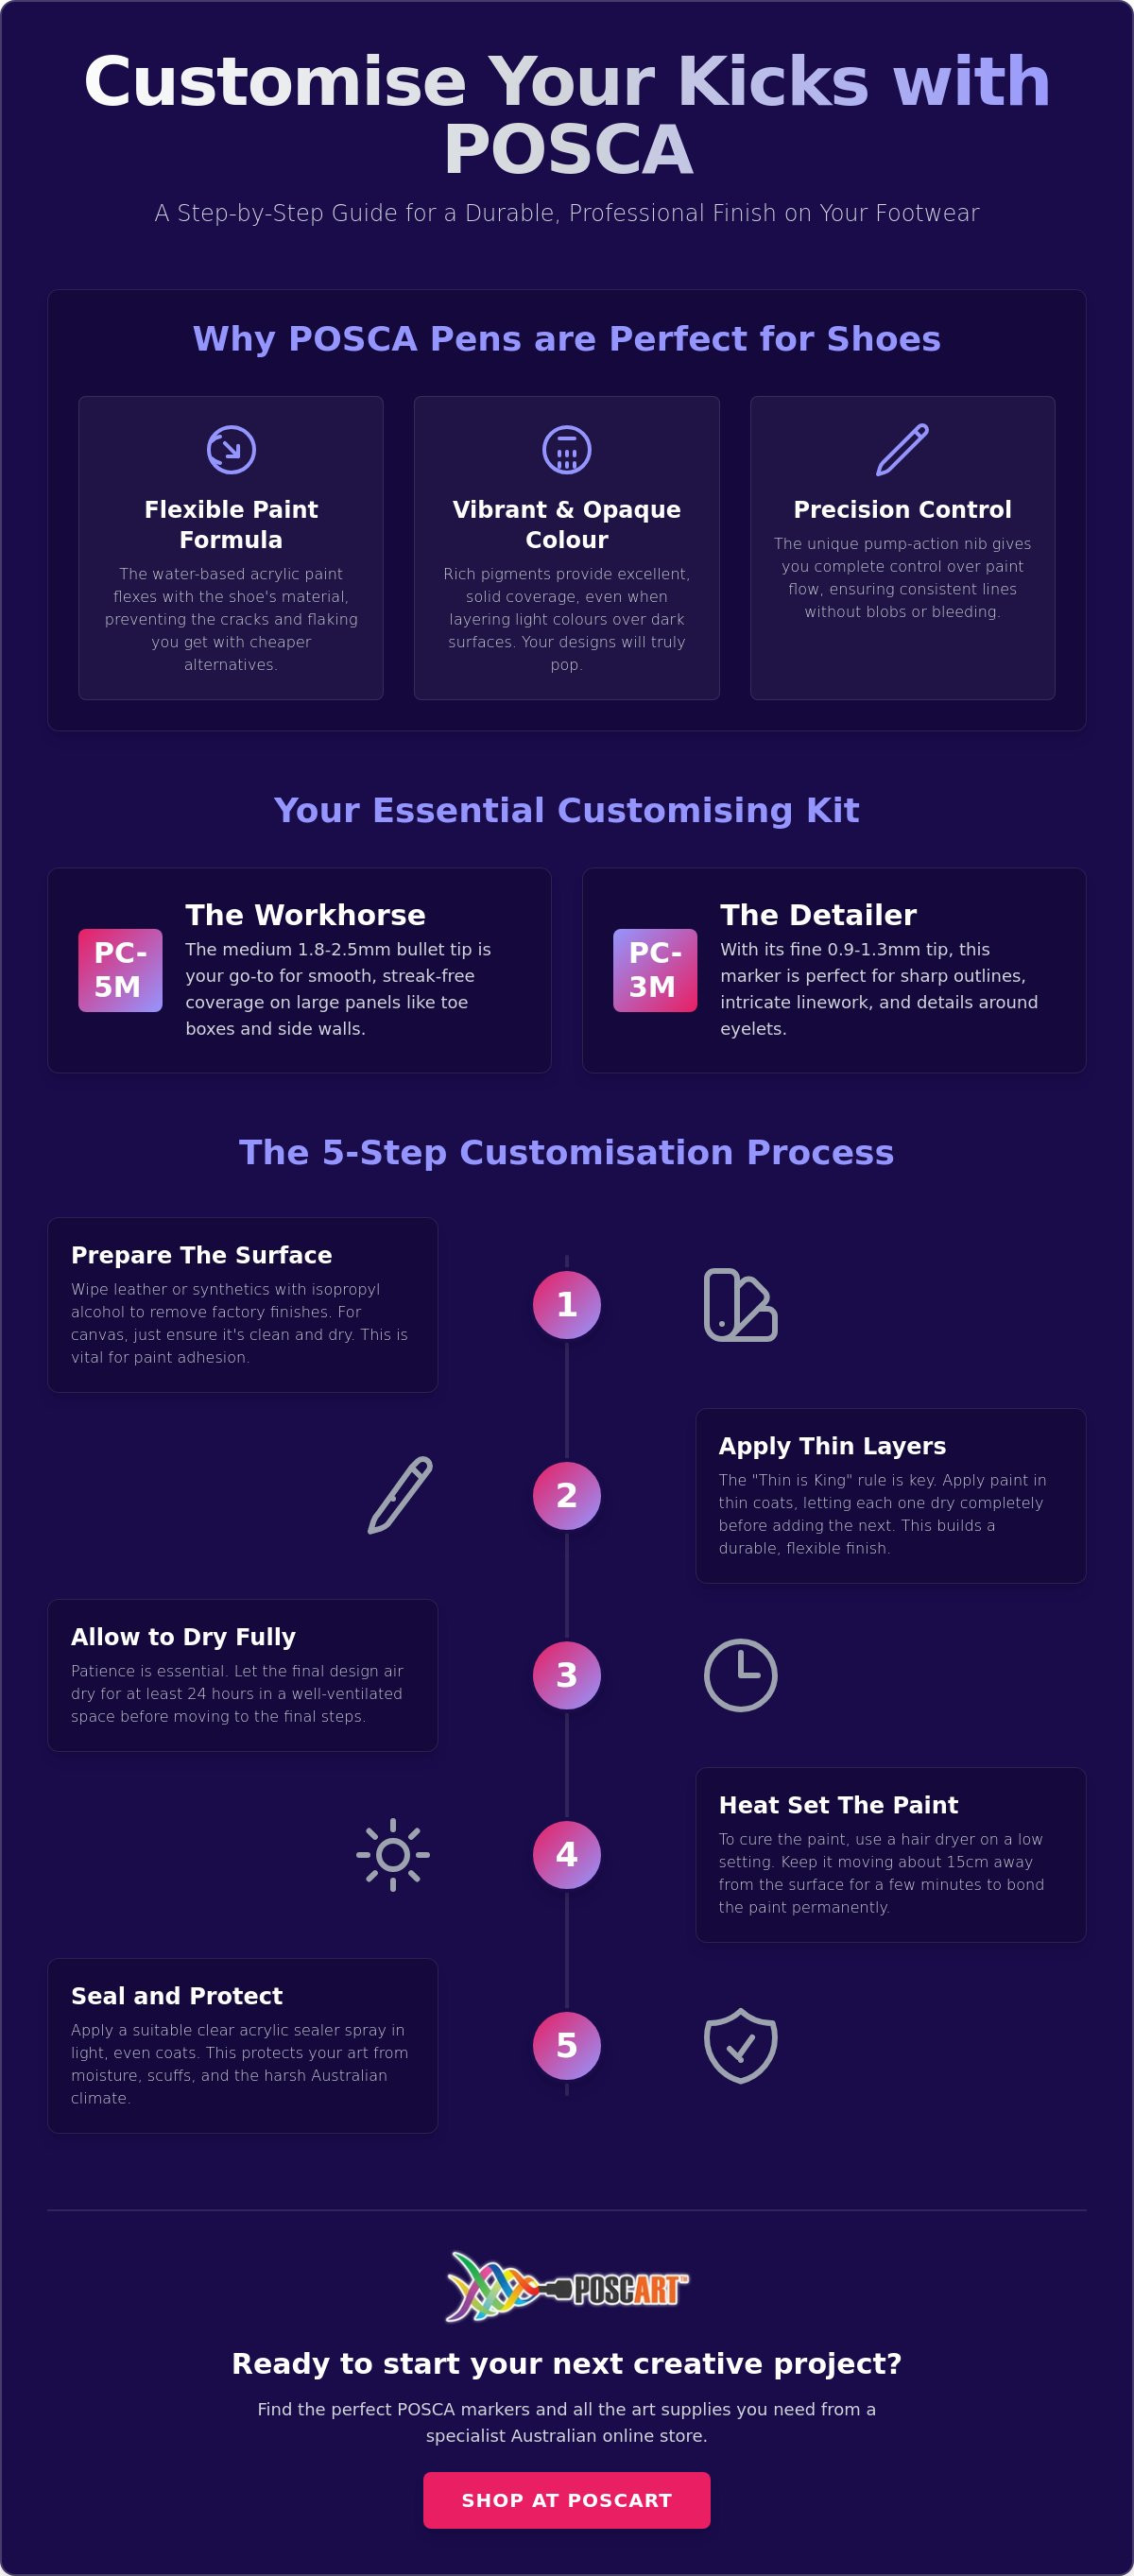
You can certainly use these markers on both, but the way they bond to the surface differs. Canvas is naturally porous, so it drinks up the acrylic binder, creating a very stable and integrated finish. Leather is non-porous and requires a mechanical bond; the paint needs a clean, slightly prepared surface to grip onto properly. Synthetic "pleather" is often the trickiest because it can have a slick plastic coating that resists paint. Extra care during the preparation phase is vital here to ensure your design doesn't peel away. Whether you're working on old favourites or a fresh pair, customising shoes with posca pens using the POSCA PC-5M will provide the coverage you need for a lasting custom look.
Selecting Your Kit: Essential POSCA Markers for Footwear
Successful shoe customisation depends entirely on having the right tool for the specific part of the shoe. While some suggest a single marker is enough, customising shoes with posca pens is far more effective when you use a tiered selection of tip sizes. This approach ensures your base colours are smooth and your fine details remain crisp around tricky areas like eyelets. When selecting your supplies, always look for the AP seal on the label to ensure the Safe use of art products in your home studio or classroom.
The PC-5M: Your Base Layer Specialist
The POSCA PC-5M is the undisputed workhorse for footwear. Its medium bullet tip allows for smooth, streak-free coverage on large panels like the toe box or side walls. To get the best results, you must prime the nib on a scrap piece of paper first. This prevents "blobs" of paint from ruining your shoe surface by allowing the pressure to equalise before the pen touches the material. For a deeper dive into mastering this specific tool, check out our POSCA PC-5M Australia guide.
Fine Liners and Detail Pens
Once your base is set, you'll need precision. The PC-3M Fine Bullet Tip is essential for medium-sized patterns and fills where the PC-5M is too chunky. It strikes a perfect balance between coverage and control. For the most intricate work, the PC-1MR Ultra Fine Tip is your best friend. Its tapered metal tip is perfect for navigating around stitching and eyelets without getting paint where it doesn't belong. You can use these fine tips to "clean up" the edges of your larger shapes, giving the entire design a professional, sharp look.
Choosing between tip shapes is also vital for your project. Bullet tips are generally better for the organic curves and rounded geometry of a shoe, whereas chisel tips like the PC-8K are better for bold, geometric block lettering. Most artists find that Custom POSCA bundles are the smartest investment. Having a range of sizes on hand saves time and prevents you from forcing a large pen into a small space, which often leads to messy leaks. If you're unsure which set suits your specific project, feel free to chat with our creative team for a personalised recommendation.
Preparation Workflows: Prepping Your Kicks for Paint
Preparation is the most vital phase of customising shoes with posca pens. If you skip this, your hard work will likely peel or crack within a few wears. Most new shoes come with a "factory finish", which is a thin, protective wax or chemical coating designed to repel dirt and moisture. Unfortunately, this coating also repels acrylic paint. Removing it creates a clean surface for the paint to grip, ensuring your design becomes a permanent part of the shoe rather than a temporary layer on top.
Before you even open a marker, gather your essential prep kit:
- High-quality masking tape: To protect the midsoles, soles, and any areas you want to keep pristine.
- Isopropyl alcohol or acetone: For stripping factory coatings (material dependent).
- Lint-free cloths: To wipe down the surface without leaving behind fibres.
- A lint roller: Essential for canvas surfaces.
Start by removing the laces completely. This gives you full access to the tongue and prevents accidental ink stains on the fabric. Use your masking tape to carefully cover the rubber midsoles and soles. Press the edges of the tape down firmly with a fingernail or a blunt tool to prevent paint from seeping underneath. Prep takes time. Don't rush it. A few extra minutes spent masking will save you hours of cleaning up messy edges later.
The Leather and Synthetic Prep Guide
Leather requires a process called "de-glazing." Use a lint-free cloth soaked in isopropyl alcohol or a specialist leather preparer to rub the surface until the factory shine disappears. You'll know it's ready when the surface feels slightly "tacky" to the touch. For stubborn synthetic materials or "pleather," a very light scuff with high-grit sandpaper (around 400 to 600 grit) can help create the mechanical bond needed for the acrylic paint markers to adhere properly. Ensure you wipe away all dust after sanding before you start your first layer.
The Canvas and Fabric Prep Guide
Canvas is more forgiving but requires a different approach. Use a lint roller to remove every speck of dust and loose fibre. If the shoes are older, a quick scrub with mild soapy water is fine, but they must be 100% dry before you start customising shoes with posca pens. Never use fabric softener during the cleaning process, as it leaves a residue that blocks paint absorption. A pro tip for canvas is the "water-mist" technique. Lightly dampening the fabric with a spray bottle before your first layer helps the POSCA paint penetrate deep into the fibres for a more integrated look. Allow ample drying time between cleaning and painting; moisture trapped in the fabric often leads to bleeding lines and fuzzy edges.
Creative Techniques for Durable Shoe Art
When you begin the actual painting process, the golden rule to remember is that "Thin is King." Many beginners make the mistake of applying one thick, heavy coat of paint to get instant coverage. This is the primary cause of cracking later on. Instead, apply multiple thin, translucent layers, allowing each one to dry completely. This method builds a flexible "skin" of acrylic that can withstand the constant movement of your feet. When customising shoes with posca pens, this technique ensures the pigment bonds to the material without becoming brittle.
Pay special attention to the "Flex Zones," particularly the area across the toe box where the shoe naturally creases as you step. Keep your paint application exceptionally light in these sections. If the paint layer becomes too dense here, the mechanical stress of walking will eventually snap the acrylic bond. Map out your entire design first using a light-coloured POSCA or a graphite pencil. This allows you to adjust the composition before committing to darker, more permanent pigments. It is much easier to cover a faint pencil line than it is to fix a dark ink mistake.
Blending and Gradients on Footwear
Achieving smooth transitions requires speed and a slightly different approach depending on the shoe surface. On leather, the paint stays wet longer; this allows you to use a damp synthetic brush to soften the edges between two colours while they are still on the shoe. Canvas absorbs the paint much faster, so you must work in small sections to blend effectively before the fibres lock in the pigment. For a deeper look at advanced blending methods, our guide on POSCA Pen Techniques offers professional tips for mastering gradients. Always wait at least 20 minutes before layering a new colour over a dry one to prevent the pigments from mixing into a muddy mess.
Outlining and Finishing Touches
The final outlines are what separate a hobbyist project from a professional custom. Use a steady hand and rest your pinky finger on a dry part of the shoe for stability when navigating curved heels or soles. If you make a mistake, don't panic. You can often scratch away small errors with a toothpick once dry, or simply paint over them with a fresh white base layer. Adding tiny white highlights with a PC-1MR can make your 3D designs pop, giving them a vibrant quality that catches the light. If you're struggling with a specific design element or need help choosing the right shades, reach out to our creative specialists for technical support on your next project.
Sealing and Weatherproofing Your Custom Creation
Completing your design is a massive achievement, but the process isn't truly finished until you've protected your work against the elements. In Australia, our footwear faces intense UV radiation and unpredictable weather patterns that can quickly degrade unprotected acrylic paint. Professional sealing is a two-step insurance policy. It involves heat setting to bond the pigment to the fibres and applying a chemical barrier to repel water and dirt. By taking these final steps, you ensure that customising shoes with posca pens results in a durable product that looks as good after six months as it did on day one.
Heat Setting: The Invisible Bond
Heat setting is the most frequently skipped step, yet it's arguably the most important for permanent adhesion. For canvas shoes, use a hairdryer on a medium heat setting and move it constantly over the painted areas for several minutes. This process helps the acrylic binder "lock" into the fabric fibres. When working with leather or synthetic materials, you must be more cautious. Excessive heat can soften the factory glues holding the soles together or cause the material to warp. Keep the hairdryer at least 15 centimetres away and use a circular motion to distribute the warmth evenly. This simple act of thermal bonding significantly increases the paint's resistance to cracking and peeling during daily wear.
Selecting a Professional Sealant
There's a persistent myth in the DIY community that hairspray can serve as a sealant; in reality, it's a sticky resin that will yellow over time and attract dirt. Instead, you should invest in a dedicated acrylic finisher or a high-quality waterproofer. Your choice of finish will define the final look of your sneaker:
- Matte: Best for a "factory" look that doesn't shine, perfect for traditional canvas kicks.
- Satin: Provides a slight sheen that mimics the natural look of new leather.
- Gloss: Makes colours pop with a high-shine, vibrant finish often used for "cartoon" or pop-art styles.
When applying your chosen sealer, use the "mist" technique. Hold the spray can about 20 to 30 centimetres away and apply several light, even mists rather than one heavy coat. This prevents the solvent in the spray from reacting with the POSCA paint and causing it to run or bleed. If you're unsure about the compatibility of a specific spray with your individual POSCA pens, it's a great idea to check our frequently asked questions or test it on a small, hidden area first.
Long-term maintenance is just as vital as the initial seal. Never put your custom shoes in a washing machine, as the mechanical agitation and hot water will eventually strip the paint. Instead, clean them by hand using a soft cloth and mild soapy water. Because the Australian sun is so harsh, look for sealants that specifically mention UV protection to keep your colours from fading. With the right paint accessories and a bit of patience, your customised footwear will remain a vibrant staple of your wardrobe for years to come.
Step Into Your Own Custom Design
You now have a professional blueprint for transforming ordinary sneakers into wearable masterpieces. Success in customising shoes with posca pens comes down to the details: stripping back the factory finish, applying multiple thin layers to survive the flex zones, and heat setting for a permanent bond. By following these specialist workflows, you'll avoid the common pitfalls of cracking and fading, ensuring your artwork stands up to the rigours of everyday wear in the Australian climate.
As an Australian family-owned and operated business, PoscART is dedicated to supporting your creative journey with authentic products and specialist knowledge. We provide fast national shipping across Australia, ensuring you have the right tools exactly when inspiration strikes. If you're feeling unsure about a specific material or need help choosing the right marker tip for your design, reach out to our friendly support team for personalised advice.
Your blank canvas is waiting. It's time to lace up, grab your markers, and make your mark with absolute confidence.
Frequently Asked Questions
Will POSCA pens wash off my shoes in the rain?
POSCA paint is water-based, so it will eventually wash off or bleed in heavy rain if you haven't applied a sealant. While the paint is permanent once dry on porous surfaces like canvas, footwear is constantly exposed to friction and puddles. Always heat set your design and apply several light coats of a quality waterproofer to keep your artwork intact during a sudden Australian downpour.
How do I stop POSCA paint from cracking on my leather sneakers?
Preventing cracks requires a "thin is king" approach to paint application. When customising shoes with posca pens, avoid heavy, thick layers that become brittle as you walk. Instead, build your colour with multiple light coats. Proper preparation by removing the factory finish from leather with alcohol is also vital; it allows the paint to bond directly to the material rather than sitting on a waxy surface.
Can I use POSCA pens on black or dark-coloured shoes?
Absolutely, the opaque nature of these acrylic markers makes them perfect for dark surfaces. Unlike traditional dye-based markers that soak in and disappear, POSCA pigments sit on top of the material. This allows a bright yellow or crisp white to remain vibrant even on jet-black leather or navy canvas. Just ensure the first layer is completely dry before adding second layers or fine details.
Do I need to prime my shoes before using POSCA markers?
You don't need a separate primer, but thorough surface preparation is mandatory for a professional result. For leather and synthetic sneakers, you must strip the factory coating using isopropyl alcohol or a specialist preparer. For canvas, a simple lint roll and a light mist of water can help the paint penetrate. This ensures the customising shoes with posca pens process starts with a surface ready for a permanent bond.
What is the best sealant for POSCA pens on footwear?
The best choice is a dedicated acrylic finisher or an aerosol-based waterproofer spray designed for shoes. Never use hairspray, as it yellows over time and becomes sticky. Look for a spray that offers UV protection to combat the harsh Australian sun. Depending on your style, you can choose between matte, satin, or gloss finishes to protect the paint from moisture, dirt, and scuffs.
How long do I need to let the paint dry before wearing the shoes?
You should wait at least 24 hours before wearing your new creations, though 48 hours is safer for full curing. While the paint feels dry to the touch within minutes, the acrylic binder needs time to harden completely. Wearing them too early, especially in humid conditions, can lead to premature cracking in the flex zones where the shoe naturally bends the most.
Can I use POSCA markers on the rubber soles of my shoes?
You can apply paint to rubber soles, but it won't be nearly as durable as the work on the uppers. Because soles are in constant contact with the ground and experience high friction, the paint will eventually scuff or peel. If you decide to paint the midsoles, ensure they are perfectly clean and use extra layers of sealant to prolong the life of the design.
Is it possible to remove POSCA paint if I make a mistake?
Mistakes are easy to fix if you catch them early. While the paint is still wet, a damp cloth or a cotton bud will wipe it away cleanly. If the paint has already dried on leather, you can sometimes gently scratch it off with a toothpick or a blunt plastic tool. On canvas, it is usually better to let the mistake dry completely and then paint over it with your original base colour.
General Information
This article is provided as general information only to help customers compare and choose POSCA markers, acrylic markers, art supplies, creative tools and related products. Product details, colours, finishes, surface suitability, availability, pricing and usage results may vary. Always check the individual product page, manufacturer information, age guidance, surface instructions and safety recommendations before purchasing or using a product.