


Mastering Layering POSCA Markers: The Ultimate How-To Guide for Australian Artists
The secret to achieving a perfectly opaque highlight over a dark background isn't applying more paint; it's actually about mastering your timing and pressure. Many Australian artists have experienced that sinking feeling when a second coat turns into a muddy mess or, worse, starts pilling the surface of a favourite sketchbook. It's a common hurdle that can make layering posca markers feel more like a gamble than a creative technique.
We understand that you want your illustrations to look as crisp and vibrant as the markers themselves. Whether you're working on a large-scale canvas or a detailed student project, pilling and bleeding shouldn't stand in your way. This guide shares the professional secrets to achieving professional-grade results without the frustration of streaky finishes or ruined paper. You'll learn how to choose the right tip sizes for your specific project, how to manage drying times in our unique climate, and the exact steps to ensure your layers remain separate and sharp. Let's transform your approach so you can create with total confidence.
Key Takeaways
- Understand the technical difference between dry-on-dry layering for sharp edges and wet-on-wet blending for smooth colour transitions.
- Discover how to prevent muddy results and paper pilling by mastering the specific timing and pressure required for layering posca markers.
- Learn the importance of proper surface preparation and unidirectional strokes to create a stable, opaque foundation for your top-layer details.
- Identify the best tip sizes for each stage of your project, from using the PC-5M for broad base layers to ultra-fine tips for intricate highlights.
The Fundamentals of Layering POSCA Markers
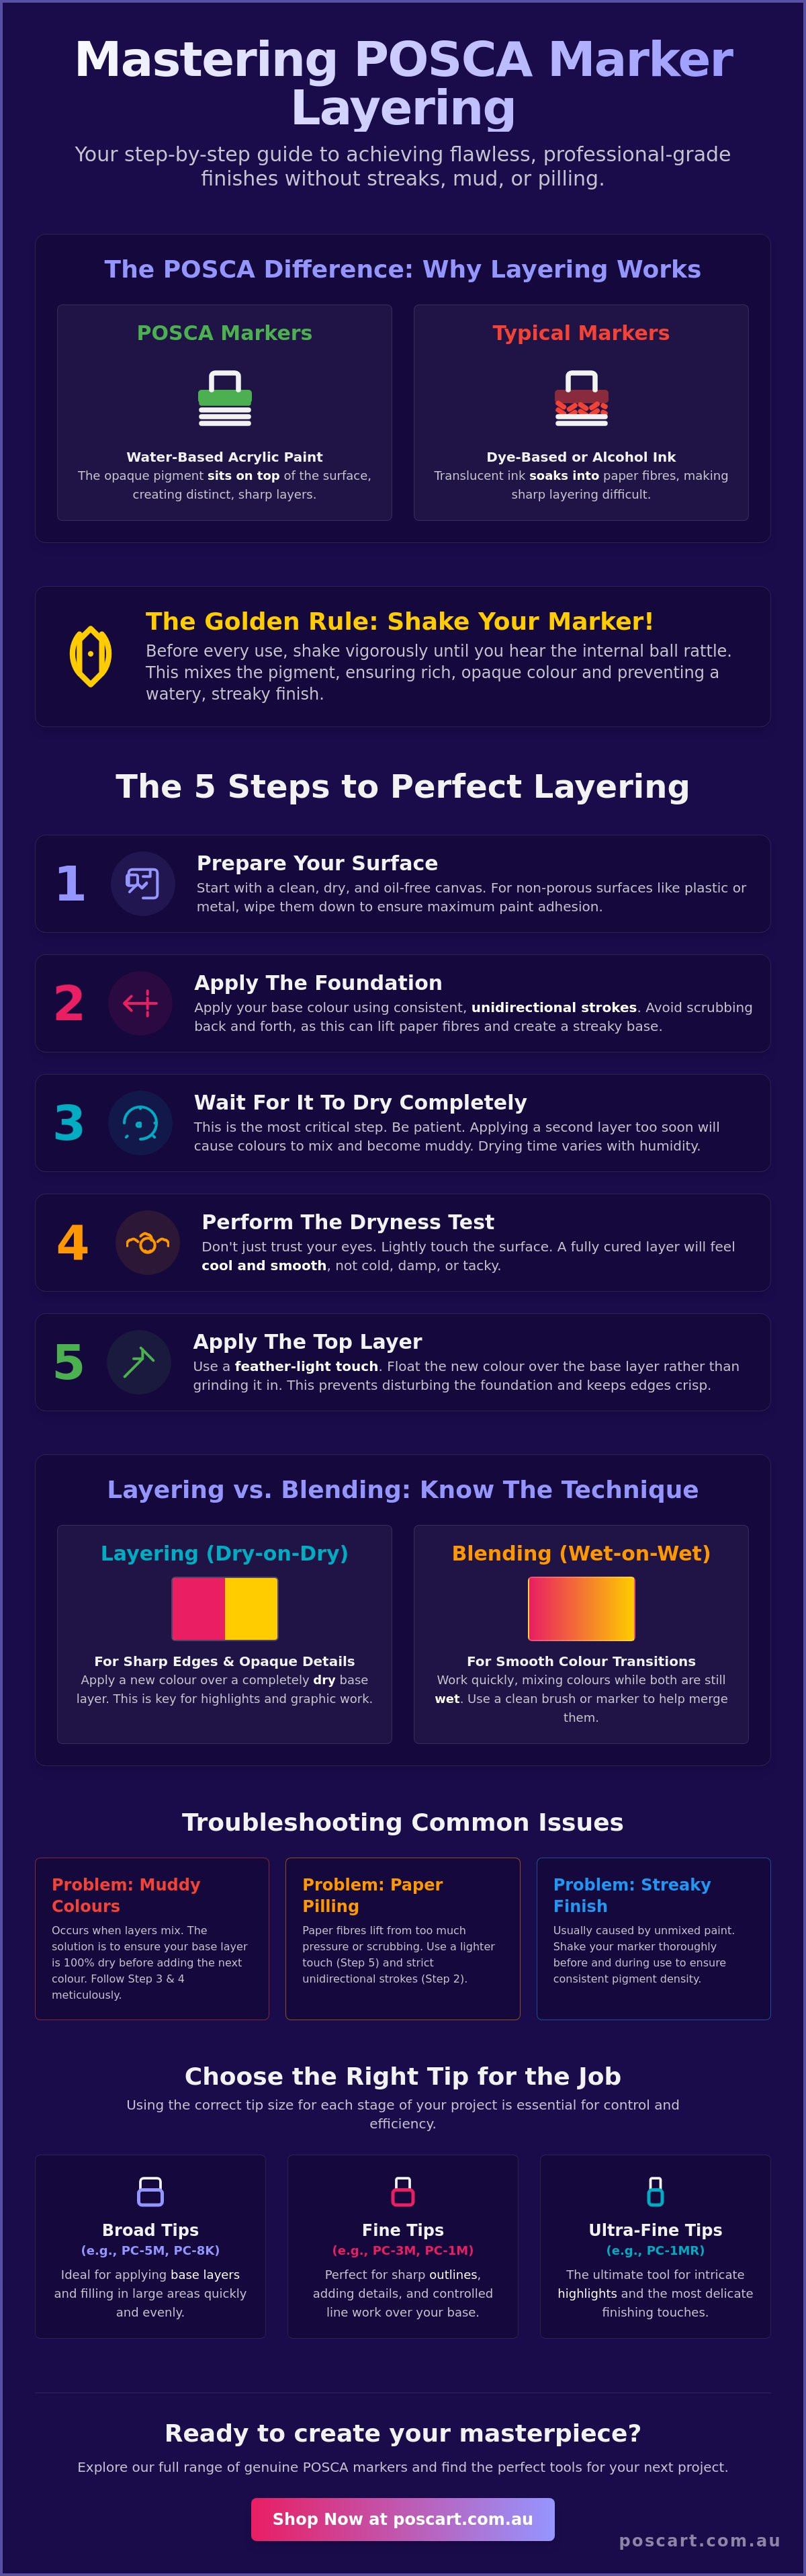
POSCA markers aren't your typical drawing tool. While most office markers use dye-based inks that soak deep into the fibres of your paper, POSCAs contain a high-quality, water-based acrylic paint. This distinction is the primary reason why layering posca markers is such a powerful technique for Australian artists. Because the pigment sits on the surface rather than sinking in, you can build up distinct, opaque levels of colour without them necessarily bleeding into each other. This allows for a level of correction and detail that simply isn't possible with traditional felt-tip pens.
To better understand this concept, watch this helpful video:
This physical characteristic sets them apart from alcohol-based markers like Copics. Alcohol markers are translucent; they blend by saturating the paper and mixing dyes within the fibres. In contrast, POSCAs behave like liquid paint. This means you can successfully place a vibrant yellow or a stark white directly over a black background once the base is dry. The success of this process depends heavily on the "tooth" of your surface. Tooth refers to the microscopic texture or roughness that allows the acrylic pigment to grab hold. A surface with a healthy tooth ensures your layers stay put and don't flake away over time.
Opacity and Pigment Density
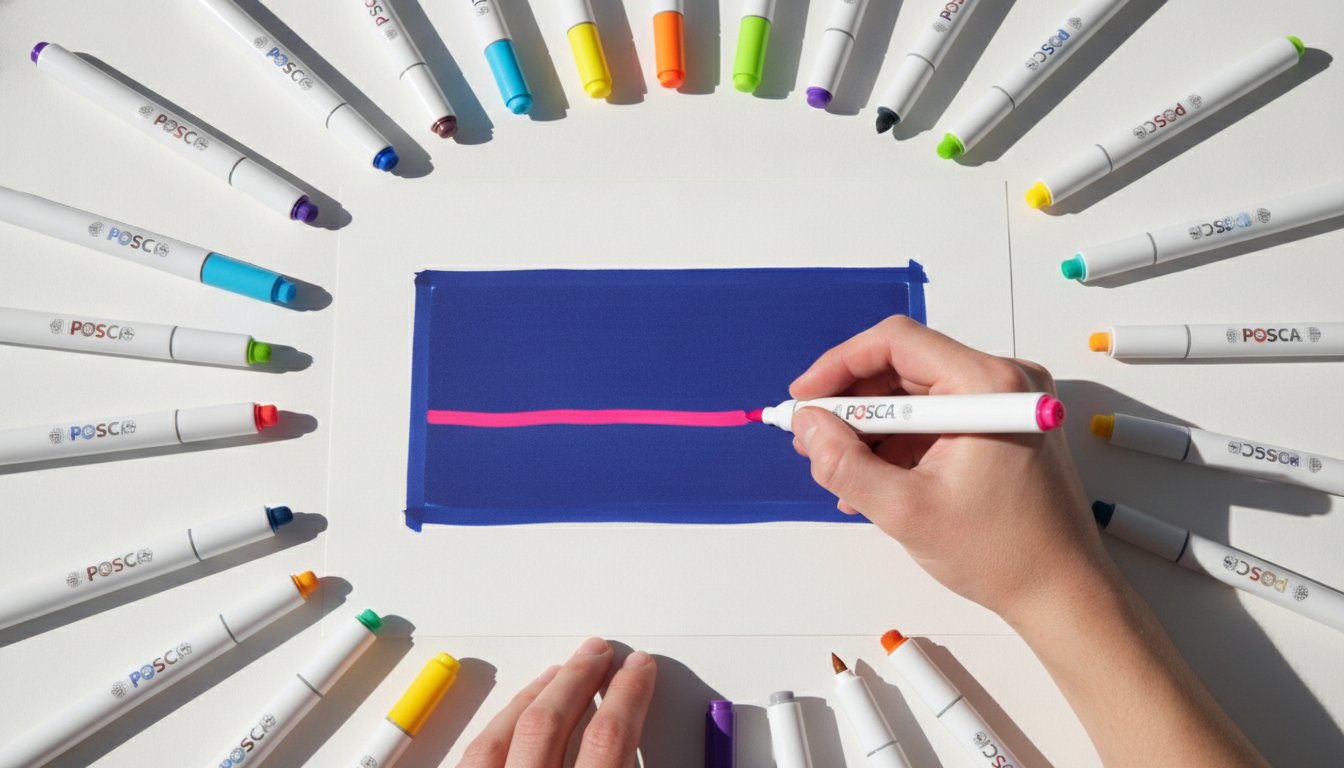
The secret to that signature POSCA finish is the high pigment load within every marker. In the context of layering acrylic markers, opacity is the measure of how effectively a layer of paint hides the surface or colour beneath it. To maintain this density, you must shake your marker thoroughly before every session. You'll hear the internal metal ball rattling; this is essential for breaking up settled pigment and ensuring the paint consistency remains thick and uniform. Without a proper shake, the paint may come out watery, leading to translucent patches that fail to cover your base layers effectively.
Choosing Your Base Layer
Your choice of base layer often determines whether your final piece looks professional or amateur. A solid, well-applied foundation prevents the top colours from appearing streaky or uneven. While paper is the most common choice, POSCAs are incredibly versatile and behave differently depending on the substrate. Porous surfaces like wood or unglazed terracotta will absorb more moisture, requiring a steadier hand to avoid over-saturation. If you're planning a project on a unique material, check out our guide on What Surfaces Do POSCA Pens Work On? to ensure you're using the right preparation techniques for maximum adhesion.
Step-by-Step Guide to Perfect Layering
Mastering the art of layering posca markers requires a shift in mindset from traditional drawing to miniature house painting. You aren't just sketching; you're applying thin, successive coats of acrylic pigment. To achieve that professional, streak-free finish common in high-end illustrations, you must follow a disciplined sequence that respects the chemistry of the paint. Skipping even a single step often leads to the dreaded "muddying" of colours where the base and top layers mix into an unintentional grey or brown.
- Step 1: Surface Preparation. Start with a clean, dry surface. Even the natural oils from your fingertips can prevent the paint from adhering properly, so wipe down non-porous surfaces like plastic or metal with a lint-free cloth first.
- Step 2: The Foundation. Apply your base colour using consistent, unidirectional strokes. Instead of scrubbing the nib back and forth, move in one direction across the area to keep the paint distribution even and prevent the paper fibres from lifting.
- Step 3: The Wait State. This is where patience pays off. You must allow the base layer to dry completely before even thinking about the next colour.
- Step 4: The Dryness Test. Never assume a layer is ready just because it looks dry. Perform a temperature test to confirm the paint has cured chemically.
- Step 5: The Feathered Touch. When applying your top layer, use the lightest possible pressure. Think of it as "floating" the new colour over the old one rather than grinding it in.
The Secret of Drying Times
Australia’s diverse climate plays a massive role in how your markers behave. If you're working in the humid heat of coastal Queensland, your paint will stay "open" and tacky for much longer than it would in the dry, arid conditions of Western Australia. In high-humidity areas, a layer that looks dry might still be soft underneath, leading to pilling if you apply a second coat too soon. You can safely use a hair dryer on a low, cool setting to speed things up, provided you keep it at least 30 centimetres away to prevent the paint from cracking. A layer is chemically dry when the surface no longer feels cool to the touch and the initial liquid gloss has settled into a flat matte finish.
If you're ever unsure about how a specific colour will react on a new surface, our team is always happy to help you find the right technical advice for your project.
Pressure Management
Heavy hands are the enemy of successful layering. If you press the nib firmly against a base layer, the friction acts like a scraper, reactivating the bottom paint and pulling it up into your marker tip. This not only ruins your illustration but can also contaminate your marker nib with the base colour. Practise a "floating" technique where the nib barely kisses the surface. This allows the fresh paint to flow out and sit on top of the foundation. If your nib does pick up a bit of the base colour, quickly scribble on a scrap piece of paper until the ink runs pure again. Keeping a clean workspace and a light touch ensures your highlights remain crisp and your deep tones stay bold.
Layering vs. Blending: Knowing the Difference
Understanding the technical difference between layering and blending is the hallmark of an advanced marker artist. While both techniques involve placing one colour near another, the timing of your application changes the outcome entirely. When layering posca markers, you are working "dry-on-dry" to create distinct, stacked levels of pigment. Blending, however, relies on a "wet-on-wet" approach where the paint is mixed directly on the surface. If you find your work looks muddy or the colours are mixing unintentionally, you've likely hit the "in-between" state: the paint wasn't wet enough to blend, but wasn't dry enough to layer.
Layering is your go-to for sharp edges, highlights, and complex patterns. Because POSCA paint is opaque, a dry base layer acts as a solid wall. The new colour sits on top without disturbing what's underneath. This is the foundation of the professional, high-contrast look common in street art and graphic illustration. Blending is more about atmosphere and soft transitions. It requires speed and a bit of bravery, as you must work while the paint is still fluid to fuse the pigments together.
Mastering the Gradient
To create a smooth gradient, apply your first colour liberally to create a small "puddle" of wet paint. Immediately introduce the second colour and use the marker nib to swirl or zig-zag the two together while they are both still wet. This technique is brilliant for skies, skin tones, or metallic reflections. For a deeper look at these methods, explore our POSCA Pen Techniques: A Comprehensive Guide. Just remember to keep a scrap piece of paper handy; you'll need to scribble off any excess mixed paint from your nib immediately to keep your markers pure for the next project.
Crisp Details and Outlines
If your goal is a pop-art or comic-book aesthetic, layering is your best friend. This style relies on high-contrast outlines and bold highlights that sit perfectly on top of base colours. For the most professional results, we recommend using the POSCA PC-3M Fine Bullet Tip for your detail layers. Its precision allows you to add fine highlights or sharp outlines over dry backgrounds without the risk of bleeding. If you're struggling to choose the right tool for the job, check out our guide on Which POSCA Pen is Best for Outlines? to ensure your details remain sharp and professional.
Troubleshooting Common Layering Issues
Even the most seasoned practitioners encounter hurdles when layering posca markers. The most common frustration is the top colour "lifting" or reactivating the base layer. This usually happens because the foundation hasn't cured chemically, even if it feels dry to a quick tap. If you see the bottom colour swirling into your new stroke, stop immediately. Let the piece sit for another twenty minutes; your patience is the only tool that can fix a timing error once the paint is on the surface.
Paper pilling is another frustrating obstacle. It occurs when the paper fibres become over-saturated and the friction of the marker nib physically tears the surface. To avoid this, limit your passes over a single area and ensure you aren't using a "scrubbing" motion. If you're working on a large background and notice streaky coverage, try overlapping your strokes while the paint is still slightly "open" to create a more uniform field. If the paint has already dried, a second light coat applied in the opposite direction often levels out the finish and provides the opacity you're after.
Nib Maintenance and Care
Contaminated nibs don't have to mean the end of your marker. If you've accidentally picked up a darker pigment while layering posca markers, you can often clean the tip by removing it and rinsing it under lukewarm water. Don't use soap or harsh chemicals, as these can damage the internal valve system. If the nib is frayed or permanently stained, it's much more efficient to swap it out for fresh replacement nibs. Always store your markers horizontally; this keeps the pigment particles evenly distributed and prevents the nib from drying out or becoming flooded with excess paint.
Surface Recovery
If your paper starts to pill, don't panic. Let the area dry completely, then very gently use a clean, dry brush to flick away the loose paper crumbs. You can often mask these minor imperfections by applying a slightly thicker layer of paint once the area is stable, or by using a POSCA White Pen to redefine highlights and draw the eye away from the texture. For non-porous surfaces like glass, recovery is even easier. You can carefully scrape away a mistake with a plastic blade once it's dry and start the section again without leaving a trace of the previous layer.
If you've tried these steps and still find your markers aren't behaving as expected, please check our frequently asked questions for more personalised troubleshooting advice on your specific project.
The Best POSCA Tools for Successful Layering
Selecting the right hardware is just as critical as the technique itself. For layering posca markers effectively, the POSCA PC-5M Medium Bullet Tip is widely considered the gold standard for base layers. Its 1.8mm to 2.5mm tip provides enough surface area to cover large sections quickly while maintaining enough control to define basic shapes. Once that medium foundation is cured, switching to a fine or ultra-fine tip for your highlights ensures you don't accidentally reactivate the bottom layer with too much fresh paint.
Efficiency also comes from having a curated selection. Custom POSCA Bundles allow you to build a cohesive colour palette without the guesswork, ensuring your layers complement each other rather than clashing. To keep your creative flow uninterrupted, consider investing in POSCA storage cases. Storing your markers horizontally keeps the pigment properly mixed and ready for immediate use, which is essential when you're trying to hit that perfect dry-state window.
Building Your Layering Kit
Beginners should start with a solid foundation of primary colours plus plenty of black and white for highlights and outlines. If you're planning a mural or a large-scale project, having multiple markers of your primary background colour is a smart move. This prevents the frustration of running out mid-layer, which can lead to visible seams in your work. For those tackling larger surfaces, the Big Job Coverage Set provides the high-volume tools needed for consistent, professional-grade layering across broad areas.
PoscART: Your Australian Specialist
Choosing where to source your supplies is the final piece of the puzzle. At PoscART, we pride ourselves on being a specialist Australian online store, providing genuine products to artists, teachers, and hobbyists nationwide. As a local, family-owned business, we understand the specific needs of our creative community. We offer fast shipping across the country to ensure your momentum never stalls while you're waiting for that one perfect shade of aqua. Explore the full POSCA range at PoscART today and start your next project with the confidence that only professional-grade tools can provide.
Elevate Your Artwork with Professional Layering
Mastering the art of layering posca markers is a journey of patience and precision. By respecting chemical drying times and adopting a light, feathered touch, you can achieve the vibrant, professional results your artwork deserves. Your foundation is vital. Using a medium tip like the PC-5M for base coats ensures a smooth, opaque surface for your finer details to sit upon. These simple shifts in technique transform a basic sketch into a professional-grade illustration.
As an Australian family-owned and operated business, PoscART is dedicated to supporting your creative growth. We provide an extensive range of all POSCA tip sizes, ensuring you always have access to genuine Uni Mitsubishi Pencil products. Whether you're a student starting your first project or a professional artist working on a large-scale mural, we have the specialised tools and local expertise to help you succeed. Shop the full range of genuine POSCA markers at PoscART today to find your perfect palette. We can't wait to see the incredible layers and vibrant designs you create next.
Frequently Asked Questions
Can you layer POSCA markers on top of each other?
Yes, POSCA markers are designed for layering because they contain opaque, water-based acrylic paint. Unlike dye-based markers that soak into the paper fibres, these paint pens sit on the surface, allowing you to build up distinct levels of colour. The key to successful layering posca markers is ensuring the previous coat is completely dry to prevent the pigments from mixing and becoming muddy.
How long should I wait between layers of POSCA pens?
You should typically wait between 10 and 20 minutes, though this varies based on your local Australian environment. In the humid conditions of Darwin or Brisbane, the paint stays "open" longer and requires more patience. You can tell a layer is ready when it loses its initial liquid shine and feels room temperature to the touch rather than cool.
Why is my POSCA marker picking up the colour underneath?
This usually happens because the base layer hasn't chemically cured or you're applying too much pressure. If the paint is still slightly tacky, the friction of the marker nib acts like a scraper and reactivates the bottom pigment. Try using a lighter "floating" touch and give the foundation more time to settle before you add your next highlight or detail.
Can you put light POSCA colours over dark ones?
Yes, the high pigment density allows light colours like white or yellow to cover dark backgrounds with ease. This opacity is what makes POSCA a favourite for pop-art and comic styles. Just make sure to shake your marker thoroughly before use to ensure the paint consistency is thick enough to provide total coverage over the darker base.
How do I stop POSCA markers from streaking when layering?
Streaking is best prevented by using consistent, unidirectional strokes rather than scrubbing the nib back and forth. Choosing the correct tip size also helps; a PC-5M is often better for large backgrounds than a fine tip. If you still see lines, apply a second light coat in the opposite direction once the first is dry to level out the finish.
What is the best surface for layering POSCA markers?
Smooth, non-porous surfaces or high-quality art paper with a slight "tooth" work best for layering. While you can use them on almost anything, surfaces like primed canvas, treated wood, or heavy-duty cardstock allow the paint to sit on top without soaking in too deeply. This surface stability is essential for maintaining sharp edges between your different colour layers.
Can I use a hair dryer to speed up POSCA drying times?
Yes, a hair dryer is a great tool for busy artists, provided you use it on a low or cool setting. Keep the dryer at least 30 centimetres away from your work to avoid "shocking" the paint, which can cause it to crack or bubble. This is particularly helpful in cooler southern states where natural drying times can sometimes be a bit sluggish.
Will layering too many times ruin my paper?
Repeated layering can eventually cause paper pilling, where the surface fibres become over-saturated and start to rub off. To avoid this, use paper with a higher GSM or apply a thin layer of gesso to prime the surface first. Limit your passes over the same area and always wait for total dryness between coats to keep the paper intact.
General Information
This article is provided as general information only to help customers compare and choose POSCA markers, acrylic markers, art supplies, creative tools and related products. Product details, colours, finishes, surface suitability, availability, pricing and usage results may vary. Always check the individual product page, manufacturer information, age guidance, surface instructions and safety recommendations before purchasing or using a product.