


How to Make POSCA Permanent on Wood: The Ultimate Australian Guide
You've spent hours meticulously detailing a custom timber sign, only to watch the vibrant pigment sink into the grain like a thirsty sponge. It's a heart-sinking moment that many Australian artists encounter when they're learning how to make posca permanent on wood. You want your work to stand the test of time, but without the right technique, even the most beautiful designs can bleed, fade, or smudge.
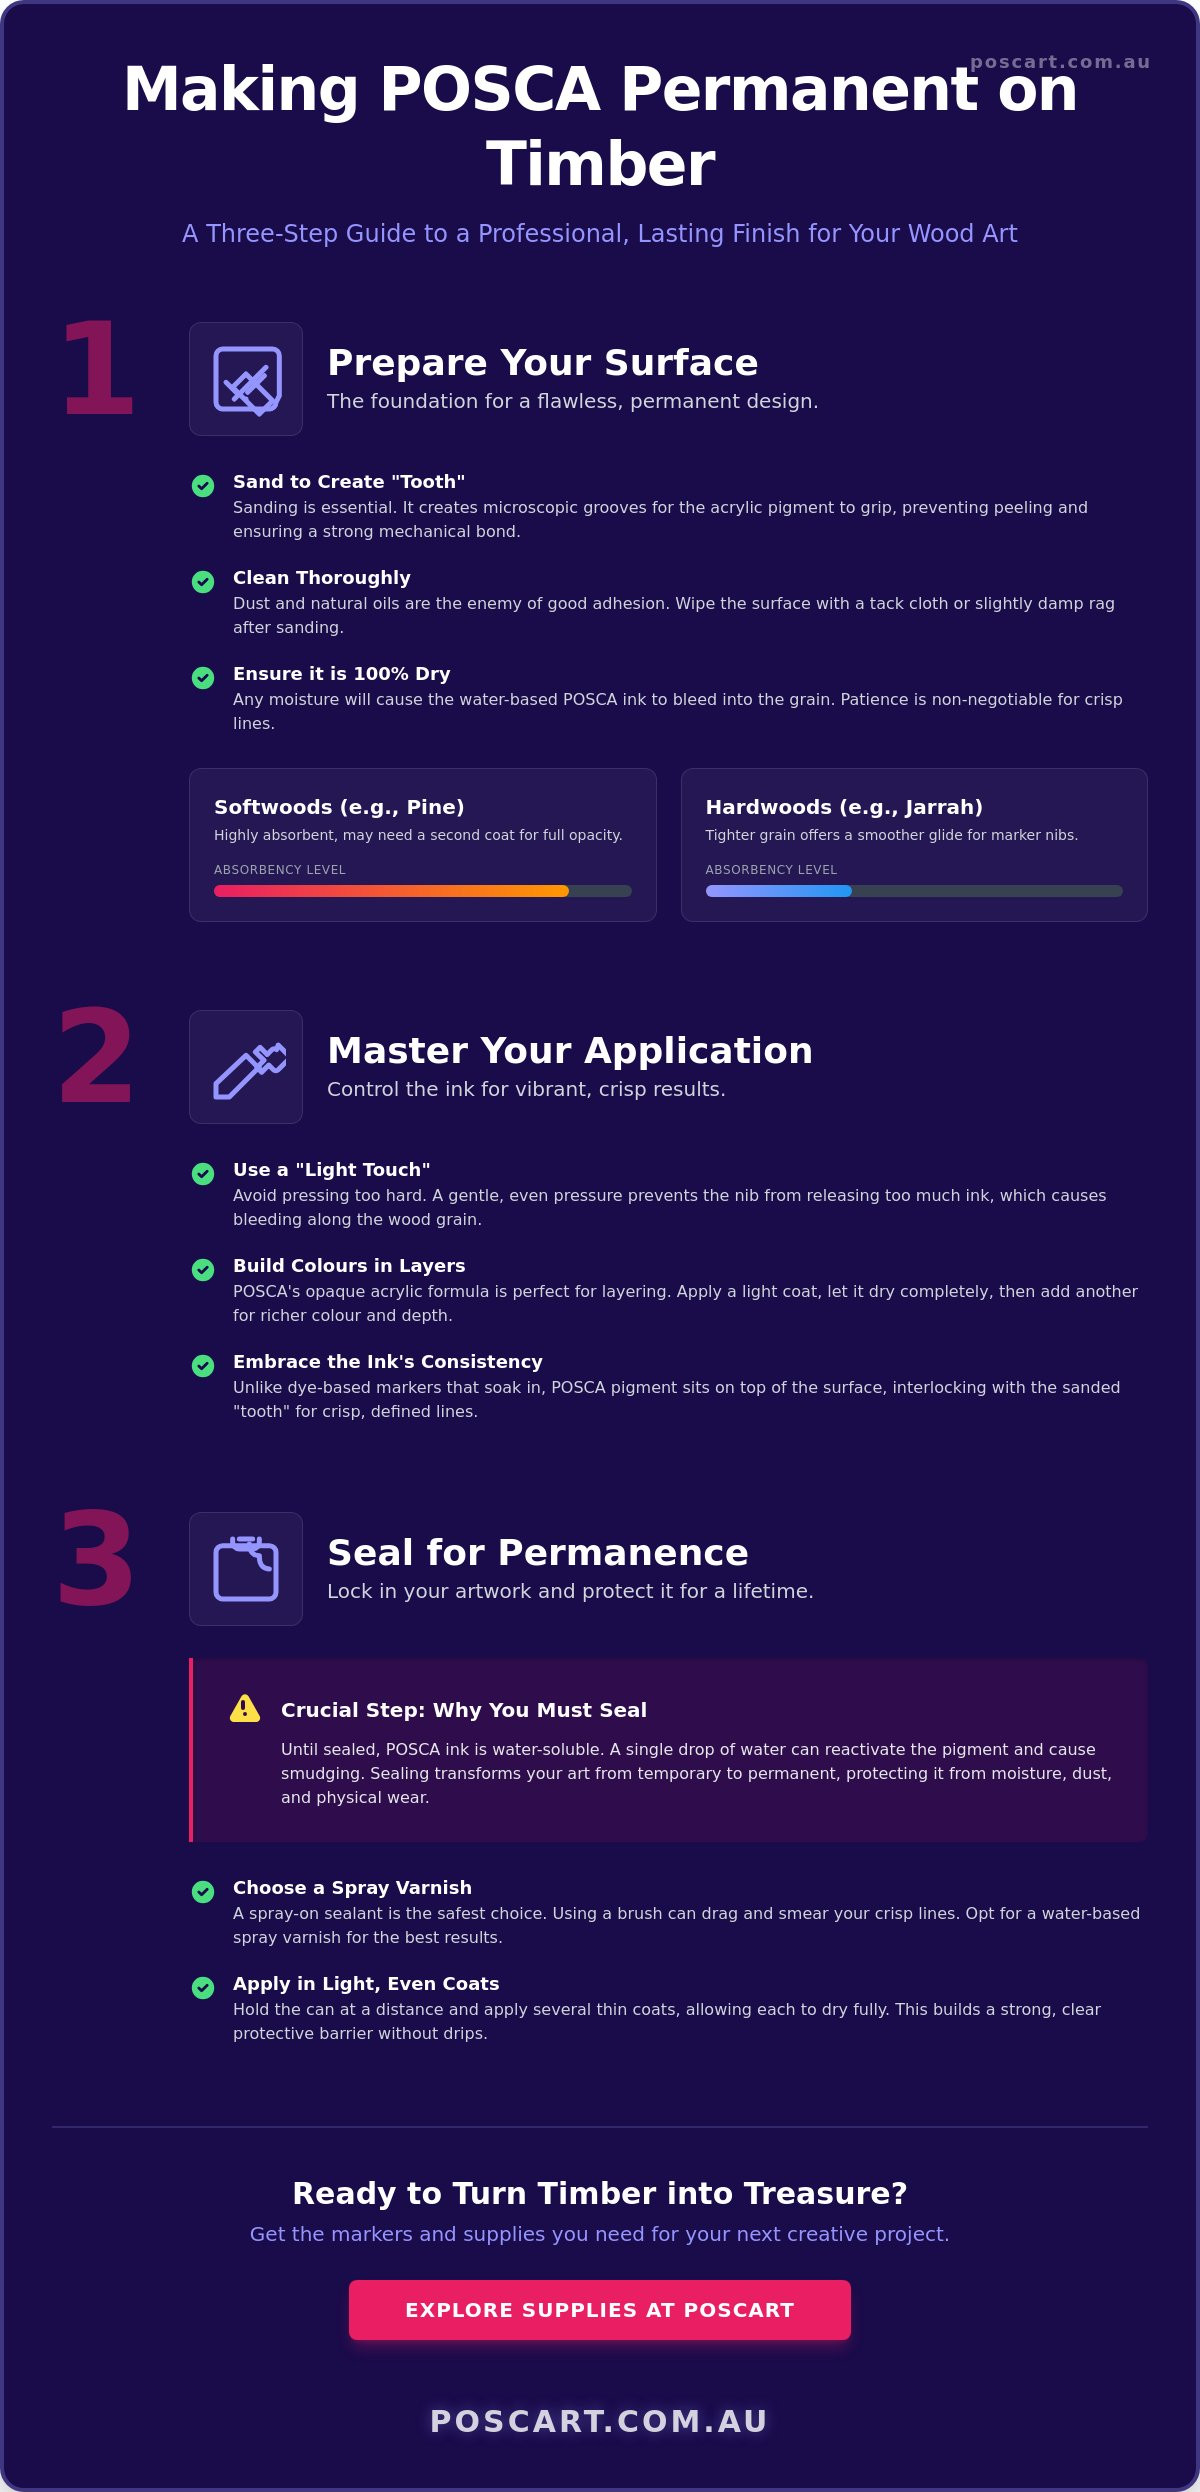
We understand that frustration. There's nothing worse than seeing your crisp lines blur or your favourite colours lose their punch because the timber wasn't prepared quite right. This guide will give you the professional secrets to a finish that won't peel or dull over time. We'll cover the essential three stage process of sanding for a mechanical bond, controlled layering, and choosing the right water based sealant to lock in your design. By the end, you'll have the confidence to turn any piece of wood into a permanent, professional canvas.
Key Takeaways
- Understand why sanding is the essential first step to create "tooth" on timber, allowing the pigment to grip the surface properly rather than soaking in.
- Master the "light touch" technique to prevent paint bleeding into the wood grain and ensure your colours remain vibrant and crisp.
- Discover the professional secrets of how to make posca permanent on wood using a water-based spray varnish to lock in your design for a lifetime.
- Learn why spray-on sealants are the safest choice for wood projects to protect your artwork without the risk of smearing or dragging the ink.
- Gain the practical skills needed to transform raw timber into professional-quality art pieces that resist fading, peeling, and environmental wear.
Why POSCA Markers and Wood are a Perfect Match
POSCA markers are essentially portable pots of high-quality acrylic paint. Unlike standard felt-tip pens that rely on translucent dyes, POSCA uses a highly opaque acrylic polymer emulsion. This pigment-rich formula is designed to sit on the surface while simultaneously anchoring into the timber's natural texture. When you're exploring how to make posca permanent on wood, understanding this chemical bond is the first step toward a professional finish. The pigment doesn't just sit there; it interlocks with the wood fibres to create a foundation that resists fading over time.
Timber is a living, breathing material. Its porous nature creates a physical "bite" for the paint markers. While a standard permanent marker might bleed uncontrollably along the grain, the thicker consistency of POSCA ink stays exactly where you put it. This allows for crisp lines and overlapping colours that remain vibrant even after the paint dries. Because the ink is water-based, it doesn't have the harsh chemical smell of solvent-based pens, making it a safer and more pleasant choice for long studio sessions or classroom activities.
To better understand how these markers behave on different surfaces, watch this helpful video:
Without proper sealing, your timber art is technically temporary. While the pigment "bites" into the grain, it remains water-soluble until it's protected. If a stray drop of water hits an unsealed board, the ink can smudge or run. Learning how to make posca permanent on wood involves moving beyond the initial sketch and applying a protective barrier that shields the acrylic from moisture and physical wear. This transition from a raw drawing to a finished piece is what separates a hobbyist's doodle from a professional art project.
Understanding Wood Porosity
Softwoods like pine or plywood are highly absorbent. They act like a sponge, often requiring a second coat to achieve full opacity. The grain in these woods is often wide, which can sometimes "pull" the ink away from your intended line. Hardwoods, such as Australian Jarrah or Spotted Gum, have a tighter grain. These offer a smoother glide for your marker nibs, but the paint may sit higher on the surface and take longer to cure fully.
The Australian Artist’s Advantage
Australia offers a wealth of unique timber surfaces for creative projects. Many local artists find inspiration in sun-bleached driftwood collected from our coastlines or upcycled eucalyptus offcuts from backyard renovations. These weathered woods provide incredible character and texture. POSCA markers have become a staple for community murals and school projects because they handle these rugged textures with ease. For a broader look at compatible materials, check out our guide to surfaces to see how timber compares to other popular bases.
Preparing Your Wood: Sanding and Cleaning for Success
Before you even shake your paint pen, you need to inspect your timber. Success starts with the surface. If you're wondering how to make posca permanent on wood, the secret isn't just in the final sealing; it's in the initial preparation. You must first identify if your wood is raw, treated, or already varnished. Raw timber is a blank slate but very thirsty. Treated wood often contains wood preservative chemicals that can interfere with paint bonding. If the wood is already varnished, your marker will simply slide around on top without ever sticking properly.
Sanding is the most critical step in the preparation phase. It creates what artists call "tooth". This is a series of microscopic grooves that the acrylic paint can settle into. Without this texture, the paint sits precariously on the surface and is much more prone to chipping or peeling later. Once you've finished sanding, dust becomes your primary enemy. Use a tack cloth or a slightly damp rag to wipe the surface completely clean. Any leftover grit or natural oils will prevent the paint from making a clean connection with the timber fibres.
Drying time is non-negotiable. Ensure the timber is 100% dry before you make your first stroke. If the wood is even slightly damp from cleaning, the water-based ink will bloom and bleed into the grain in ways you didn't intend. For those seeking maximum colour vibrancy, consider a light coat of acrylic primer or gesso. This acts as a barrier, stopping the wood from swallowing your pigment and allowing the colours to pop against the grain.
Choosing the Right Sandpaper Grit
Start with a 120-grit paper if you're dealing with rough-sawn timber. It levels the surface and removes splinters efficiently. Switch to a 240-grit for your final pass to create a professional drawing area. This grit creates a surface that feels smooth to the touch but still has enough texture for the paint to grip. Don't over-sand with very high grits like 600 or 1000. These can polish the wood, making it too slick for the paint to "bite" effectively.
Cleaning Recycled and Driftwood
Recycled timber and driftwood often carry salt, sand, or tannins that can discolour light POSCA shades. Clean these pieces with a soft brush and a mild soap solution if necessary, but allow at least 48 hours for the wood to dry completely. Work in a clean, dust-free environment. If you sand and paint in the same spot, floating particles will inevitably land in your wet ink and ruin the finish. If you're unsure about a specific piece of salvaged timber, our team can provide personalised advice on surface prep to ensure your project is a success.
Application Mastery: Managing Grain and Bleeding
Once your timber is prepped, the way you apply the paint determines the final quality of your work. The most important rule is to use a "light touch". Pressing too hard on the nib can force excess ink into the wood fibres, causing it to spider out uncontrollably. This is a common hurdle when learning how to make posca permanent on wood, as the porous grain acts like a series of tiny straws. By keeping your pressure light, you ensure the pigment sits on the surface where it can be properly sealed later.
For your initial block colours or base layers, the POSCA PC-5M Medium Bullet Tip is an excellent choice. It provides enough coverage to fill shapes quickly without flooding the surface. Think of your first layer as a functional seal. As the acrylic paint dries, it fills the microscopic gaps in the wood grain. This creates a smoother, less absorbent foundation for your second coat, allowing your details to remain sharp and your colours to stay vibrant.
Feathering is another challenge, particularly on woods with a prominent grain. To manage this, always try to work in the direction of the wood grain rather than across it. If you must draw perpendicular to the grain, move your marker faster to prevent the ink from pooling. Because POSCA markers use a high-quality acrylic, they follow professional conservation guidelines for acrylic paint regarding stability and lightfastness. This means that once you master the application, your artwork is built to last.
Preventing Ink Bleed on Softwoods
Softwoods like pine and cedar are notorious for bleeding because their fibres are less dense. If you're working on these surfaces, consider using a clear acrylic primer first. This acts as a microscopic barrier, stopping the ink from travelling sideways. For your initial outlines, try using POSCA pencils. They allow you to map out your design with precision without introducing any liquid ink that might bleed before you've established your boundaries.
Choosing the Right Tip for the Job
Matching your marker tip to the task is vital for a professional finish. Use broad chisel tips for large background areas and save the ultra-fine tips for the final highlights. Timber can be abrasive, so keep an eye on your nibs. If they start to look fuzzy or frayed, it will ruin your crisp lines. You can easily maintain your markers by replacing nibs when they wear down. If you want to blend colours, do it while the paint is still slightly wet on the wood surface, using a clean scrap of timber to test your gradients first.
How to Seal POSCA on Wood: The Permanence Phase
Completing your design is a massive achievement, but the work isn't quite finished yet. If you skip the sealing stage, your art remains vulnerable to moisture, dust, and physical damage. Learning how to make posca permanent on wood requires a shift from the creative phase to the protection phase. A high-quality varnish acts as a transparent shield, locking the pigment into the timber grain and preventing the acrylic from lifting or fading over time. Without this barrier, even a small amount of humidity can cause the water-based ink to reactivate and smudge.
Choosing a spray varnish over a brush-on alternative is the most important technical decision you'll make. While brush-on varnishes are common in woodworking, they are risky for POSCA projects. The mechanical action of a brush can drag the paint, even if it feels dry to the touch, leading to heartbreaking smears across your crisp lines. A spray-on acrylic sealer allows you to apply protection without ever physically touching the paint surface. You can choose between gloss, satin, or matte finishes. Gloss will make your colours appear deeper and more vibrant, while matte preserves the natural, raw look of the timber.
The "Mist Coat" technique is a professional secret for a flawless finish. Instead of trying to cover the wood in one heavy go, start with a very light, dusty layer of spray. This initial "mist" anchors to the paint and creates a microscopic barrier. Once this layer is dry, it protects the ink from the heavier wet coats that follow. If you're unsure which finish will best suit your specific timber species, you can ask our expert team for a recommendation based on your project goals.
Water-Based vs. Solvent-Based Varnishes
Water-based acrylic sprays are the gold standard for POSCA markers. They're chemically compatible with the ink and won't cause the pigment to bleed. Be cautious with oil-based polyurethanes; while they're durable, they often have a yellow tint that can alter your lighter colours. In the Australian climate, always check the humidity before spraying. High humidity can cause "blushing", where the varnish dries with a cloudy, white haze. Aim for a clear, dry day and work in a well-ventilated area to avoid inhaling vapours.
The Step-by-Step Sealing Process
Patience is your best tool during the permanence phase. Follow these steps for a result that lasts a lifetime:
- Wait for the cure: Let your POSCA artwork sit for at least 24 hours. Even if it feels dry, the lower layers of paint need time to fully bond with the wood fibres.
- The first pass: Apply a very thin mist coat from about 30cm away. Don't worry about full coverage yet.
- Build the layers: Apply 2 to 3 thin coats, allowing each one to dry completely. This creates a much tougher finish than one thick, runny layer.
- Final cure: Let the finished piece sit in a dust-free environment for 48 hours before heavy handling or mounting.
By following this systematic approach, you ensure that your creative efforts are preserved. A properly sealed piece of wood art isn't just a drawing; it's a durable, professional-grade object that can be handled, cleaned, and enjoyed for years without fear of degradation.
Project Inspiration: Permanent Wood Art Ideas
Now that you've mastered the technical aspects of preparation and sealing, it's time to put those skills to work. Knowing how to make posca permanent on wood transforms a simple hobby into a way to create lasting heirlooms and professional-grade decor. Timber art is versatile. Whether you're rescuing a thrifted stool or creating a bespoke gift, the results are limited only by your imagination and the quality of your tools.
Customising kitchenware is a favourite starting point for many artists. Decorative wooden spoons and serving boards provide a beautiful, natural canvas for intricate patterns or bold typography. It's vital to remember that while the finish is permanent, these items should remain decorative only. Even with a high-quality sealer, paint markers are not food-safe. They're perfect for hanging on a kitchen wall or sitting in a display jar, but they shouldn't be used for actual cooking or food preparation.
For garden enthusiasts, creating outdoor decor adds a personalised touch to the veranda. You can design wooden stands to complement your terracotta pots, ensuring your plant display is cohesive and colourful. Once you understand how to make posca permanent on wood through proper sealing, you can even tackle high-wear items like skateboard decks or surfboard fins. These projects require several extra coats of varnish to withstand the friction and environmental impact, but the result is a truly unique piece of functional art.
Personalised gifts always carry more weight than store-bought items. Small jewellery boxes, picture frames, and even hand-painted timber coasters make for thoughtful presents. Because you've followed the professional steps to seal the work, these gifts will resist fading and handling for years to come. The natural warmth of the wood combined with vibrant acrylic pigment creates a contrast that is difficult to achieve with any other medium.
Upcycling Furniture with POSCA
Furniture restoration is a fantastic way to use your markers on a larger scale. Adding small accents to stool legs or drawing detailed motifs on drawer knobs can completely change the look of a room. Using the POSCA PC-3M allows for the precision needed for intricate floral patterns or geometric borders on furniture edges. It's a steady, rewarding process that breathes new life into old timber pieces.
Maintenance is simple once your furniture is correctly varnished. You can clean your artwork with a soft, slightly damp cloth to remove dust. Avoid using harsh chemical cleaners or abrasive scrubbers, as these can eventually wear down the protective sealer. If the wood is kept indoors and away from direct, harsh sunlight, your designs will remain as bright as the day you painted them.
While DIY upcycling is a great way to personalise your space, for more extensive furniture or timber features that require expert attention, you can check out Performance Painting to ensure the base is professionally restored and ready for your creative touch.
Classroom and Group Projects
Timber is a fantastic medium for students because it's durable and easy to handle. Safe wood craft ideas for Australian schools include painting individual plywood tiles that can be joined together to create a community mural. This teaches students about surface absorbency and the importance of patience during the drying process. It's an engaging way to introduce young artists to the world of mixed media and functional design in a supervised, creative environment.
Ready to start your next timber masterpiece? Explore the full POSCA range at PoscART and find the perfect colours and tip sizes for your project.
Bring Your Timber Vision to Life
Creating vibrant art on wood is a rewarding process that combines the warmth of natural timber with the bold pigment of acrylic markers. By mastering the three essential stages of preparation, application, and sealing, you now have the professional knowledge of how to make posca permanent on wood. Success lies in the details: sanding to create a receptive surface, using a light touch to prevent grain bleed, and applying a water-based spray varnish to lock in your hard work for a lifetime.
As Australia's leading POSCA specialist, PoscART is a family-owned and operated business dedicated to supporting our local creative community. We provide genuine markers with fast national shipping, ensuring you have the right tools for every project. If you have questions about specific timber species or need advice on choosing the perfect tip size for your restoration, we're here to support you. Get in touch with our expert team today to discuss your next creative venture.
We can't wait to see the incredible timber pieces you'll create with your new skills. Grab your markers, find a beautiful piece of wood, and let your creativity flow.
Frequently Asked Questions
Do I have to sand wood before using POSCA pens?
Sanding is highly recommended to create a surface that the paint can grip effectively. Raw timber is often too smooth or too rough in the wrong places, which prevents the acrylic pigment from bonding properly. A light sand with 240-grit paper removes loose fibres and opens up the grain. This preparation is a foundational step in learning how to make posca permanent on wood, as it ensures the paint doesn't just sit loosely on the surface.
Will POSCA pens wash off wood if it gets wet?
POSCA ink will smudge or wash away if it gets wet before it has been properly sealed. While the paint is water-resistant once dry, it's not truly waterproof or permanent on timber without a protective coating. Exposure to rain or even high humidity can reactivate the pigment. To ensure your artwork survives the elements, applying a water-based spray varnish is a non-negotiable step for any wood-based project intended for display.
Can I use a brush-on varnish over my POSCA wood art?
Avoid using brush-on varnishes directly over your finished artwork as the bristles can smear the paint. Even when the ink feels dry, the mechanical action of a brush can reactivate the acrylic and cause streaks. A spray-on sealer is the safest method because it provides a protective barrier without any physical contact. If you prefer a thick brush-on finish, apply a light mist coat of spray varnish first to lock the colours in place.
How do I stop POSCA markers from bleeding into the wood grain?
You can stop bleeding by using a light touch and working in the direction of the wood grain. Bleeding occurs when excess ink is forced into the porous fibres of the timber. If you're working on particularly thirsty softwoods like pine, applying a clear acrylic primer first acts as a barrier. This prevents the ink from spreading sideways and ensures your lines remain crisp and professional throughout the entire drawing process.
Is POSCA ink food-safe for wooden cutting boards?
POSCA markers are not food-safe and should never be used on surfaces that come into direct contact with food. While the markers are non-toxic, they aren't intended for ingestion, and the sealants required for permanence are also unsuitable for food preparation. Use your markers for decorative items like the handles of serving boards or the outside of salad bowls, but keep the actual eating surfaces raw or treated only with food-grade oils.
How many coats of POSCA do I need for a vibrant colour on timber?
Most timber surfaces require two coats of paint to achieve full, vibrant opacity. The first layer often acts as a primer, filling the pores of the wood and sealing the surface. Once this is dry, the second coat will sit on top with much more intensity. Softwoods like cedar may require additional layering compared to hardwoods, as they absorb more pigment. Always allow each layer to dry completely to avoid dragging the previous coat.
What is the best varnish for POSCA on wood in Australia?
A water-based acrylic spray varnish is the best choice for sealing paint markers on wood in the Australian climate. Look for non-yellowing clear sprays which are chemically compatible with the water-based ink in POSCA pens. These products provide a durable finish without the risk of smudging. Avoid oil-based polyurethanes where possible, as they can sometimes react with the paint or yellow over time, especially when exposed to high heat or direct sunlight.
Can I use POSCA on treated pine or stained wood?
You can use POSCA on treated or stained wood, but the surface requires significant preparation first. Treated timber often has a chemical coating that repels water-based paints, so you must sand it back to reach the raw fibres. For stained wood, ensure the stain is completely cured and not oily. If the stain is oil-based, the acrylic paint may struggle to adhere, so a light sand and a clear primer are essential for a professional result.
General Information
This article is provided as general information only to help customers compare and choose POSCA markers, acrylic markers, art supplies, creative tools and related products. Product details, colours, finishes, surface suitability, availability, pricing and usage results may vary. Always check the individual product page, manufacturer information, age guidance, surface instructions and safety recommendations before purchasing or using a product.