







Beginner POSCA Pen Projects: Easy Ideas to Kickstart Your Creativity in 2026
You don't need a fine arts degree or a massive budget to turn a plain terracotta pot into a vibrant piece of Australian-inspired decor. It's completely normal to feel a bit of "ink anxiety" when you first uncap a fresh set of markers, especially if you're worried about wasting paint or choosing the wrong tip size for your first beginner posca pen projects. We understand that the fear of a smudge or a scratch can sometimes hold back your creative flow; however, the beauty of these acrylic paint pens lies in their forgiving nature and incredible versatility across almost any surface you can find.
Key Takeaways
- Start your creative journey with the PC-5M medium bullet tip, the versatile gold standard for mastering everything from bold colour blocking to tidy outlines.
- Learn why high-gsm paper and dedicated sketchbooks are essential for practising your layering techniques without compromising the surface texture.
- Discover how to turn household items and natural materials into art with these low-stress beginner posca pen projects, including custom glass jars and painted timber coasters.
- Understand the specific preparation requirements for different surfaces to ensure your acrylic paint markers adhere perfectly to both porous wood and non-porous plastic.
- Protect your finished Australian-inspired designs from moisture and UV fading by choosing the right matte, satin, or gloss sealant for a professional result.
Getting Started with POSCA Markers: The Beginner's Toolkit
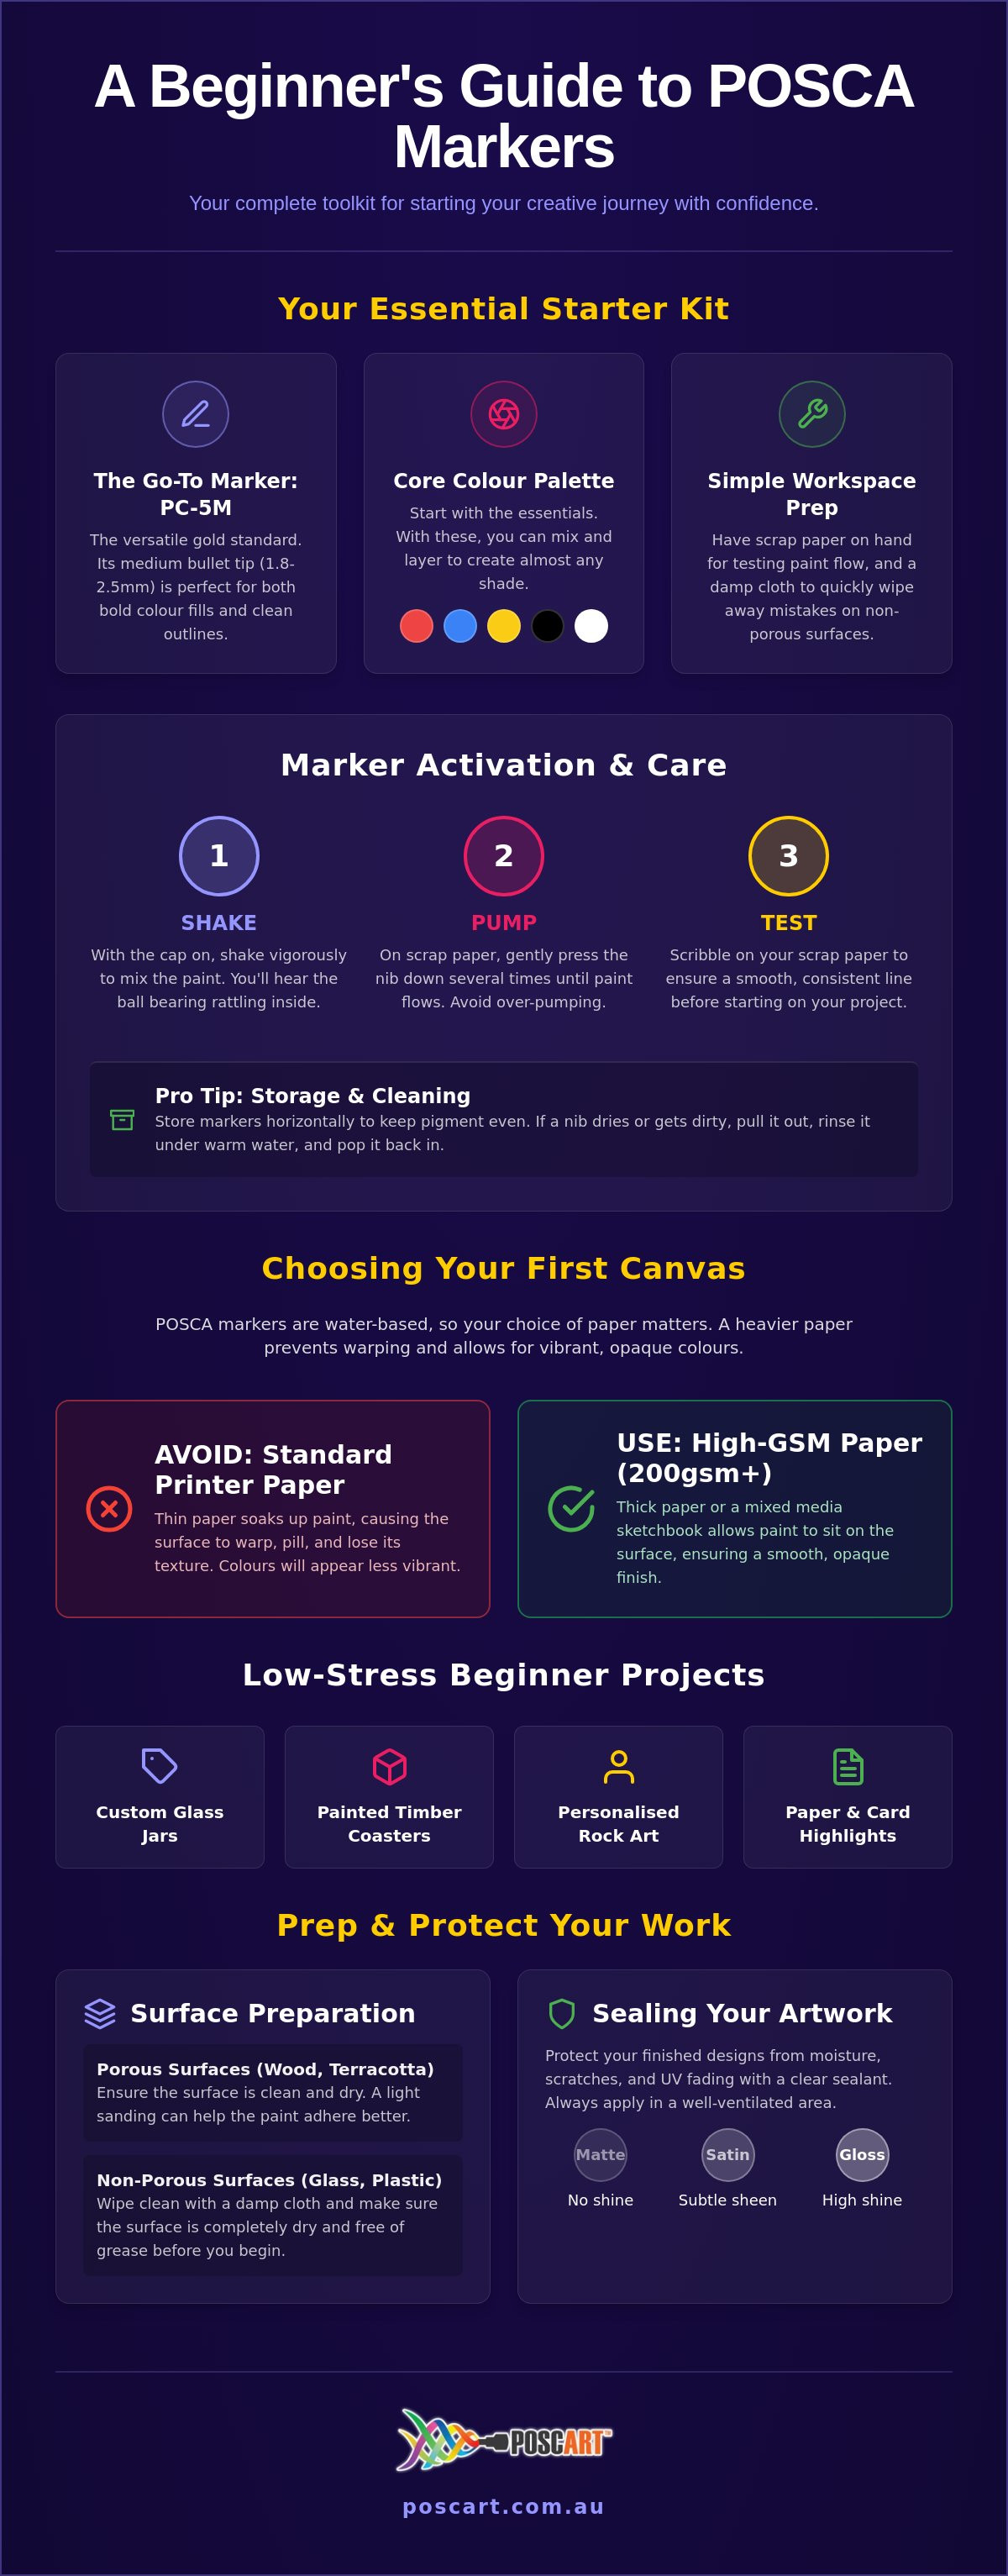
Selecting the right tools is the first step toward creative success. For most Australian hobbyists, the POSCA PC-5M medium bullet tip is the absolute gold standard. Its 1.8mm to 2.5mm line width provides the perfect balance between filling in larger shapes and maintaining enough control for outlines. This versatility makes it the most reliable companion for your first beginner posca pen projects. While professional artists often use a vast array of nibs, starting with a POSCA marker pen in this specific size ensures you won't feel overwhelmed by technical choices while you're still learning the basics of paint flow.
Your essential colour palette doesn't need to be massive to be effective. We recommend starting with the primary colours; red, blue, and yellow; alongside the indispensable black and white. Because these markers contain opaque acrylic paint, you can layer light colours over dark ones once they've dried. This allows you to create highlights and intricate details that standard felt-tip markers simply can't achieve. Before you start, organise your workspace with a few sheets of scrap paper and a damp cloth. The scrap paper is vital for testing your markers, while the cloth allows you to quickly wipe away mistakes on non-porous surfaces before the paint sets.
To better understand the mechanics of these markers and how to handle them, watch this helpful video:
Choosing Your First POSCA Set
While individual pens are great for replacements, custom POSCA bundles often provide much better value when you're building a kit from scratch. These curated sets ensure you have a cohesive range of shades that work well together. As you gain confidence, you might find that the success of your beginner posca pen projects often depends on having a PC-3M fine tip nearby. This smaller nib is perfect for adding fine details, such as the delicate veins on a gum leaf or tight patterns on a personalised phone case, which the broader PC-5M might struggle to reach.
Activating and Storing Your Markers
Activating a new marker requires a specific "shake, pump, and test" routine. Keep the cap on tightly and shake the marker vigorously; you'll hear the internal ball bearing mixing the pigment and binder. Remove the cap and gently press the nib down onto your scrap paper several times until the paint begins to saturate the tip. Avoid over-pumping, as this can lead to flooding and messy blobs on your artwork. Once you've finished for the day, store your markers horizontally. This position keeps the pigment evenly distributed and prevents the nib from either drying out or becoming clogged with excess paint. If a nib does become dirty or dry, you can simply pull it out, rinse it under warm water, and pop it back in to extend the life of your marker.
Easy Paper-Based Projects: Practising Your Technique
The first mistake many novices make is reaching for standard printer paper. Because POSCA markers are filled with water-based acrylic paint, they require a sturdy surface that can handle moisture without warping or pilling. High-gsm paper, generally 200gsm or higher, or dedicated mixed media sketchbooks are vital. These surfaces allow the paint to sit on top of the fibres rather than soaking through, which is essential for achieving that signature opaque finish. While these markers are safe for all ages, referring to an Art Safety Guide reminds us that even with water-based tools, working in a ventilated space and keeping your workspace tidy is a great habit to form early on.
One of the most rewarding beginner posca pen projects is the "white highlights" trick. This simple technique involves adding a tiny dot or curved line of white paint to the edge of a coloured shape once it is completely dry. This creates an instant 3D effect, making flat circles look like shiny marbles or giving lettering a polished, "pop art" feel. It's a professional-looking finish that requires very little technical skill but offers a massive boost in confidence.
The Geometric Doodle Method
Geometric patterns are perfect for those who feel they "can't draw" because they rely on structure rather than illustration. Start by using a light pencil to map out large, simple shapes like triangles, hexagons, or overlapping circles across your page. Use your PC-5M markers to fill in these sections with solid, flat colours; this is known as "colour blocking." Once these base layers are bone dry, use a contrasting colour or a finer tip to add micro-patterns. Think tiny dots, parallel stripes, or small crosses on top of the solid blocks. This layering technique is the secret to creating complex-looking art with very basic movements.
Simple Lettering for Gifts
Creating personalised greeting cards is a fantastic way to practise "faux calligraphy" without needing expensive nibs. Simply write a name in your normal cursive or print style, then go back and thicken every downward stroke of the letters. This mimics the look of professional brush lettering with much more control. Choosing the right books and pads ensures the ink doesn't feather at the edges of your letters. You can even layer a light pastel shade over a dark base once it's dry to create high-contrast, vibrant names that stand out. If you're unsure which paper weight suits your specific project, feel free to reach out to our creative support team for personalised advice.
Upcycling Household Items: Giving Old Objects New Life
Moving beyond the sketchbook opens up a world of sustainable art. Upcycling everyday household items is one of the most effective ways to master your markers while reducing waste. These beginner posca pen projects allow you to practise on diverse textures without the pressure of a blank white page. However, non-porous surfaces like glass, plastic, and metal behave differently than paper. Since these materials don't absorb paint, the pigment sits on top and can slide if not handled correctly. For general safety and hygiene when working with various materials, the Art and Craft Safety Guide provides excellent foundational advice on maintaining a clean and safe creative environment.
Glass jars are ideal for beginner posca pen projects because they are essentially free canvases. Whether you're making spice jars for the kitchen or a pen holder for your desk, you must start by cleaning the surface with rubbing alcohol. This removes fingerprints and oils that prevent the paint from sticking. If you're looking for a wide variety of shades to bring these objects to life, starting with a POSCA marker set will give you the colour range needed for complex patterns and vibrant designs.
Glass and Ceramic Customisation
Successful painting on glass requires a light touch. If you press too hard, the nib might scrape away the previous layer of wet paint. A unique advantage of working on glass is that mistakes are temporary; you can simply scrape off the paint with a plastic card or a fingernail before it fully cures. When decorating ceramic mugs, remember that POSCA paint is for decorative use only. Keep your designs away from the rim where lips touch, and avoid the interior of the vessel to ensure the piece remains a safe display item.
Plastic and Metal Upcycling
Transforming a plain plastic phone case is a brilliant project for testing your layering skills. Use the PC-5M for your base coats to ensure even coverage across the smooth surface. Once the base is dry, you can add personalised details or intricate doodles on top. Cure time is the most critical factor here. Let your upcycled items sit undisturbed for at least 24 hours before you handle them. This patience marks your transition from a casual hobbyist to a thoughtful eco-artist, giving old objects a vibrant new life instead of sending them to landfill.
Working with Natural Elements: Rock and Wood Art
Stepping into the garden offers a refreshing change of pace from paper-based work. Porous surfaces like raw wood and sandstone are ideal for beginner posca pen projects because the paint grips the surface immediately, preventing the "sliding" effect you might experience on glass or plastic. Australian backyards are often goldmines for materials; think fallen gum branches, smooth river stones, or weathered driftwood. These organic canvases are incredibly forgiving for novices because their natural textures hide minor imperfections while providing a beautiful, rustic backdrop for your designs.
Sourcing your materials locally is a sustainable way to grow your art practice. Before you begin, ensure your finds are clean and dry. A quick brush with a stiff bristle to remove dirt or loose bark is usually all the preparation required. Unlike the smooth surfaces discussed earlier, natural materials often absorb the first layer of paint quite heavily. This is actually a benefit; it creates a solid foundation that makes your subsequent layers of colour appear even more vibrant and opaque.
Rock Painting Essentials
Creating "Kindness Rocks" for local community gardens is a wonderful way to practise your skills while spreading a bit of joy. Look for smooth river stones or beach pebbles, but always check your local council regulations regarding the collection of natural materials from public spaces. Once you've found the perfect stone, apply a solid base coat using a PC-5M or a broader PC-7M to ensure a consistent colour payoff. Simple Australian floral motifs like the golden wattle or a bright red waratah look stunning against a dark background. Mandalas and ladybirds are also fantastic starting points for those wanting to experiment with repetitive patterns and dot work.
Art on Timber and Driftwood
Decorating raw timber slices or coasters allows you to work with the unique character of wood grain. It's vital to remember that wood is highly absorbent; therefore, the paint may "bleed" slightly along the fibres if the nib is too wet. You can use specific POSCA pen techniques to blend colours directly on the timber, creating soft gradients that mimic a sunset or the ocean. Raw wood is perhaps the most beginner-friendly surface because you can easily sand back a mistake and start again. This flexibility encourages experimentation and helps you understand how different pigments interact with textured fibres. If you're unsure whether a particular piece of timber from your garden is suitable for beginner posca pen projects, ask our team for advice on surface preparation.
Finishing Your Projects: How to Seal and Protect Your Work
Completing your artwork is a huge milestone, but the process doesn't end when you put the cap back on your marker. Because POSCA markers contain water-based pigment, your finished beginner posca pen projects remain vulnerable to moisture, fingerprints, and UV fading if left unprotected. A single accidental spill or a humid afternoon can cause your hard work to smudge or bleed. Sealing your art provides a durable barrier that locks in those vibrant colours and ensures your creations last for years. Whether you prefer a flat matte look, a subtle satin sheen, or a high-shine gloss finish, choosing the right sealant is the final step toward a professional result.
Long-term care is just as vital as the initial application. Once your item is properly sealed, it becomes much easier to maintain. You can gently wipe down your customised objects with a damp cloth to keep them looking fresh and vibrant. Avoid using harsh household chemicals or abrasive sponges, as these can eventually wear down the protective coating. By taking these final precautions, you can display your work with pride, knowing it's shielded from the elements.
Choosing the Right Varnish
Beginners often wonder whether they should use a brush-on sealer or a convenient spray. While brush-on options provide a thick, sturdy layer, they carry a high risk of smearing your ink as you drag the bristles across the surface. For most beginner posca pen projects, a spray varnish is the safest choice. You should also consider the chemistry of your sealer. While water-based markers are generally compatible with most sprays, it's always wise to check our ultimate surface guide for advice tailored to specific materials like glass, fabric, or timber. This ensures you don't accidentally choose a product that reacts poorly with your specific surface.
The Sealing Process Step-by-Step
Patience is your best friend in this final phase. You must ensure your art is 100% dry before applying any sealant; we recommend waiting at least 24 hours, especially if you have used heavy layering. When you're ready, take your project to a well-ventilated Australian outdoor space to avoid inhaling fumes. Start with a very light "mist" coat from about 30cm away. Don't try to cover the entire piece in one heavy layer. Instead, apply two or three thin coats, allowing each to dry completely in between. This prevents the solvent in the spray from reacting with the paint and causing the colours to run or bleed. Using this steady, layered approach will give you a smooth, even finish every time.
Start Your Creative Journey Today
Mastering your markers is all about taking that first step with simple, low-stress projects. Whether you're upcycling glass jars or decorating river stones, the key is to trust the process and embrace the vibrant, opaque nature of acrylic paint. You've learned how to choose the right nib, prepare different surfaces, and protect your hard work with a professional finish. These beginner posca pen projects are just the beginning of what you can achieve when you have the right tools and a bit of inspiration.
As an Australian family-owned and operated specialist, we're here to support your creative growth with 100% genuine Uni POSCA products. We provide fast national shipping on all orders to ensure you spend less time waiting and more time creating. If you're feeling inspired and ready to start your first project, reach out to our team for any advice on selecting the perfect set for your needs. We can't wait to see the incredible Australian-inspired art you'll produce in 2026. Keep experimenting, keep layering, and most importantly, keep having fun with your markers.
Frequently Asked Questions
What are the best POSCA pen projects for someone who can't draw?
Geometric patterns and "colour blocking" are excellent projects for those who feel they lack traditional drawing skills. You can use a ruler or household items like coins and glasses to trace shapes before filling them with vibrant pigment. Dot art and mandalas are also highly effective; they rely on repetitive, simple movements rather than complex illustration. These beginner posca pen projects allow you to create impressive, professional-looking results through structure and bold colour choice.
Do I need to prime the surface before using POSCA markers?
Priming requirements vary depending on how absorbent your surface is. Porous materials like raw timber or heavy cardstock don't require priming; the paint grips the fibres naturally. However, smooth, non-porous surfaces like plastic or metal benefit from a light sanding or a dedicated primer to improve adhesion. For glass and glazed ceramics, a thorough clean with rubbing alcohol is usually enough to ensure your paint stays exactly where you want it without sliding.
Are POSCA pens permanent on all surfaces?
POSCA markers are permanent on porous surfaces but can be removed from non-porous materials. On wood, paper, and fabric, the paint soaks into the fibres and becomes a permanent part of the object once dry. On glass, plastic, or metal, the paint can be scraped off or wiped away with a damp cloth unless you apply a protective sealant. This makes them incredibly forgiving for novices who want to practise their technique on various household items without the fear of making permanent mistakes.
Which POSCA tip size should a beginner buy first?
The PC-5M medium bullet tip is the most recommended size for any beginner's first purchase. Its 1.8mm to 2.5mm line width is versatile enough to handle both solid colour fills and bold outlines. While finer tips like the PC-3M are brilliant for intricate details, the PC-5M provides the most consistent paint flow and coverage. This makes it the ideal tool for most beginner posca pen projects across a wide variety of different surfaces, from paper to stone.
How do I stop my POSCA pens from smudging when I layer colours?
Preventing smudges requires patience and a light touch during the layering process. You must ensure the base layer is completely dry; usually waiting at least 10 to 20 minutes; before adding a second colour on top. When you do layer, avoid pressing the nib firmly into the surface. A light, sweeping motion prevents the wet ink from "reactivating" the layer underneath, keeping your colours crisp and preventing any unwanted blending or muddiness in your artwork.
Can I use POSCA markers on fabric or t-shirts?
You can certainly use these markers on fabric, including t-shirts, tote bags, and canvas sneakers. The paint is permanent on textiles once it has been heat-set with an iron. To do this, iron the reverse side of your design on a medium heat setting without using steam for about four minutes. This process seals the pigment into the fabric fibres, allowing your personalised wearable art to withstand gentle machine washing without the colours fading or washing away.
How do I make my POSCA art waterproof for outdoor use?
Making your art waterproof involves applying a protective spray varnish once the paint has fully cured. For items that will live outdoors, such as garden rocks or timber signs, a UV-resistant clear coat is essential to prevent fading and peeling. Apply two or three thin mist coats rather than one heavy layer. This ensures the water-based paint doesn't react with the sealant, providing a weather-resistant finish that keeps your beginner posca pen projects looking vibrant in the Australian sun.
Are POSCA markers safe for children's school projects?
POSCA markers are an excellent choice for school and classroom activities because they are water-based and non-toxic. They don't produce the strong fumes associated with solvent-based permanent markers, making them safe for children to use in enclosed spaces. They are perfect for decorating posters, school supplies, or science project displays. Just remember that while the paint is non-toxic, these activities should always be supervised to ensure markers are capped correctly and used appropriately for the best results.
General Information
This article is provided as general information only to help customers compare and choose POSCA markers, acrylic markers, art supplies, creative tools and related products. Product details, colours, finishes, surface suitability, availability, pricing and usage results may vary. Always check the individual product page, manufacturer information, age guidance, surface instructions and safety recommendations before purchasing or using a product.