


POSCA Markers on Fabric Tutorial: The Complete Australian Artist’s Guide
You might think that creating a custom t-shirt is as simple as putting pen to paper, but the secret to a design that survives the wash isn't just in your drawing hand; it's in the "chemical sandwich" of preparation and heat-setting. We’ve all felt that sting of disappointment when a favourite design bleeds into the denim or starts to crack after a single cycle in the machine. It's frustrating to spend hours on a piece only for the fabric fibres to swallow the ink, but these common hurdles are easy to clear with the right technical knowledge.
This posca markers on fabric tutorial is designed to give you the confidence to turn plain textiles into professional-grade wearable art. You'll master the art of customising everything from cotton tote bags to heavy denim jackets using our step-by-step guide to preparation, application, and permanent heat-setting. We will explore which POSCA markers to buy for different textures, how to organise your workspace for the best results, and the precise techniques needed to ensure your colours stay as bold as the day you drew them.
Key Takeaways
- Understand why pre-washing new and vintage textiles is a non-negotiable step to remove industrial sizing agents that can hinder paint adhesion.
- Identify the ideal marker tip for your project, including why the PC-5M Medium Bullet Tip is a versatile favourite for general fabric coverage.
- Master the professional techniques in this posca markers on fabric tutorial to manage pigment absorbency and layer colours without muddying your design.
- Learn the precise heat-setting process using a steam-free iron to ensure your custom creations remain permanent and vibrant through every wash.
- Gain the creative confidence to transform your wardrobe with practical guidance on customising sneakers, denim jackets, and cotton tote bags.
Preparing Your Fabric for POSCA Art: The Essential First Steps
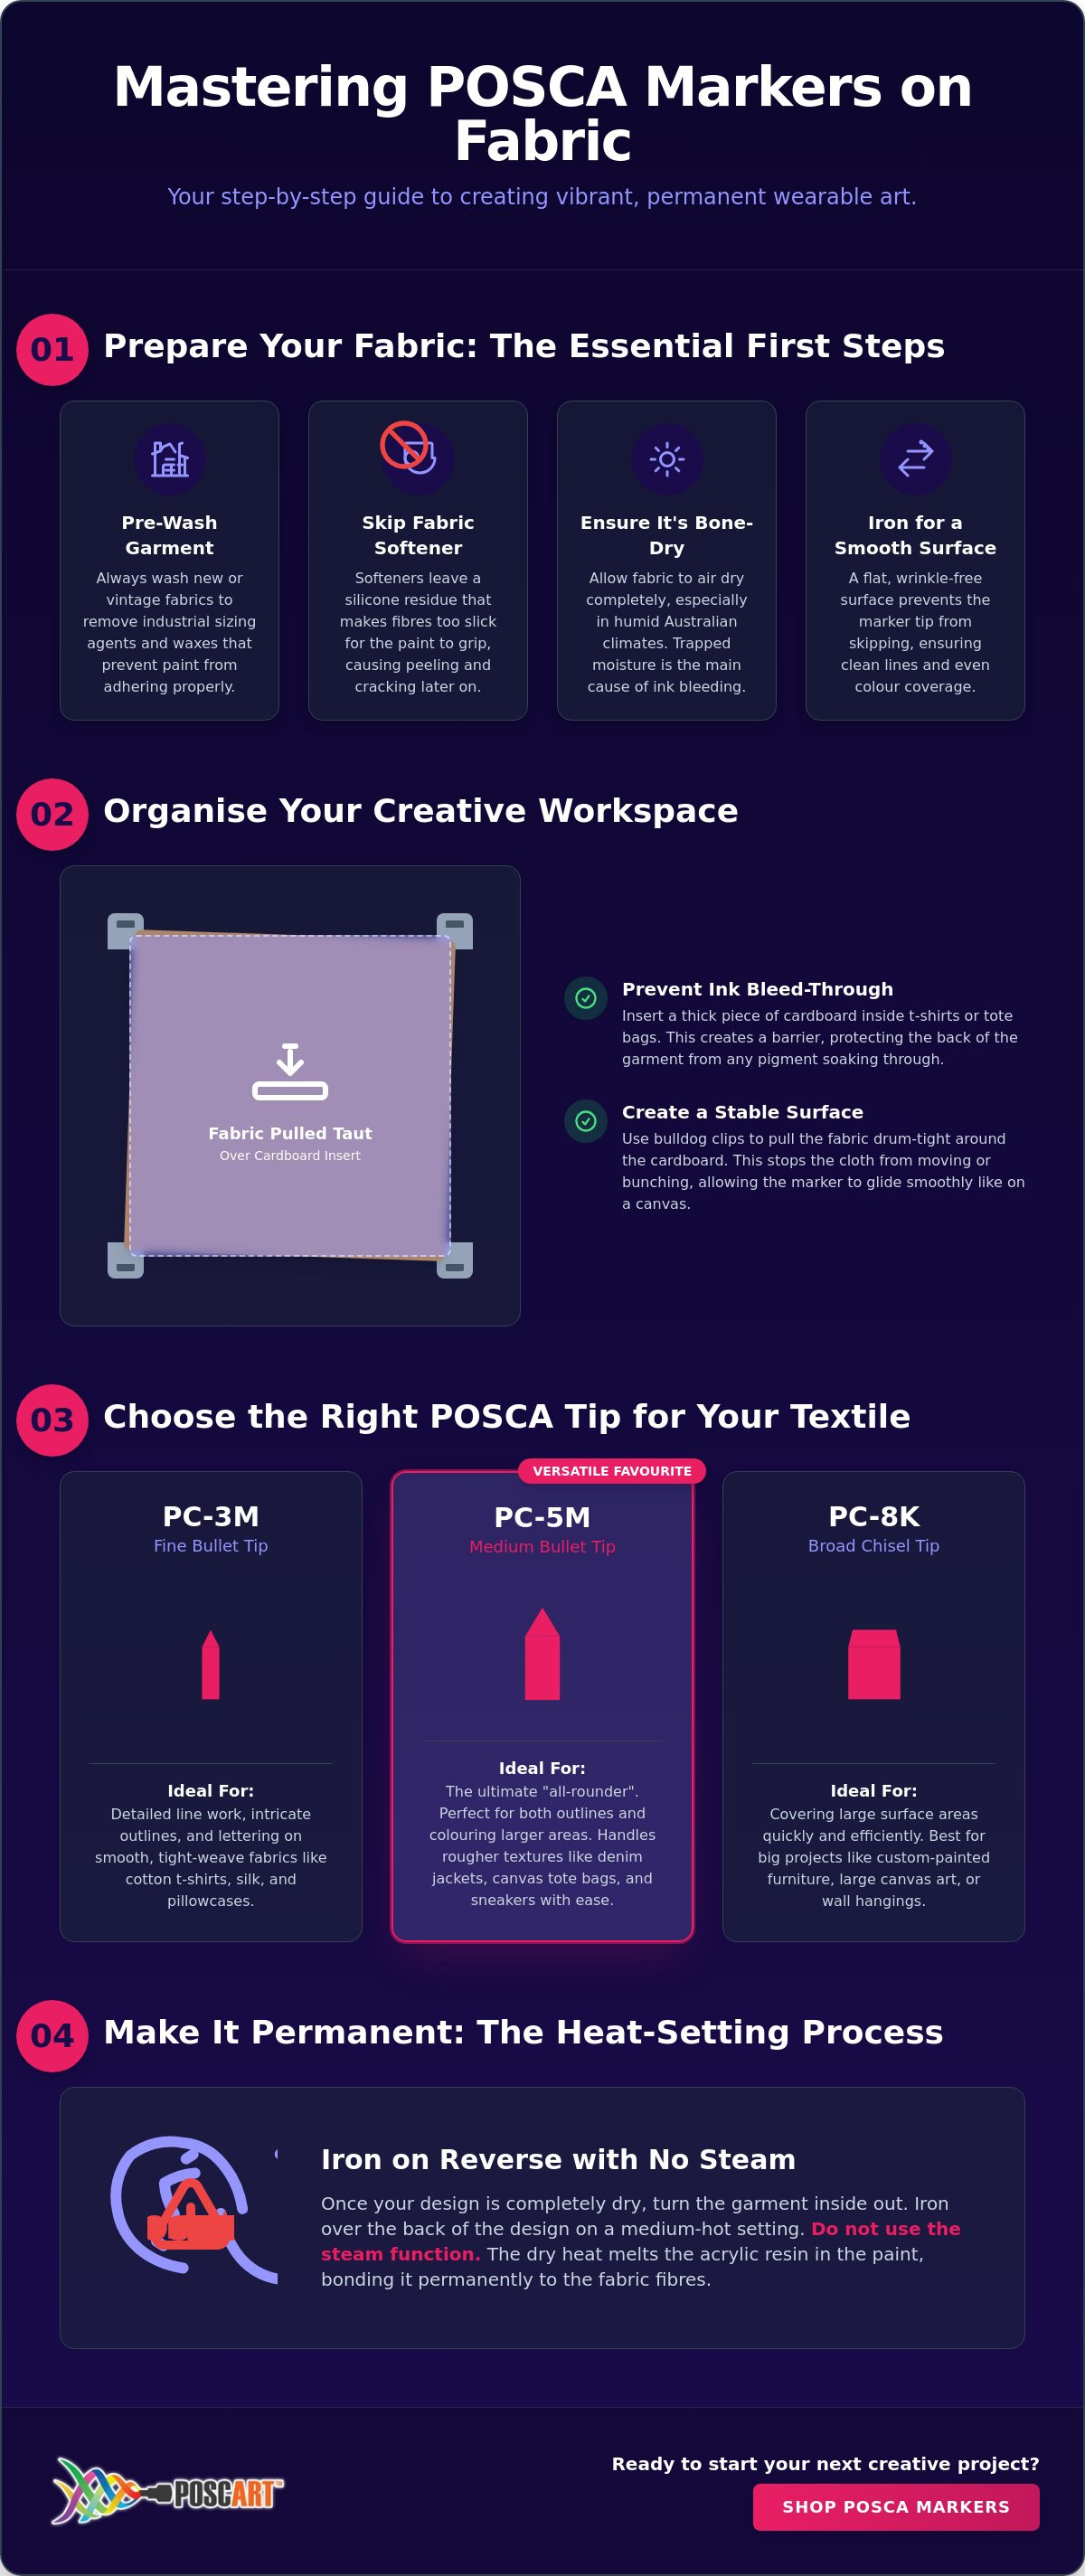
Before you even shake your first pen, the success of your design depends entirely on the state of your textile. This posca markers on fabric tutorial begins with the most overlooked step: stripping the fabric back to its raw state. Whether you're working with a brand-new cotton tee or a vintage denim jacket, the surface must be free of any barriers that prevent the acrylic pigment from bonding with the fibres. A Paint marker works by depositing a layer of water-based pigment on the surface, but if that surface is coated in chemicals, the art will simply sit on top and peel away after the first wash.
In Australia, our varied climate plays a huge role in preparation. If you're working in the humid conditions of Queensland or the Northern Territory, your fabric might feel dry to the touch while still holding deep-seated moisture. Always allow extra time for textiles to air out in a dry, shaded area before you begin. Moisture trapped in the weave is the leading cause of ink bleeding, as the water in the paint follows the water already in the fabric.
The Pre-Wash Protocol
Pre-washing is non-negotiable for both new and second-hand items. New garments are treated with industrial "sizing" agents; these are starches and waxes that give clothes a crisp, shelf-ready look but act as a repellent to paint markers. Use a standard machine cycle with your usual detergent, but skip the fabric softener. Softeners leave a silicone-based residue that makes the fibres too slick for the paint to "bite" into. Once washed, ensure the item is bone-dry. Don't rely on a quick tumble dry; let it sit until there's no hint of dampness. Finally, iron the fabric flat. Any wrinkles or folds will cause the marker tip to skip, resulting in jagged lines and uneven colour blocks.
Setting Up Your Creative Workspace
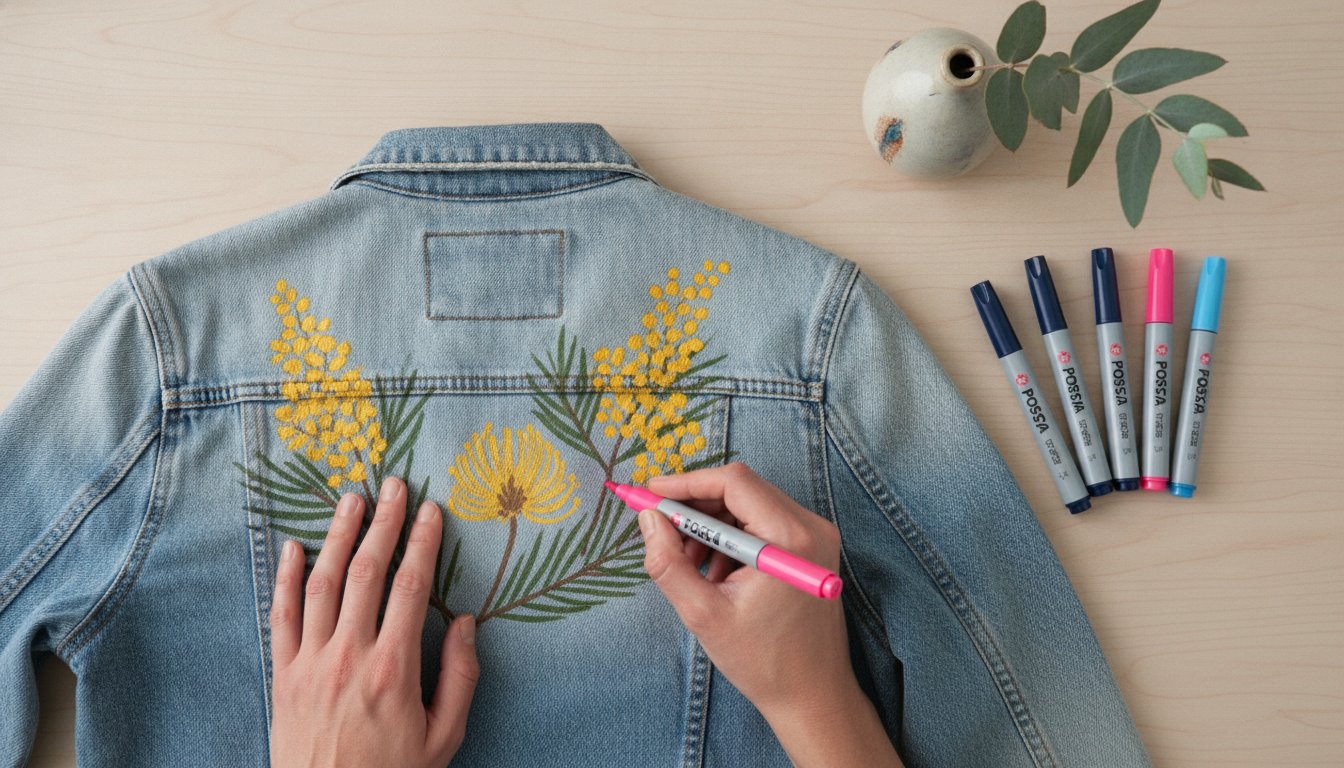
Tension and protection are your two best friends when working on cloth. For t-shirts, tote bags, or pillowcases, always insert a thick piece of cardboard between the layers. This prevents the ink from bleeding through to the back of the garment. To get the best results, use bulldog clips to secure the fabric to the cardboard, pulling it drum-tight. This creates a stable, flat surface that mimics a canvas, allowing your POSCA PC-5M markers to glide without snagging the weave. Organise your pens by colour before you start so you don't have to scramble for a specific shade while your paint is still wet and blendable.
If you're working on "skins" like leather or faux-leather, the process differs slightly. These surfaces don't require a washing machine. Instead, wipe the area gently with a damp sponge to remove dust and oils. If the leather is particularly smooth or treated with a gloss finish, a light brush with a soft-bristled brush can help create enough "tooth" for the paint to adhere properly. Always let these surfaces dry completely before applying your first layer of colour.
Choosing the Right POSCA Marker Tips for Your Textile Project
Selecting the correct nib size is just as vital as your preparation work. If you choose a tip that is too fine for a rough surface, you risk snagging the fibres and spraying ink across your design. Conversely, using a broad tip on a delicate silk can lead to pigment spreading far beyond your intended lines. This posca markers on fabric tutorial focuses on matching the physical characteristics of the marker nib to the specific weave of your textile to ensure professional results every time.
The texture of your cloth acts like sandpaper on the marker tip. Rough textiles like heavy canvas or denim require durable nibs that can withstand friction without fraying. Smoother fabrics, such as tight-weave cotton or polyester blends, allow for much finer detail. Understanding this relationship helps you avoid the common pitfall of ruined marker tips and blotchy applications.
Matching Tips to Fabric Textures
Fine tips like the PC-3M are the gold standard for detailed work on smooth cotton t-shirts, pillowcases, and silk. Their bullet shape provides enough precision for intricate outlines while maintaining a steady flow of ink. For most Australian hobbyists, the PC-5M Medium Bullet Tip is the ultimate "all-rounder." It handles the rougher terrain of denim jackets and canvas tote bags with ease, providing consistent coverage without the nib wearing down prematurely. If you are tackling a larger project, such as a custom-painted armchair or a wall hanging, the PC-8K Broad Chisel Tip is essential. It allows you to block out large areas of colour quickly, which is critical for maintaining an even finish before the paint begins to dry.
The PoscART Selection Guide
Investing in genuine POSCA marker sets is the most reliable way to ensure your ink flow remains consistent across absorbent surfaces. Many artists find that a PC-5M bundle provides the perfect foundation for textile art, offering a full colour palette for both bold shapes and blending. While it's tempting to use the ultra-fine PC-1MR for tiny details, its tapered metal tip is often too delicate for rough textile fibres. The metal can snag on the weave, causing "ink flicking" that can ruin a nearly finished piece. For those high-detail moments on fabric, stick to the PC-1M or PC-3M instead.
If you're unsure which nib will best suit your specific material, you can always ask our team for advice to ensure your supplies match your creative vision. Having the right tools on hand from the start prevents frustration and ensures your custom garment looks exactly as you imagined.
Creative Techniques for Smooth POSCA Application on Cloth
Once your workspace is ready and your fabric is drum-tight, the real magic begins. Applying paint markers to cloth requires a different approach than working on paper or wood. Natural fibres like cotton and linen are incredibly thirsty; they act like a wick, pulling the liquid pigment deep into the weave. If you aren't careful, this capillary action creates a "fuzzy edge" effect where the ink bleeds beyond your intended outline. This posca markers on fabric tutorial focuses on controlling that flow to keep your designs crisp and professional.
Synthetic fibres, such as polyester or nylon, behave differently. Because these materials are less porous, the pigment tends to sit on the surface rather than being absorbed. While this results in vibrant colours, it also means the paint takes slightly longer to dry and can be prone to smudging if you're too heavy-handed. Understanding whether your material is "drinking" the ink or letting it rest on top is the first step toward a successful custom garment.
Mastering the "Light Touch" on Fabric
The most common mistake beginners make is pressing the marker nib too hard into the cloth. This forces a surge of ink into the fibres, leading to pooling and uncontrollable bleeding. Instead, use a light, skimming motion. It's much better to work in multiple thin layers than one thick, heavy coat. Thin layers ensure the fabric remains flexible once the paint dries; if the application is too thick, the design may feel "crunchy" and will be more likely to crack over time. Always allow each colour to become touch-dry before applying an adjacent shade to prevent the pigments from bleeding into one another.
Blending and Layering Secrets
You can achieve stunning gradients on fabric by blending your colours while they are still wet. If you're working on a natural cotton, a slightly damp cloth can help the markers behave more like watercolours, allowing for soft transitions between hues. For sharp, opaque layering, you must wait for the base coat to dry completely. Once the bottom layer is set, you can use a white POSCA pen to add highlights or fine details that pop against darker backgrounds. For a deeper dive into advanced colour mixing, refer to our guide on POSCA pen techniques to help you master the art of creative blending.
Mistakes happen, but they don't have to be permanent. If you catch a slip-up while the paint is still wet, you can sometimes dab the area with a clean, damp cloth to lift some of the pigment. If the paint has already dried, your best strategy is to wait for it to set fully and then "colour correct" by layering a more opaque shade over the top. This layering capability is what makes acrylic markers such a forgiving medium for textile art.
How to Make POSCA Permanent on Fabric: The Fixation Process
The final phase of this posca markers on fabric tutorial is the most critical for the longevity of your art. While POSCA ink is water-resistant once dry, it's the application of heat that truly 'locks' the acrylic pigment into the textile fibres. Without this step, your hard work will likely fade or wash away during the first laundry cycle. Heat-setting triggers a chemical bond between the water-based paint and the fabric weave, ensuring your custom designs remain as bold as the day you created them.
In our Australian climate, it's particularly important to ensure the paint has cured properly before applying heat. Humidity can slow down the internal drying process, even if the surface feels dry to the touch. Rushing this step can lead to the paint "smudging" under the iron or hair dryer, so giving the garment ample time to rest is essential for a professional finish.
The Ironing Method: Step-by-Step
Patience is your best tool when it comes to permanence. You must wait at least 24 hours for the design to fully cure before you start the ironing process. Once cured, turn your garment inside out or work on the reverse side of the design. Set your iron to a medium-to-high temperature suitable for the specific fabric, but ensure the steam function is turned off. Steam introduces moisture back into the paint, which can ruin the bond you're trying to create. For extra protection, place a sheet of greaseproof paper between the iron and the fabric. Move the iron continuously over the design for four to five minutes to ensure even heat distribution across the entire artwork.
Fixation for Delicate or Synthetic Materials
Not every textile can handle the direct heat of an iron. For heat-sensitive materials like delicate synthetic blends or items with complex shapes like custom sneakers, a hair dryer is a reliable alternative. Hold the dryer approximately 30cm away from the surface and use small, circular movements to warm the area thoroughly. This method takes slightly longer than ironing, so be diligent in covering every part of the design. Heat-setting is the only way to ensure 100% wash-fastness for your textile projects. Once fixed, you should still treat your wearable art with care. We recommend washing your items inside out on a cold, gentle cycle and avoiding the tumble dryer to prevent the paint from cracking over time.
If you have questions about specific fabric types or need help choosing the right tools for your project, get in touch with our specialist team for expert guidance. Having the right knowledge before you start ensures your creative outcomes are both beautiful and durable.
Customising Your Wardrobe with PoscART Specialist Bundles
Mastering the technical side of this posca markers on fabric tutorial is only the beginning of your creative journey. Once you understand the "chemical sandwich" of preparation and fixation, your entire wardrobe becomes a potential canvas. Whether you're looking to refresh a tired pair of kicks or create a statement piece on a vintage jacket, having the right supplies on hand makes all the difference. Australian artists consistently turn to PoscART because we aren't just a retailer; we're specialists who understand the unique needs of the local creative community.
Building a dedicated textile kit allows you to move from one-off experiments to consistent, professional-grade production. By organising your markers into specialised bundles or cases, you ensure that you always have the necessary nib sizes and colour palettes ready when inspiration strikes. This organised approach is what separates a hobbyist from a designer who can reliably produce high-quality custom garments for themselves or others.
Project Ideas to Kickstart Your Creativity
The versatility of acrylic paint markers allows you to tackle projects of any scale. A popular choice for many is customising denim jackets. Because denim is a heavy-duty fabric, it provides a stable foundation for bold, illustrative back-pieces that can be as intricate or as minimalist as you like. For parents, creating personalised school bags is a practical way to ensure items stand out in a crowded classroom while letting kids express their personality. If streetwear is more your style, designing one-of-a-kind canvas sneakers is a fantastic way to achieve a unique look that you won't find on any store shelf. These projects allow you to practise the layering and blending techniques we've discussed, resulting in wearable art that is truly your own.
Why Shop with PoscART?
Building your textile kit starts with choosing the right tools. We provide access to the full range of individual POSCA pens, which is essential when you need a very specific shade to match a particular fabric or design. Buying from a specialist Australian store means you're guaranteed genuine products. This is vital for fabric art, as counterfeit markers often contain inferior pigments that will wash out or bleed despite your best heat-setting efforts. We take pride in our fast national shipping across Australia, ensuring your art supplies arrive quickly so you can get started on your next project without delay. By choosing a local specialist, you're not just buying pens; you're joining a community of creators who value quality and reliability in every stroke.
Your creative potential is limitless when you have the right guidance and professional-grade tools. Now that you've completed this guide, you're ready to transform ordinary textiles into extraordinary custom pieces. Grab your markers, prep your fabric, and start creating something remarkable today.
Bring Your Textile Vision to Life
Customising your own clothing is an incredibly rewarding way to express your personal style. By following this posca markers on fabric tutorial, you've gained the technical skills needed to move beyond simple sketches and into the world of durable, professional-grade textile art. Success always relies on that essential "chemical sandwich": thorough pre-washing to remove industrial sizing, selecting the correct nib for your fabric's weave, and finishing with a patient, steam-free heat-setting process.
As an Australian family-owned and operated specialist, PoscART is here to support your creative journey with 100% genuine POSCA products. We take pride in providing specialist advice for every surface, ensuring you have the right tools for everything from heavy denim to delicate cotton. If you're ever unsure which marker set or nib size will work best for your specific material, reach out to our friendly team for personalised support.
There's nothing quite like the feeling of wearing a piece of art you created yourself. We can't wait to see the vibrant, permanent designs you bring to life on your next canvas of cloth. Happy creating!
Frequently Asked Questions
Are POSCA markers really permanent on fabric?
POSCA markers become permanent on fabric once they have been properly heat-set. While the water-based pigment is naturally water-resistant when dry, it requires heat to lock the paint into the textile fibres. Following a thorough posca markers on fabric tutorial ensures your designs remain vibrant and wash-fast rather than fading away after the very first laundry cycle.
Do I need to iron POSCA on fabric to make it stay?
Ironing is the most effective way to fix your design for long-term permanence on most textiles. You should iron on the reverse side of the fabric for four to five minutes using a medium-to-high setting without any steam. This heat-setting process creates a durable bond that allows the garment to be worn and washed repeatedly without the artwork cracking or peeling away.
Can I use POSCA markers on black or dark-coloured fabric?
Yes, the high opacity of POSCA ink makes it perfect for dark-coloured textiles. Light shades like white, yellow, and pastels will show up vividly on black denim or navy cotton without the base colour showing through. For the brightest results on dark backgrounds, you can apply a thin base layer of white before adding your final colours once the first coat is dry.
Will POSCA markers bleed through my T-shirt when I draw?
Ink bleeding is possible on thin or natural fabrics because the fibres naturally wick moisture through the weave. To prevent this, always place a thick piece of cardboard inside the shirt to act as a barrier before you start. This not only protects the back of the garment from stains but also provides a stable, flat surface that helps you maintain control over your lines.
How do I wash a T-shirt that I have painted with POSCA pens?
You should wash your custom garments inside out on a cold, gentle machine cycle. Turning the shirt inside out protects the design from friction against other clothes during the wash. Avoid using bleach or harsh detergents, and always air-dry your items in the shade instead of using a tumble dryer, as extreme heat in the dryer can damage the acrylic bond over time.
Can I use POSCA markers on leather or faux-leather shoes?
POSCA markers work exceptionally well on leather and faux-leather surfaces once they are cleaned of surface oils and dust. Since you cannot iron shoes, use a hair dryer held 30cm away to heat-set the design with circular movements. Because the paint sits on the surface of these materials rather than soaking in, a final spray of clear water-based varnish can provide extra protection against scuffs.
What is the best POSCA tip size for drawing on canvas bags?
The PC-5M Medium Bullet Tip is widely considered the best choice for canvas bags. Rough textures like canvas can be abrasive, but the durable nib of the PC-5M handles the friction without fraying or skipping. It provides enough coverage for filling in large areas while still allowing you to create clean, legible outlines for your personalised textile designs.
Can I use POSCA markers on polyester or synthetic fabrics?
You can use POSCA markers on synthetic fabrics, though the ink will sit on top of the fibres rather than being absorbed. This often results in very bright colours, but the paint may take longer to dry than it does on cotton. Heat-setting with a hair dryer is recommended for synthetics that might melt or scorch under the direct heat of a traditional iron.
General Information
This article is provided as general information only to help customers compare and choose POSCA markers, acrylic markers, art supplies, creative tools and related products. Product details, colours, finishes, surface suitability, availability, pricing and usage results may vary. Always check the individual product page, manufacturer information, age guidance, surface instructions and safety recommendations before purchasing or using a product.