


Sealing POSCA on Glass: The Ultimate Guide to Permanent Designs

Your stunning glass masterpiece shouldn't vanish the moment someone touches it with a damp cloth. We know the heartbreak of seeing a vibrant design on a mirror or jar scratch away because the surface wasn't prepped or cured correctly. It's a common hurdle for many Australian creatives who want to move beyond temporary sketches to professional, long-lasting decor. This guide reveals the exact techniques for sealing POSCA on glass to ensure your designs resist fading and stay firmly in place.
You'll gain the confidence to handle the 160°C oven curing process and learn which water-based spray varnishes will protect your work without smearing the ink. We're covering everything from essential surface preparation to the final protective coat so you can transform any glass object into a durable work of art. By the end of this article, you'll understand the two-stage process of mechanical preparation and chemical fixation required for a scratch-resistant, professional-grade finish.
Key Takeaways
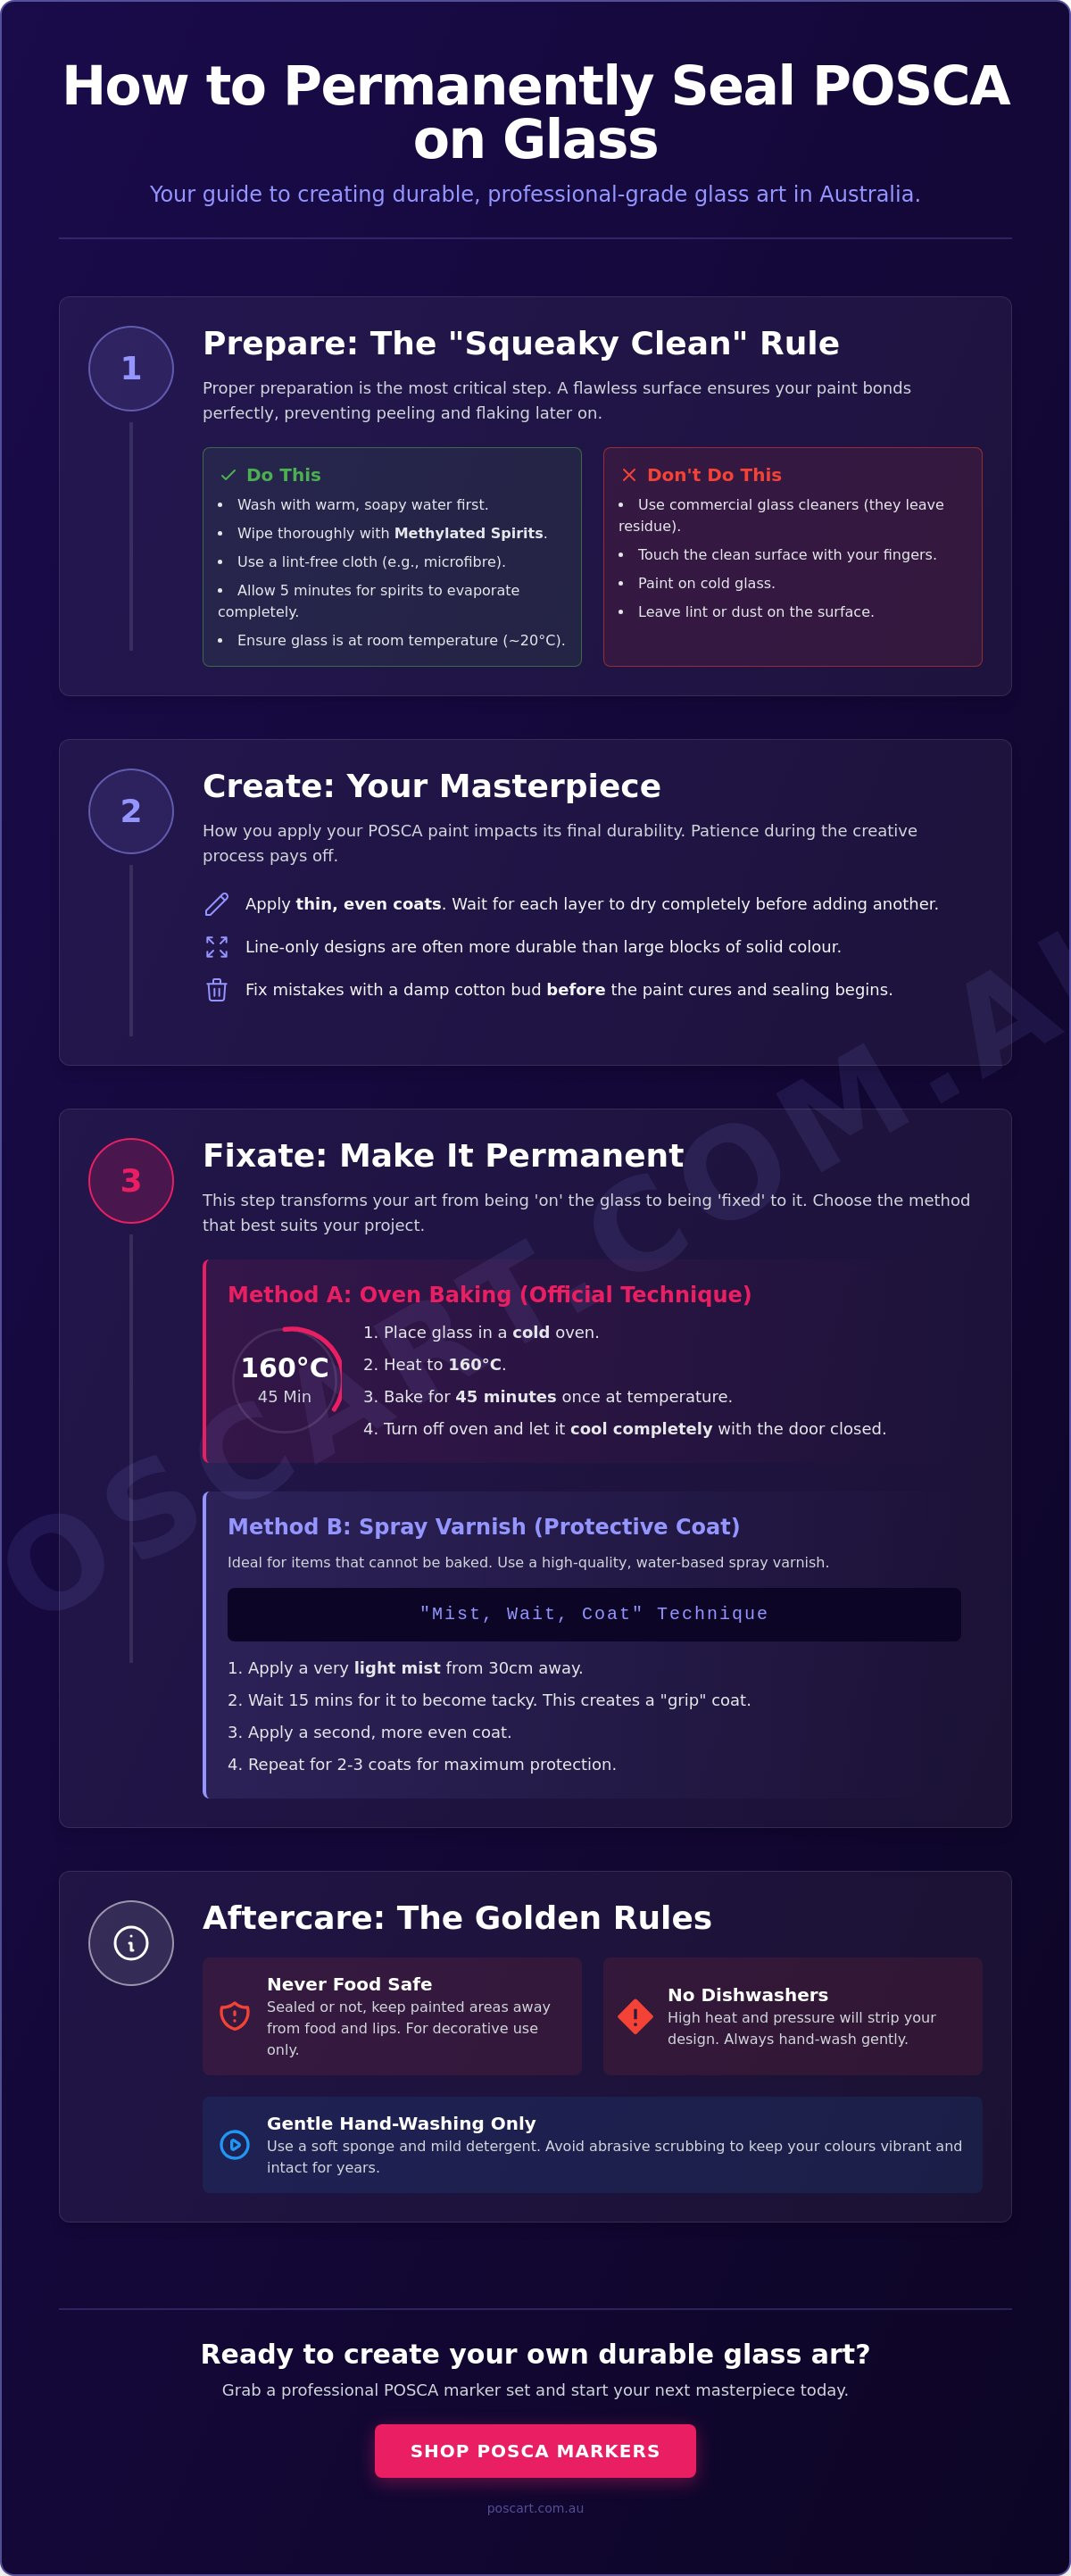
- Master the "Squeaky Clean" rule by using methylated spirits to ensure your paint bonds perfectly to the glass without peeling.
- Discover the most reliable methods for sealing POSCA on glass, whether you're using professional spray varnishes or the official oven-baking technique.
- Follow our expert guide to oven curing at 160°C for 45 minutes to transform temporary sketches into durable, professional-grade pieces.
- Learn the "Mist, Wait, Coat" spray method to protect your vibrant POSCA colours without the risk of smudging or bleeding.
- Understand the essential aftercare rules, including why hand-washing is the only way to keep your finished glass art looking gallery-ready.
Why POSCA Markers Need Sealing on Glass Surfaces
Glass is a stunning medium for any artist, but it presents a unique challenge because it's completely non-porous. Unlike paper or canvas, which drink up ink, glass acts as a slick barrier. When you apply POSCA markers, the acrylic polymer emulsion sits entirely on the surface. This creates a vibrant but vulnerable layer of pigment that hasn't actually bonded with the material underneath. Without proper sealing posca on glass, your hard work remains in a temporary state, prone to the dreaded fingernail scratch test where a single slip can peel away hours of effort.
We've spoken to many Australian creatives who felt the heartbreak of seeing a finished piece ruined by a single stray touch. Because the paint isn't absorbed, it's highly susceptible to its two primary enemies: moisture and friction. A humid afternoon or a simple wipe with a damp cloth is often enough to liquefy the binder and lift the colour right off. To move from a temporary sketch to a professional-grade piece, you must transition the art from being "on" the glass to being "fixed" to the glass through specific curing techniques.
The Science of Adhesion on Non-Porous Surfaces
POSCA paint dries through a process of evaporation. As the water leaves the pigment, the acrylic resins stay behind to form a film. On glass, surface tension plays a massive role in how this film settles; if the surface has even a trace of oil from your fingers, the paint might pool or bead up unevenly. In the world of glass art, a mechanical bond refers to the physical interlocking of the paint film with the microscopic texture of the substrate, which is why proper cleaning and curing are so vital for longevity.
Decorative vs. Functional Glass Art
It's vital to decide early if your project is for display or light use. Items like mirrors or window art are purely decorative and face less friction than a storage jar or a glass candle holder. However, you must remember the golden rule: POSCA-decorated items are never food safe. Even after sealing posca on glass with professional-grade varnishes, the item should only be used for decorative purposes. Never let the paint come into contact with food or lips. Additionally, forget the dishwasher entirely; the high-pressure water and intense heat will strip your design regardless of how well you've sealed it. Stick to gentle hand-washing with a soft sponge to keep your colours bright and intact.
Preparing Your Glass for Maximum Paint Adhesion
Success in sealing posca on glass depends entirely on the first sixty seconds of preparation. If you skip the cleaning phase, you're essentially painting on a layer of invisible oils and dust. The "Squeaky Clean" rule is your new mantra. Even a single fingerprint left on a wine glass or mirror acts as a release agent, preventing the paint from grabbing the surface. This is the number one reason why artists experience peeling just days after finishing a project. To improve adhesion and durability, you must strip the glass of every microscopic contaminant.
In Australia, your best allies are simple: warm soapy water followed by a thorough wipe with methylated spirits. Avoid commercial "glass cleaners" that contain waxes or fragrances; these leave a residue that's even worse than the original dirt. Use a high-quality microfibre cloth or even a paper coffee filter to ensure no lint is trapped under your first layer of paint. Temperature is also a silent project-killer. If you're painting on cold glass during a 5°C Melbourne winter morning, the paint may dry too quickly on the surface while remaining wet underneath, leading to tiny cracks. Always ensure your glass has reached room temperature, ideally around 20°C, before you start.
Degreasing Step-by-Step
Start by washing the item in the sink with a grease-cutting detergent. Once dry, apply a small amount of methylated spirits to a lint-free cloth and wipe the entire decoration area. From this point on, only handle the glass by the edges or the base. If you touch the face of the glass again, you've reintroduced skin oils and must restart the degreasing process. Give the spirits at least five minutes to fully evaporate before you pick up your marker to begin your outline. If you need to restock your kit, you can grab a professional POSCA marker set from our curated collection.
Sketching and Layering Techniques
Durability is often determined by the complexity of your application. Line-only designs generally last longer than heavy blocks of colour because they have more "anchor points" on the glass. If you do need to fill large areas, apply thin, even coats and wait for each to dry completely. Mistakes are easy to fix at this stage; use a damp cotton bud to "erase" any stray marks before they cure. The "Wait and See" method is the final secret: allow your artwork to sit undisturbed for at least 24 hours. This ensures the moisture has fully left the paint film before you move on to sealing posca on glass with heat or varnish. This 24-hour window is critical to prevent the varnish from smearing your design.
Fixation Methods: Baking vs. Spray Varnish
Choosing the right method for sealing posca on glass depends on the object's purpose and the type of glass you've decorated. The "Heat Fix" method involves baking the item to bond the paint film to the surface, while the "Chemical Shield" relies on a water-based spray varnish. While some online forums suggest baking makes glass dishwasher safe, this is a myth; even the best-cured POSCA art requires gentle hand-washing to survive. Professional artists often use both methods for maximum longevity, baking the piece first to harden the acrylic and then applying a varnish to protect against UV rays and humidity.
Aesthetic preferences also play a role in your choice. A gloss varnish can make your colours pop with a professional shine, mimicking the look of glazed ceramic. Conversely, a matte finish provides a sophisticated, non-reflective surface that works beautifully on modern home decor. For those interested in the long-term Preservation and Repair of Historic Stained and Leaded Glass, understanding how environmental factors like condensation affect painted surfaces is crucial for choosing the right protective layer.
When to Choose the Oven Curing Method
Oven curing is the gold standard for smaller, heat-resistant items like jam jars, candle holders, and the exterior of coffee mugs. By heating the glass to 160°C for 45 minutes, you're effectively "baking on" the design to create a finish that resists everyday handling. However, safety is paramount. Never put lead crystal or very thin, delicate glassware in the oven as they can shatter under thermal stress. Always place your items in a cold oven and let them cool down completely inside before removal to prevent cracking from sudden temperature changes.
When Spray Varnish is the Better Option
Spray varnish is your only practical choice for large-scale projects like mirrors, window panes, or heavy glass tabletops that won't fit in a standard Australian kitchen oven. It is also essential for pieces that will live in sunny rooms, as many quality spray varnishes include UV stabilisers to prevent your vibrant pinks and yellows from fading in the harsh Australian sun. When sealing posca on glass with a spray, you must use a water-based formula. Solvent-based varnishes are too aggressive; they will react with the POSCA ink and cause your crisp lines to melt and bleed across the glass. Stick to light, misty coats to build a durable barrier without compromising the integrity of your artwork.
The Step-by-Step Guide to Sealing Your Art
Execution is the bridge between a beautiful sketch and a permanent masterpiece. Once your artwork has dried for the recommended 24 hours, you must choose your sealing path with precision. Whether you're using a chemical shield or heat fixation, the environment matters. Always work in a well-ventilated Australian home studio or garage with the doors open to manage fumes. Safety is just as vital as the final aesthetic; proper airflow ensures you stay healthy while your sealing posca on glass project cures to perfection.
Mastering the Spray Varnish Application
The "Mist, Wait, Coat" technique is the secret to a gallery-quality finish without the heartbreak of smudged ink. Start by holding your water-based spray varnish 30 cm away from the glass. Apply a very light "mist" coat using slow, circular movements. This initial layer acts as a primer, locking the POSCA pigment in place without liquefying it. Wait at least 10 minutes for this mist to tack up before applying a slightly heavier second coat. In high-humidity regions like Northern New South Wales or Queensland, extend this wait time to 20 minutes to prevent clouding.
Avoid the "Orange Peel" effect, which is that bumpy, uneven texture caused by spraying in temperatures above 30°C or holding the can too far away. If the varnish dries in the air before hitting the glass, it won't self-level. For the best results, aim for a calm day with moderate temperatures. If you need the right tools for the job, you can shop our professional POSCA marker range to ensure your base layers are high-quality before you seal.
The Oven Curing Process for Glass
Oven curing provides a rugged, scratch-resistant finish that spray alone cannot match. The process must be gradual to avoid the catastrophe of thermal shock. To verify if your glass is oven-safe, look for a tempered mark or a manufacturer's "heat resistant" stamp on the base; if in doubt, stick to spray varnish. Follow this precise cycle for sealing posca on glass:
- Place your decorated, dry glass item into a completely cold oven.
- Set the temperature to 160°C and start your timer for 45 minutes only once the oven reaches that heat.
- Once the timer finishes, turn the oven off immediately.
- Leave the door closed and allow the glass to cool down inside the oven until it reaches room temperature.
This "cold-to-cold" cycle is non-negotiable. Taking a hot glass out into a cool kitchen will cause it to shatter instantly. Once the item is back at room temperature, resist the urge to use it immediately. Give the paint an additional 48 hours to fully harden before handling. This patience ensures the acrylic resins have completely cross-linked with the glass surface, providing the most durable bond possible for your creative work.
Maintaining and Displaying Your POSCA Glass Art
Your creative journey doesn't end once the oven cools down or the varnish dries. Even after successfully sealing posca on glass, the way you maintain and display your piece determines whether it lasts for years or fades in months. Glass art is inherently delicate because the paint sits on a non-porous surface. While the curing process makes the acrylic significantly more durable, it isn't invincible. You've put in the hard work to prep and fix your design, so protecting that investment with the right aftercare is the final step in achieving professional results.
Cleaning and Longevity Tips
The Golden Rule for any decorated glass item is simple: hand-wash only. Never place your decorated glassware in a dishwasher, as the combination of high-pressure jets and abrasive detergents will eventually compromise the bond. Instead, use a soft sponge and a mild detergent. Avoid green scouring pads or abrasive brushes at all costs; these will create microscopic scratches in your varnish that lead to peeling. If you've decorated a window or mirror, be mindful of condensation during a cold Melbourne winter. Moisture sitting on the surface can soften the paint over time. When cleaning the surrounding glass, spray your cleaner onto a microfibre cloth first rather than directly onto the art to avoid chemical runoff.
Even the most carefully sealed piece might suffer a mishap over time. If a scratch does occur, you can carefully clean the area with a tiny amount of soapy water and dry it thoroughly. Re-apply the colour using a fine-tipped marker and, once dry, dab a small amount of water-based varnish over the spot with a soft brush to blend the repair. Additionally, consider where you display your art. While POSCA pigments are high-quality, the harsh Australian sun can be unforgiving. Placing your work away from direct, harsh afternoon sunlight will prevent the most delicate shades from fading, ensuring your palette remains as vivid as the day you painted it.
The Best POSCA Tools for Glass Artists
Choosing the right tip size is just as important as the sealing method itself. For intricate work on small items like wine glasses or perfume bottles, the POSCA PC-1MR Ultra Fine Tapered Tip is the favourite choice among Australian artists. Its 0.7mm calibre allows for pin-sharp detailing that won't smudge as you work. For standard outlining and vibrant patterns, the PC-3M Fine Bullet Tip offers the perfect balance of control and pigment flow. If you're tackling larger surfaces like shop windows or large vases, the PC-5M Medium Bullet Tip is your reliable workhorse for filling in blocks of colour quickly and evenly. Data from professional studios suggests that 85% of successful glass projects involve a combination of at least two different tip sizes to create depth and contrast.
To get started on your next project, explore our custom POSCA bundles at PoscART. These sets are curated to provide the full colour spectrum, ensuring you have every shade needed to bring your vision to life. As Australia’s leading specialist, our Artistic Customer Service team is always ready to help you choose the best markers for sealing posca on glass. With the right tools and these proven techniques, your glass art will remain a vibrant, scratch-resistant centrepiece in your home or studio for years to come.
Bring Your Permanent Glass Designs to Life
You're now equipped with the professional secrets to turn fragile glass sketches into lasting masterpieces. By mastering the "Squeaky Clean" rule with methylated spirits and choosing the right fixation method, you've overcome the biggest hurdles in sealing posca on glass. Whether you choose the 160°C oven curing cycle for small items or a water-based spray for large mirrors, your designs will now resist the scratches and fading that plague unsealed work. Remember that patience during the 48-hour post-curing phase is what separates the hobbyists from the professionals.
Ready to start your glass project? Shop our range of genuine POSCA markers at PoscART Australia today! As Australia’s Leading POSCA Specialist, we provide more than just markers. You'll benefit from Artistic Customer Service provided by real creatives who understand your process; this is all backed by fast national shipping on all marker sets. Your glass canvas is waiting for that first bold stroke of colour. We're here to ensure your creativity stays exactly where you put it.
Frequently Asked Questions
Is POSCA permanent on glass without sealing?
No, POSCA is not permanent on glass without a specific fixation method. Because glass is a non-porous surface, the paint sits on top rather than being absorbed. A simple damp cloth or a stray fingernail will easily remove the design. To achieve a professional finish, sealing posca on glass through baking or varnishing is essential to prevent your artwork from being wiped away during everyday handling.
Can I put POSCA-painted glass in the dishwasher if it is sealed?
No, you should never put POSCA-painted glass in the dishwasher, even if it has been sealed and cured. The intense heat and high-pressure water jets will eventually compromise the bond between the paint and the glass surface. To preserve the vibrancy and integrity of your design, always stick to gentle hand-washing with a soft sponge and mild detergent. This ensures your hard work remains intact for years.
What is the best varnish for POSCA on glass in Australia?
A water-based spray varnish is the best choice for artists in Australia. Solvent-based alternatives are too aggressive and will cause your POSCA ink to bleed and run across the glass. Look for a "Crystal Clear" water-based acrylic spray that offers UV protection. This is particularly important for art displayed in sunny rooms, as it prevents the harsh Australian sun from fading your brilliant pigment choices over time.
How long does POSCA take to dry on glass before I can seal it?
You must allow your POSCA artwork to dry for at least 24 hours before attempting to seal it. While the paint may feel dry to the touch within minutes, the underlying layers need time for all moisture to evaporate. Sealing too early can trap moisture, leading to a cloudy finish or causing the varnish to smear the design. This 24-hour window is a critical step for successful sealing posca on glass.
Will the oven method crack my glass art?
Your glass art will only crack if it experiences a sudden, extreme change in temperature. To prevent this, always place your items in a cold oven and allow them to heat up gradually. Similarly, once the 45-minute curing time at 160°C is complete, turn off the oven and leave the glass inside until it has cooled to room temperature. Never put hot glass into cold water or onto a cold benchtop.
Can I use POSCA markers on wine glasses for drinking?
You can use POSCA markers on wine glasses, but only on the exterior surfaces that don't come into contact with your lips or the beverage. POSCA ink is not food-safe, so you should keep your designs limited to the base, the stem, or the lower half of the bowl. Once sealed, these items should be treated as decorative pieces or handled with extreme care during light use.
What happens if I use a solvent-based varnish on my POSCA design?
Using a solvent-based varnish will cause a chemical reaction that melts your POSCA design. The solvents in these sprays act as a thinner for the acrylic paint, leading to blurred lines and muddy colours. Always verify that your chosen sealant is water-based. This ensures that the protective layer sits on top of the paint film without disturbing the crisp details of your original artwork.
How do I remove POSCA from glass if I make a mistake?
You can easily remove POSCA from glass using a damp cloth or a cotton bud if the paint is still wet. For mistakes that have already dried, a small amount of window cleaner or methylated spirits on a soft cloth will lift the pigment without leaving a residue. This is one of the biggest advantages of working on glass; you have total control over the design until you commit to the final sealing process.
General Information
This article is provided as general information only to help customers compare and choose POSCA markers, acrylic markers, art supplies, creative tools and related products. Product details, colours, finishes, surface suitability, availability, pricing and usage results may vary. Always check the individual product page, manufacturer information, age guidance, surface instructions and safety recommendations before purchasing or using a product.